
Chrome Browser Extension (Legacy)
Cross-Browser Extensions have now been released which supersede this version. Recommendation is to uninstall this legacy version and update to the new version. Please see Cross-Browser Extension - Features and Installation for more details on the up-to-date version of the Passportal extensions.
Adding a Password
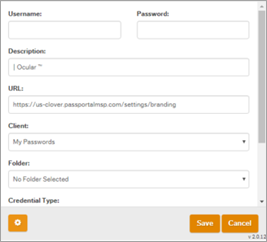
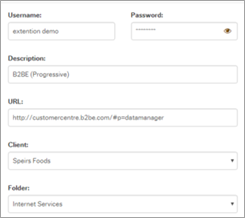
- To add a password in the extension, navigate to the login page where the username and password will be recorded. Once on the login page for the website you wish to record, click on the Add a Password button.
- This will open a dialogue where you enter the information for your new password. Ensure the URL is the same as the URL that is present for the login field of the website you want to add.
- Click Save.
Once you save, the new entry is listed under the All Websites tab.
Editing a Password
- Click on the action button ... , or the expand icon to the right of the website or client in question.
- Next click on the sub-container to open an individual password.
- Click the edit button below the password entry that you want to change.
- Click on the "sync passwords" icon at the top right of the extension.
View or Copy a Password
When viewing a password, it will be displayed in plain text, so be aware of others seeing your screen.
- If you need to view an existing password in plain text, or copy it to your clipboard, click on the row, or the expand icon to the right of the website or client in question.
- Next click on the sub-container to open an individual password. You should now have a view button below the password entry that you can click which will open up a modal where you can view the password in plain text, or be able to copy it to the clipboard.
- If you click on the key button, the password should now be saved to your clipboard so that you can paste it where it is required.
Quick Launch a Password
- If you are sorting by website, for any website that has only one account in it, you can click on the quick launch icon that is to the right of the entry in the password list.
- This allows you to launch the website and login in one easy step. You can also do this if you are sorting by client, however, you will need to open up the client first to choose which website you wish to quick launch.
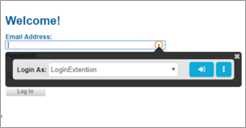
- If you have any valid accounts for the website, you can also login to a website by clicking on the "P" icon found in the login fields.
- This opens a login dialogue, where you can select from any accounts you currently have saved for the website.
Sync Changes
If you have made changes inside of the Passportal web UI, or you have added any new passwords via the extension, you will need to sync the changes. This is done by hitting the "Sync Password" icon found at the top right of the extension.
Launch Passportal Web UI/Generate Password
If you would like to launch the Passportal website from directly within the extension, you can click on the launch icon, and then hit Launch Passportal.You can also generate a random password from here as well.
Mass deployment of extension.
You can mass deploy the Chrome extension by following this Chrome guide.
We recommend using group policy to deploy the extension:
Force-installing using group policy
Using policy to deploy an extension or Chrome web app is the easiest and most scalable method. This is the recommended method for pushing extensions, as it does not require the CRX file to be on the machine. It must simply be available at a given URL.
To use this method, set the policy to "force install" the extension.
- ExtensionInstallForcelist - Configure the list of force-installed apps and extensions
- Data type - List of strings
- Windows registry location for Windows clients - Software\Policies\Google\Chrome\ExtensionInstallForcelist
- Windows registry location for Google Chrome OS clients - Software\Policies\Google\ChromeOS\ExtensionInstallForcelist
- Mac/Linux preference name - ExtensionInstallForcelist
- Supported on:
- Google Chrome (Linux, Mac, Windows) since version 9
- Google Chrome OS (Google Chrome OS) since version 11
- Supported features:
- Dynamic Policy Refresh: Yes
- Per Profile: Yes
- Description:
Specifies a list of apps and extensions that are installed silently, without user interaction, and which cannot be uninstalled nor disabled by the user. All permissions requested by the apps/extensions are granted implicitly, without user interaction, including any additional permissions requested by future versions of the app/extension. Furthermore, permissions are granted for the enterprise.deviceAttributes and enterprise.platformKeys extension APIs. (These two APIs are not available to apps/extensions that are not force-installed.)
This policy takes precedence over a potentially conflicting ExtensionInstallBlocklist policy. If an app or extension that previously had been force-installed is removed from this list, it is automatically uninstalled by Google Chrome.
For Windows instances that are not joined to a Microsoft® Active Directory® domain, forced installation is limited to apps and extensions listed in the Chrome Web Store.
Note that the source code of any extension may be altered by users via Developer Tools (potentially rendering the extension dysfunctional). If this is a concern, the DeveloperToolsDisabled policy should be set.
Each list item of the policy is a string that contains an extension ID and an "update" URL separated by a semicolon (;). The extension ID is the 32-letter string found e.g. on chrome://extensions when in developer mode. The "update" URL should point to an Update Manifest XML document as described at https://developer.chrome.com/extensions/autoupdate. Note that the "update" URL set in this policy is only used for the initial installation; subsequent updates of the extension employ the update URL indicated in the extension's manifest.
For example:
gbchcmhmhahfdphkhkmpfmihenigjmpp;https://clients2.google.com/service/update2/crx
The above installs the Chrome Remote Desktop app from the standard Chrome Web Store update URL. For more information about hosting extensions, see: https://developer.chrome.com/extensions/hosting.
If this policy is left not set, no apps or extensions are installed automatically and the user can uninstall any app or extension in Google Chrome.
- Note for Google Chrome OS devices supporting Android apps:
Android apps can be force-installed from the Google Admin console using Google Play. They do not use this policy.
Example value:
Windows (Windows clients):
Software\Policies\Google\Chrome\ExtensionInstallForcelist\1 = "gbchcmhmhahfdphkhkmpfmihenigjmpp;https://clients2.google.com/service/update2/crx"
Windows (Google Chrome OS clients):
Software\Policies\Google\ChromeOS\ExtensionInstallForcelist\1 = "gbchcmhmhahfdphkhkmpfmihenigjmpp;https://clients2.google.com/service/update2/crx"
Android/Linux:
["gbchcmhmhahfdphkhkmpfmihenigjmpp;https://clients2.google.com/service/update2/crx"]
Mac:
<array>
<string>gbchcmhmhahfdphkhkmpfmihenigjmpp;https://clients2.google.com/service/update2/crx</string>
<array>