
In order to configure incoming filtering for Exchange Online/Microsoft 365 follow these steps:
- Step 1 - Add the domain in Mail Assure
- Step 2 - Create a partner connector and rule in Exchange Online to accept filtered mail
- Step 3 - Change MX record for the domain to point to incoming servers
- Step 4 - Disable Safe Links Processing to permit Email Scout Reports and Protection Reports
Step 1 - Add the domain in Mail Assure
Domains can be added in these ways:
We recommend Adding Domains and Mailboxes via Microsoft 365 sync.
To add the domain via the Microsoft 365 Sync:
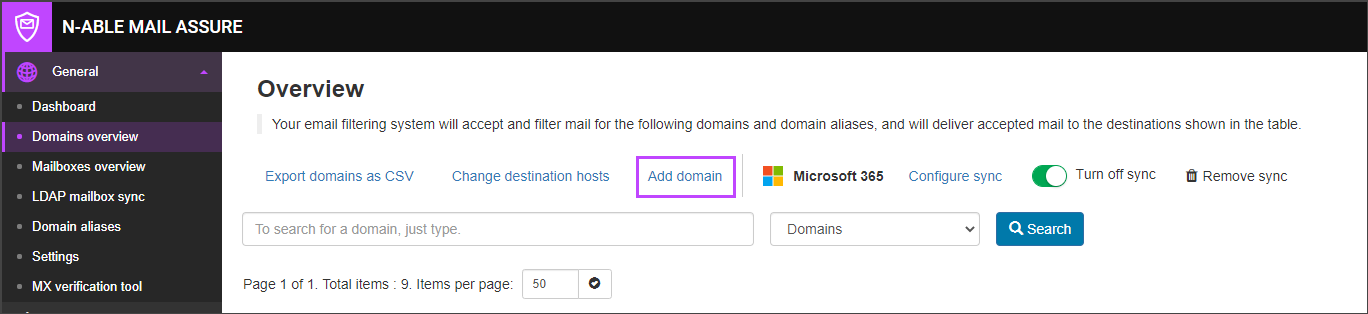
- Log in as an Admin level user, via the securemail.management link
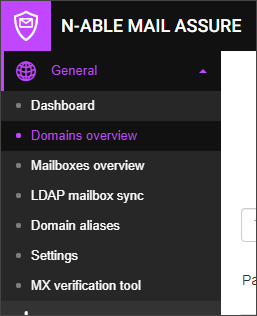
- Using the side menu on the left of the page, navigate to General > Domains Overview
- Select Microsoft 365 Configure Sync which can be found just below the page description

You will now be taken to the Configure Microsoft 365 Sync wizard.
- Select an existing Admin to associate the new Domain(s) to using dropdown or create a new Admin user by typing the new Admin name in the free text box, then selecting it from the dropdown list
It is our recommendation to create separate Admin accounts per Microsoft Tenant to allow for more specific configuration after the domains are added to Mail Assure
- Click Connect on the wizard
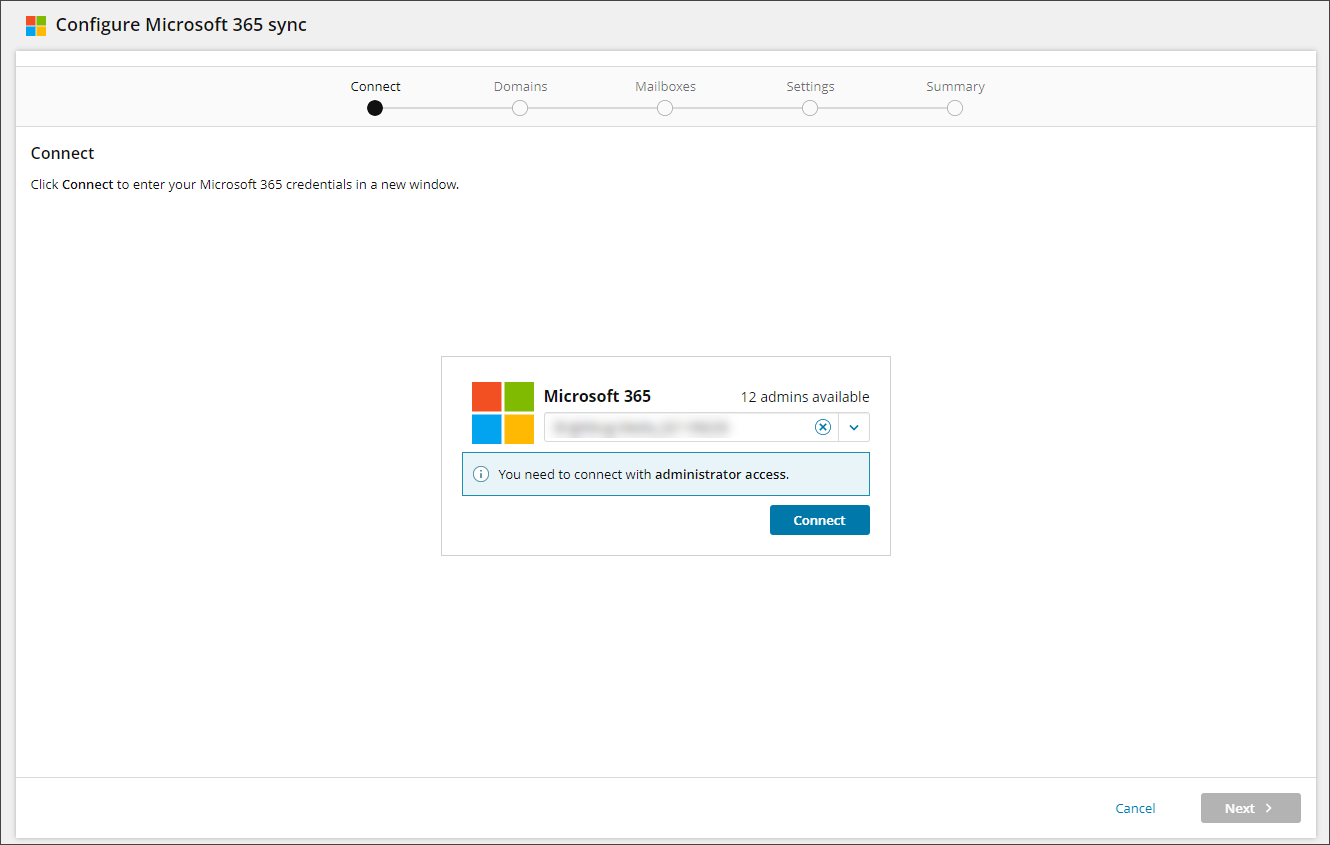
Ensure your browser is configured to allow pop-ups from Mail Assure before clicking on Connect in the wizard as you will need to authenticate to Microsoft 365 via a pop-up window for security purposes.
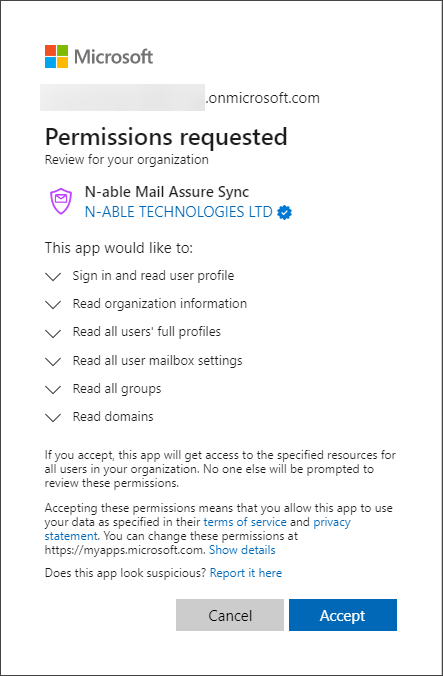
- Log in to your Microsoft 365 Global Administrator account
- Accept the permissions for the Mail AssureMicrosoft 365 sync. This connection is to allow the wizard to collect the domain and mailbox information
If you check Mail Assure at this time, you will see that Microsoft is processing the connection with a page that looks like the below:
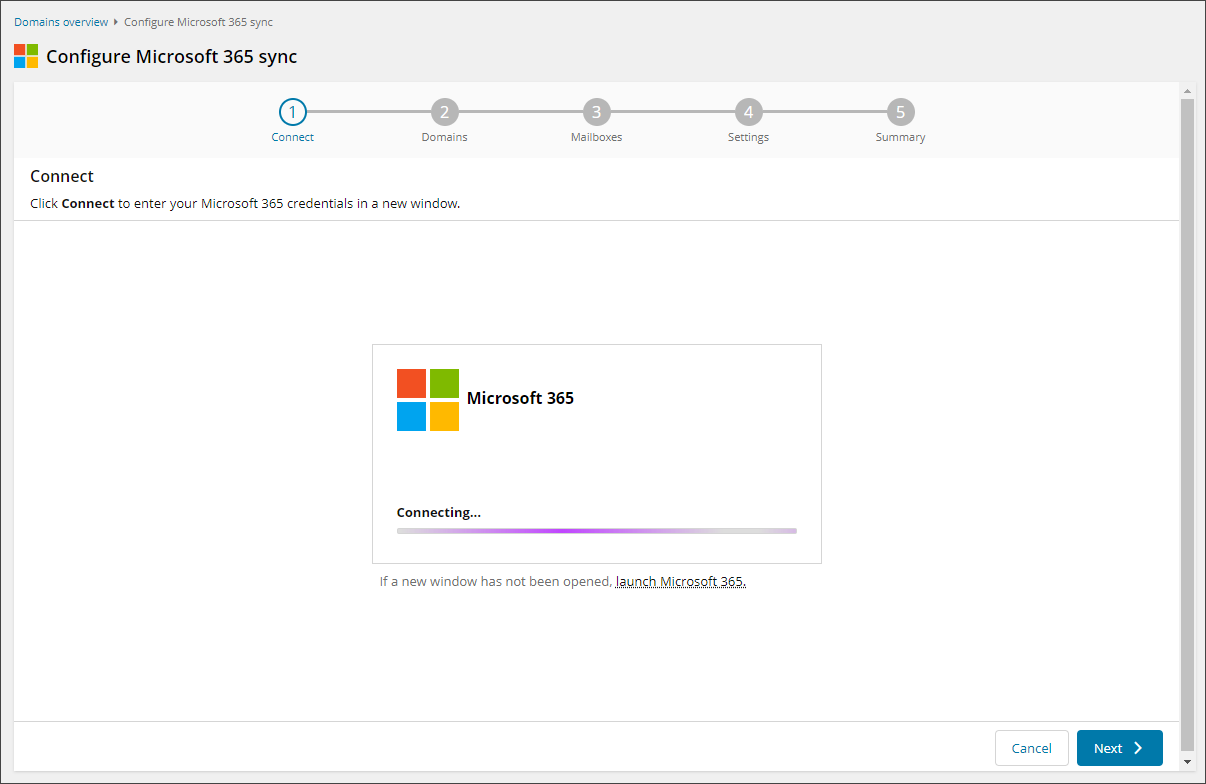
- Once you see the wizard has connected, click Next
- Select the domain(s) you wish to configure through the Microsoft 365 sync
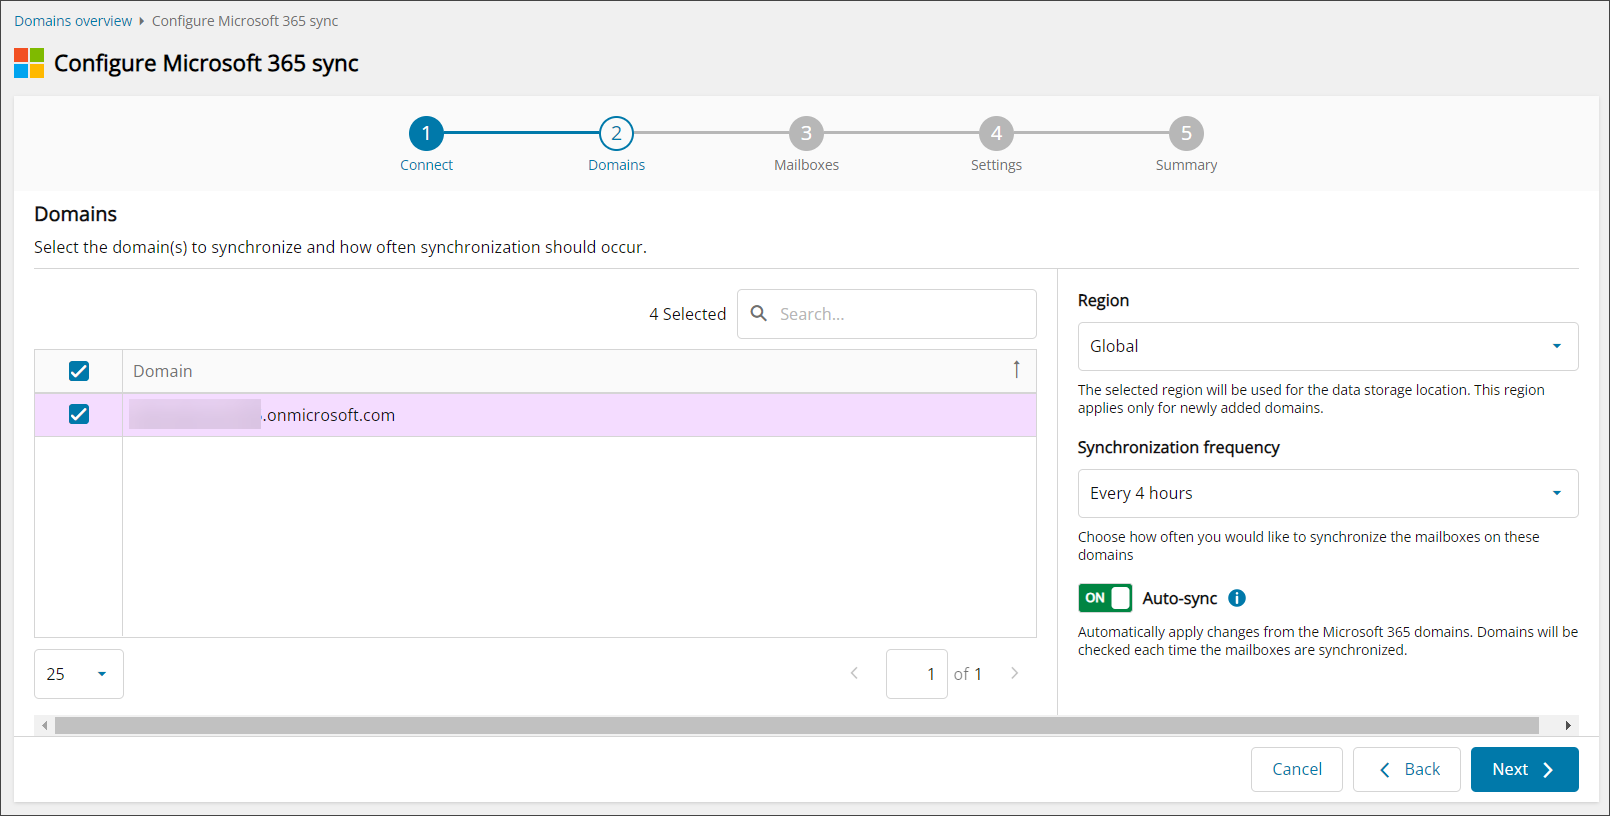
- Select the Region for the storage location
The region selected will be used for the data storage location and applies only to newly added domains.
- Select the synchronization frequency
The frequency times you may choose from are:
- Every hour
- Every 4 hours (default)
- Every 12 hours
- Every day
- Every week
- Enable Sync all Microsoft 365 domains to automatically include any other current or future Microsoft 365 domains in the Sync (default is off)
- Click Next
- Select the Mailbox(es) you wish to sync and click Next
Use the checkbox in the header row to select all mailboxes, or select individual mailboxes by placing a tick in each checkbox.
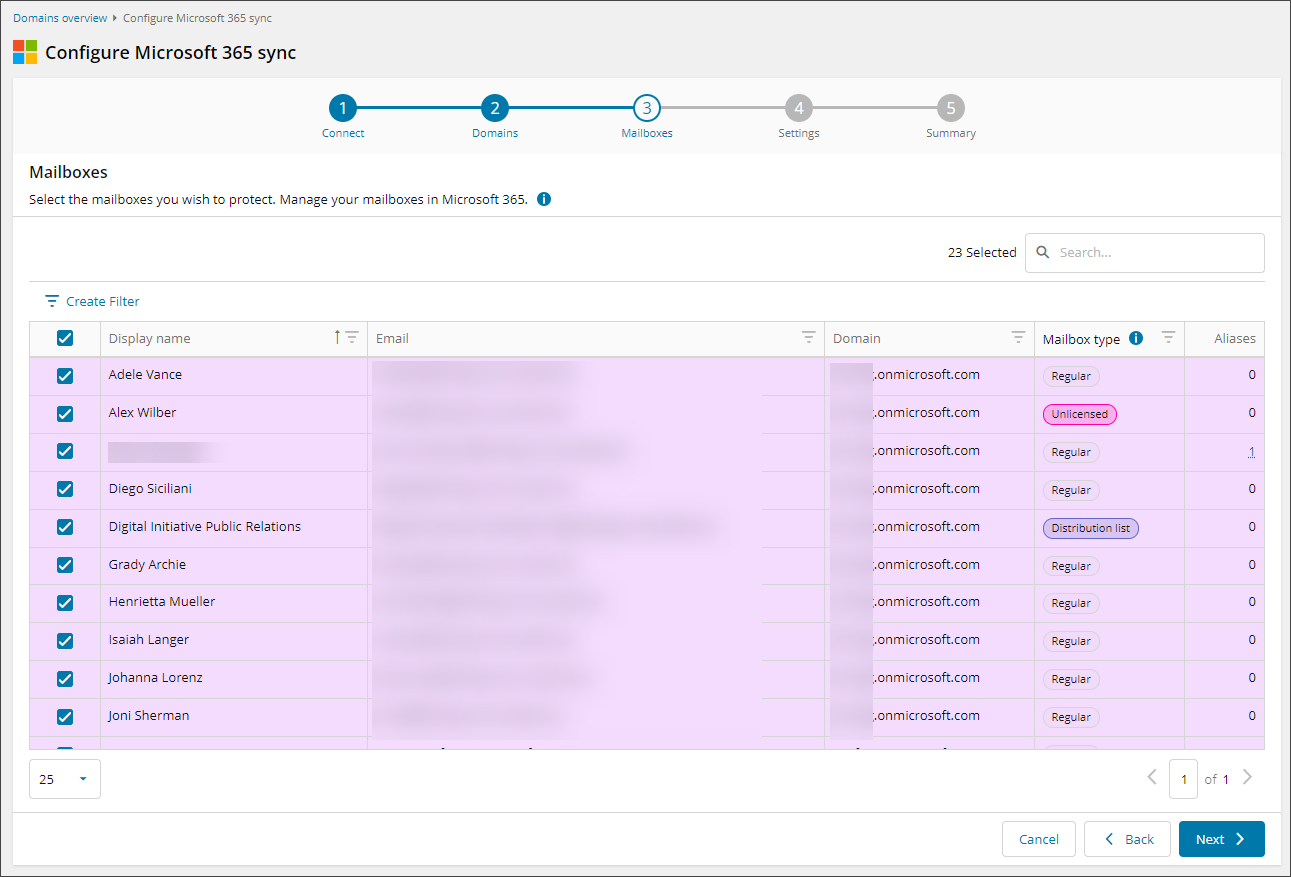
Non UTF-8 mailboxes cannot be added to Mail Assure
Though the Mailbox Type is always detected, due to a display limitation if the mailbox count exceeds 1000, the Mailbox Type column will not be displayed.
- Set the configuration for all the selected mailbox(es)
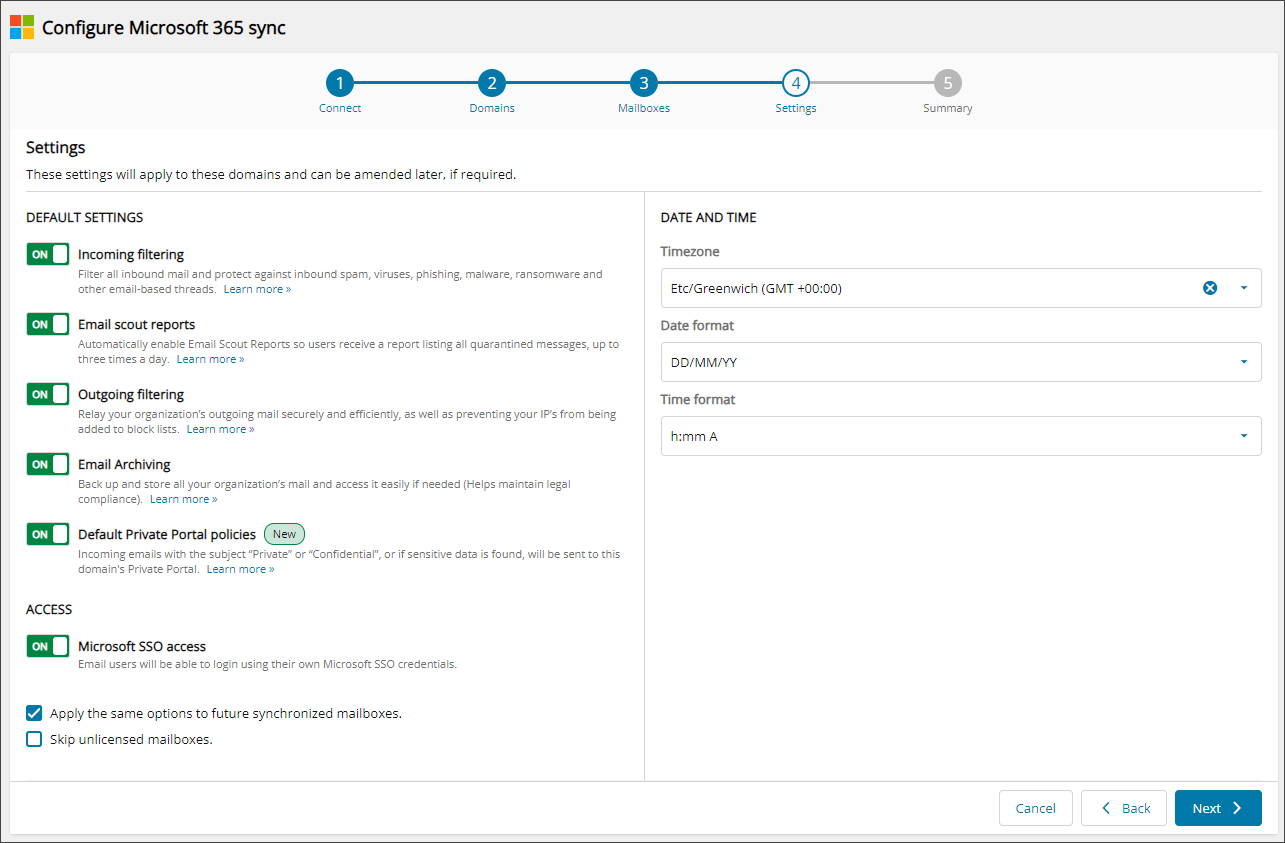
In here you can:
- Incoming Filtering - If enabled, all inbound email will be filtered
- Email Scout Reports - If enabled, Email Scout Reports will be automatically enabled so that they are sent to each recipient in your domain, up to 3 times a day
- Outgoing Filtering - If enabled, all outbound email will be filtered
- Email archiving - If enabled, a backup of all your organizations mail will be taken
- Default Private Portal Policies - If enabled, four policies will be created automatically every time the sync runs, to send emails that match the criteria to the Private Portal:
- Messages where the subject contains 'Private'
- Messages where the subject contains 'Confidential'
- Messages where the subject contains banking information
- Messages where the subject contains the padlock emoji (unicode character "U+1f512", or shortcodes ":lock:", "(locked)" or ":locked:")
Please check with your provider for how to add this
If enabled, the default Private Portal policies will apply to all the domains from the admin configuring Microsoft 365 sync process. If this admin also manages domains which are not part of Microsoft 365 sync process, the default Private Portal policies will also be applied to these domains. Therefore, we strongly recommend having different admins for the domains managed with and without Microsoft 365 sync.
- Microsoft SSO access - If enabled, email users will be able to log in using their own Microsoft SSO credentials
If Private Label (Branding) not enabled for the Domain's parent Admin (see Step #4), Microsoft SSO access will not be available for any user belonging to these Domains
- Apply the same options to future synchronized mailboxes - If enabled, all future mailboxes on the domain(s) added through the Microsoft 365 sync will have the same settings as configured here
- Skip unlicensed mailboxes - If enabled, all unlicensed mailboxes on the Microsoft 365 domain(s) added via the sync will be skipped and will not be added to Mail Assure
- Overwrite existing mailbox settings - If enabled, any manual configurations to mailboxes will be overwritten with the current sync settings
This setting is relevant only to the current manual run of the sync, and is not applied to any future auto synchronizations
- Date and Time -
- Timezone - Set the timezone the domain is based in
Automatically detected from the browser, but can be changed here
- Date format - Select a date format
- Time Format - Select a time format
Email Scout Reports for the Inbound and Outbound email flow are scheduled based on the above settings
- Timezone - Set the timezone the domain is based in
- Click Next
- Review your settings in the summary page and click Confirm. Here you will see a breakdown of the number of each mailbox type selected, the number of domains found and how many of these were selected, and all of the synchronization and configuration settings selected
If any changes are required, you can navigate back to the part of the wizard required by either clicking the breadcrumbs along the top of the screen, or Edit beside the specific section.
- Once confirmed, you will see the banner will change to say Mailboxes synchronization successfully started and you may now close the wizard
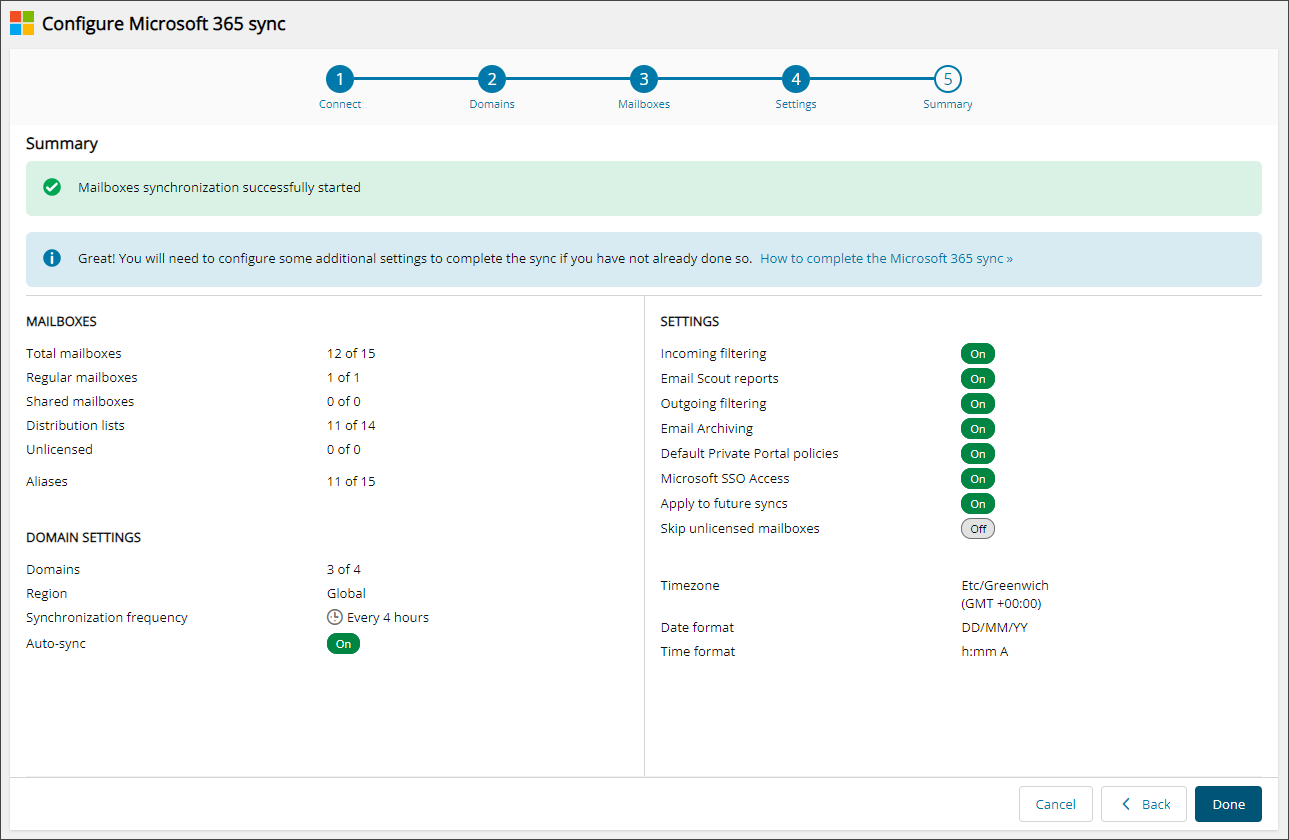
Due to a display limitation, if the mailbox count exceeds 1000, the Mailboxes section will not display the breakdown of Mailbox Type.
Syncing the onmicrosoft.com domain is strongly encouraged. It is used by Microsoft for email addresses and groups email aliases. If you deselect this here, a warning notification will be displayed to advise.
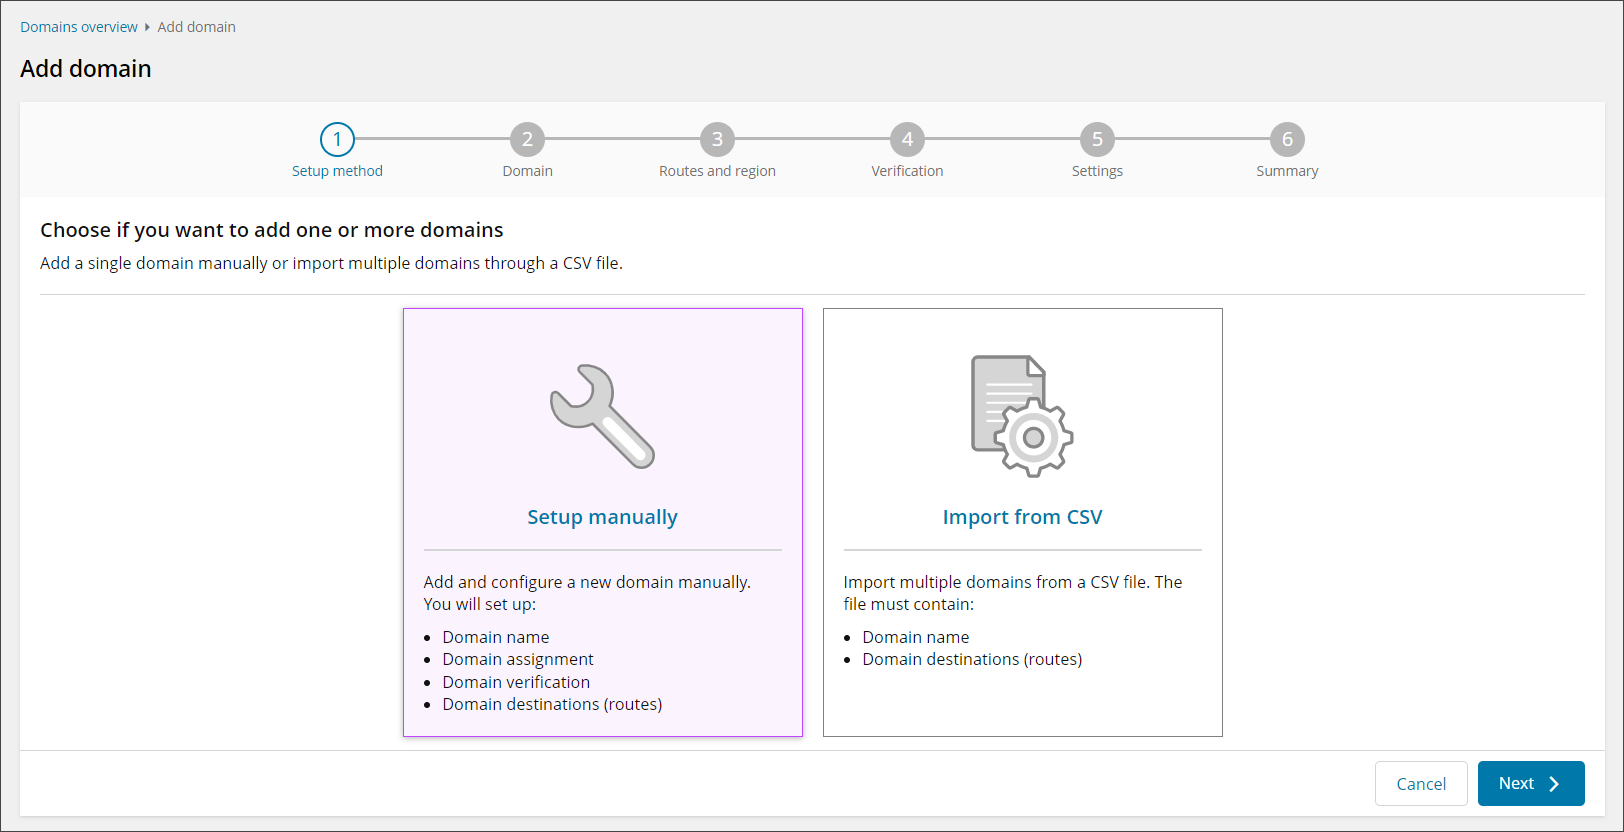
To add the domain manually:
- Login to Mail Assure as an Admin Level user
- Navigate to General > Domains Overview
- Click Add Domain
- Select Setup Manually
- Enter the domain name and assign the domain to an Admin and click Next
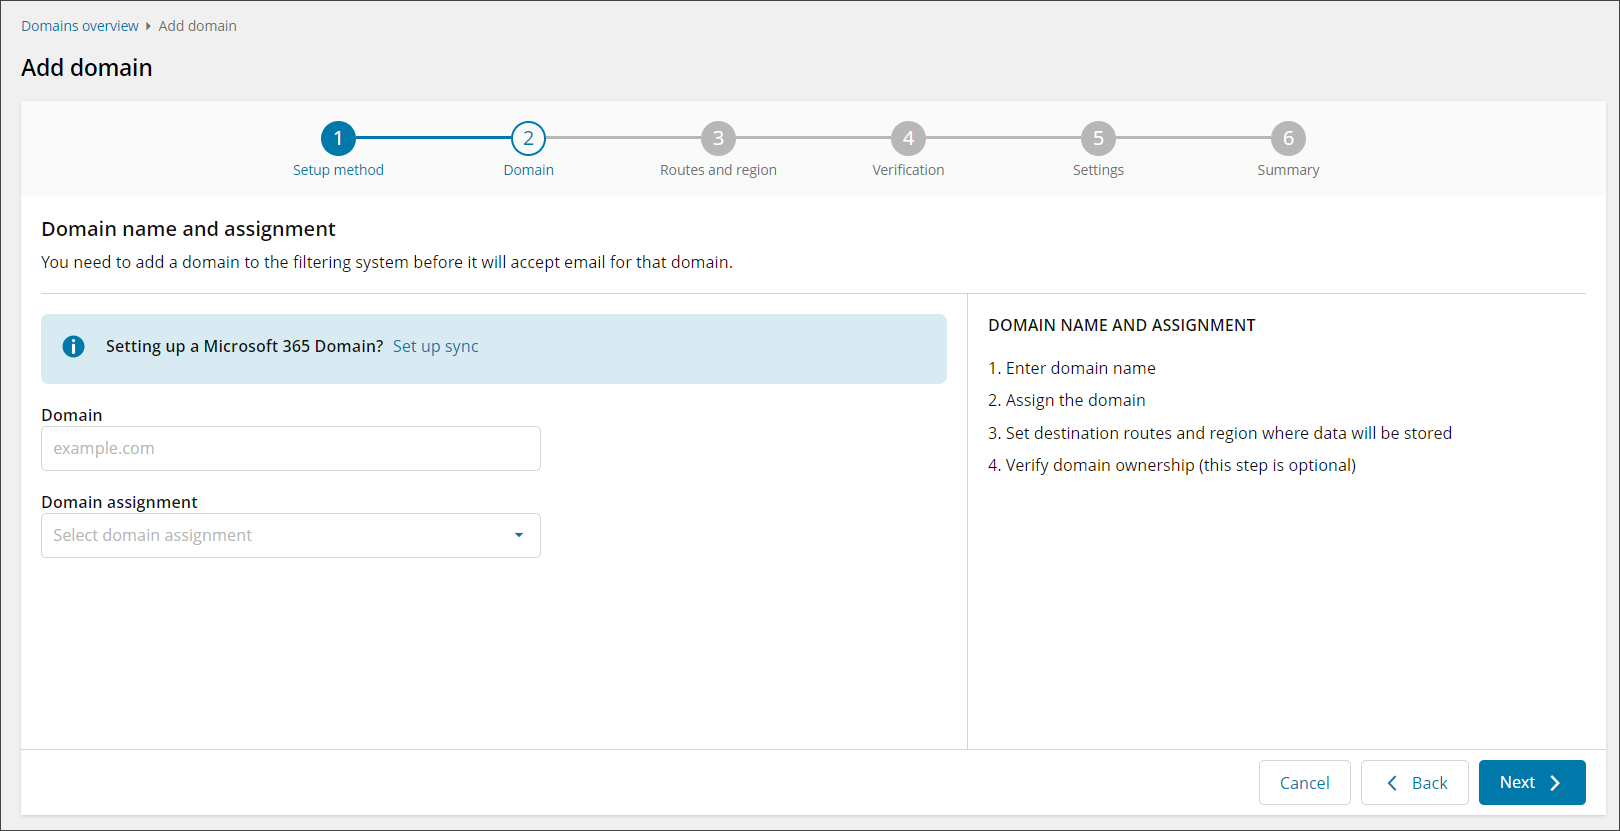
Assigning a domain dictates the ownership of a domain. The only users who can access this domain will be the top level Tenant user and the Sub-Admin to which it has been assigned.
- To keep message logs and quarantine storage within a specific geographic region, choose the territory from the Region dropdown:
- Global (recommended)
- United States
- European Union
- United Kingdom
- Asia-Pacific
- South Africa
This does not affect the mail-flow into and out of the domain. Specific Geographic MX records and relay servers must be used to alter mail-flow locations.
We recommend using the default Global region to make optimal use of our globally distributed cloud and infrastructure redundancy. When selected, our Global data centers are used for email filtering, logging and quarantine.
We then validate the entered destination and port information. For example, ensure it resolves to a valid IP address and attempt to query the domain's MX records. Where we detect an issue this is displayed in the dialog for review.
- In the Destination route hostnames fields, add the mail server address (IP or FQDN) along with the Port incoming mail is to be routed through after filtering
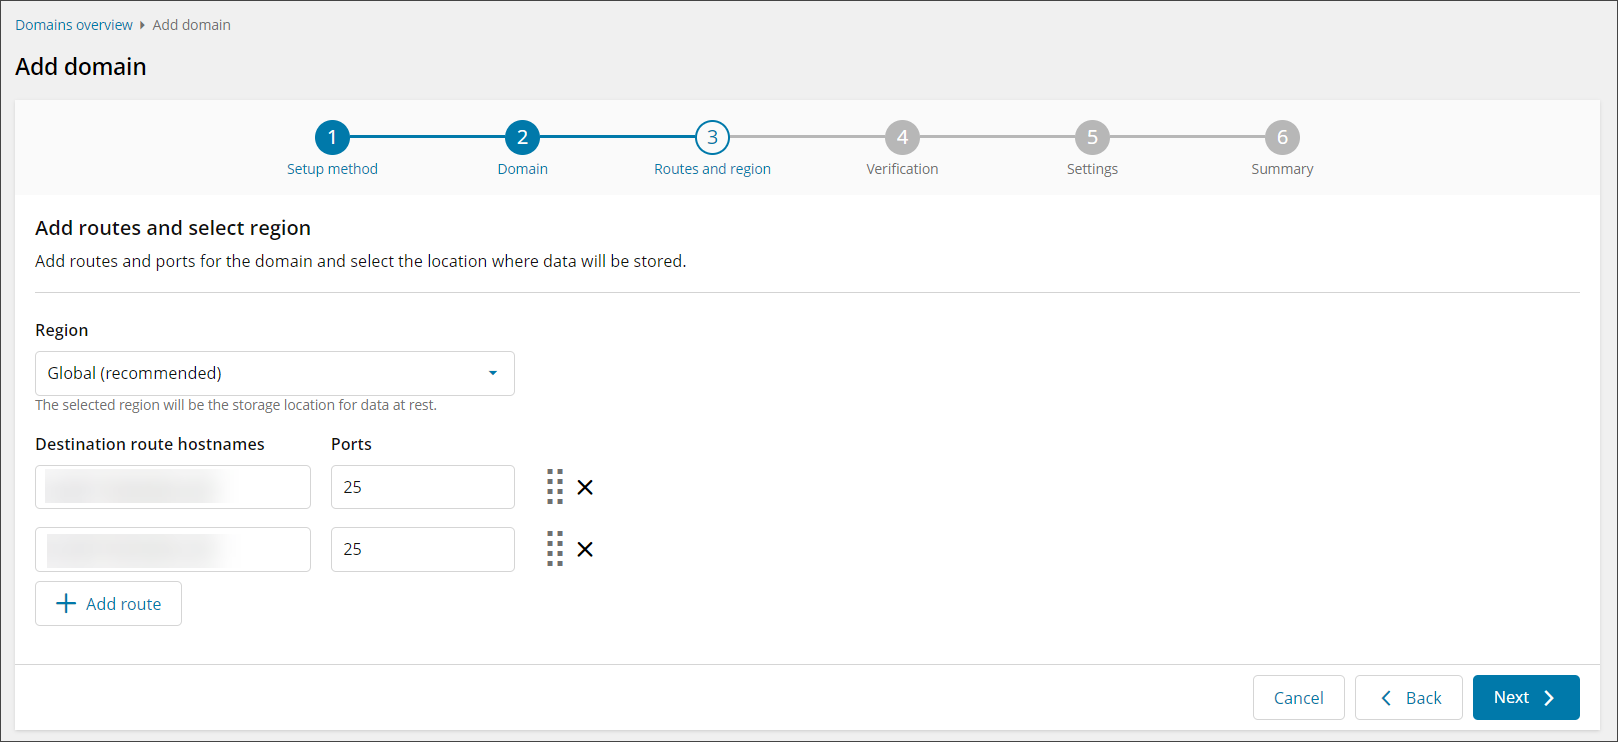
Click + Add route to include additional routes and ports for the domain. Use the drag and drop feature to reorder the destinations and ports. Adding multiple routes here is preferable for load balancing purposes or if an alternative route is needed in case of failover.
For more information on how to find your Destination server address, see Find Destination Server Hostname
If you do not have a specific destination server route to add from the start, Mail Assure will automatically fill in a suggested destination route for you (this route is detected from the domain's existing MX records), with a default destination port 25.
Once you have set your destination route(s) here, they will be displayed in the Incoming > Destinations page -
- Click Next
- You will now be presented with the Domain Verification instructions. Follow the steps provided here to verify ownership of the domain you are adding
This step is mandatory, either now or after the domain has been added.
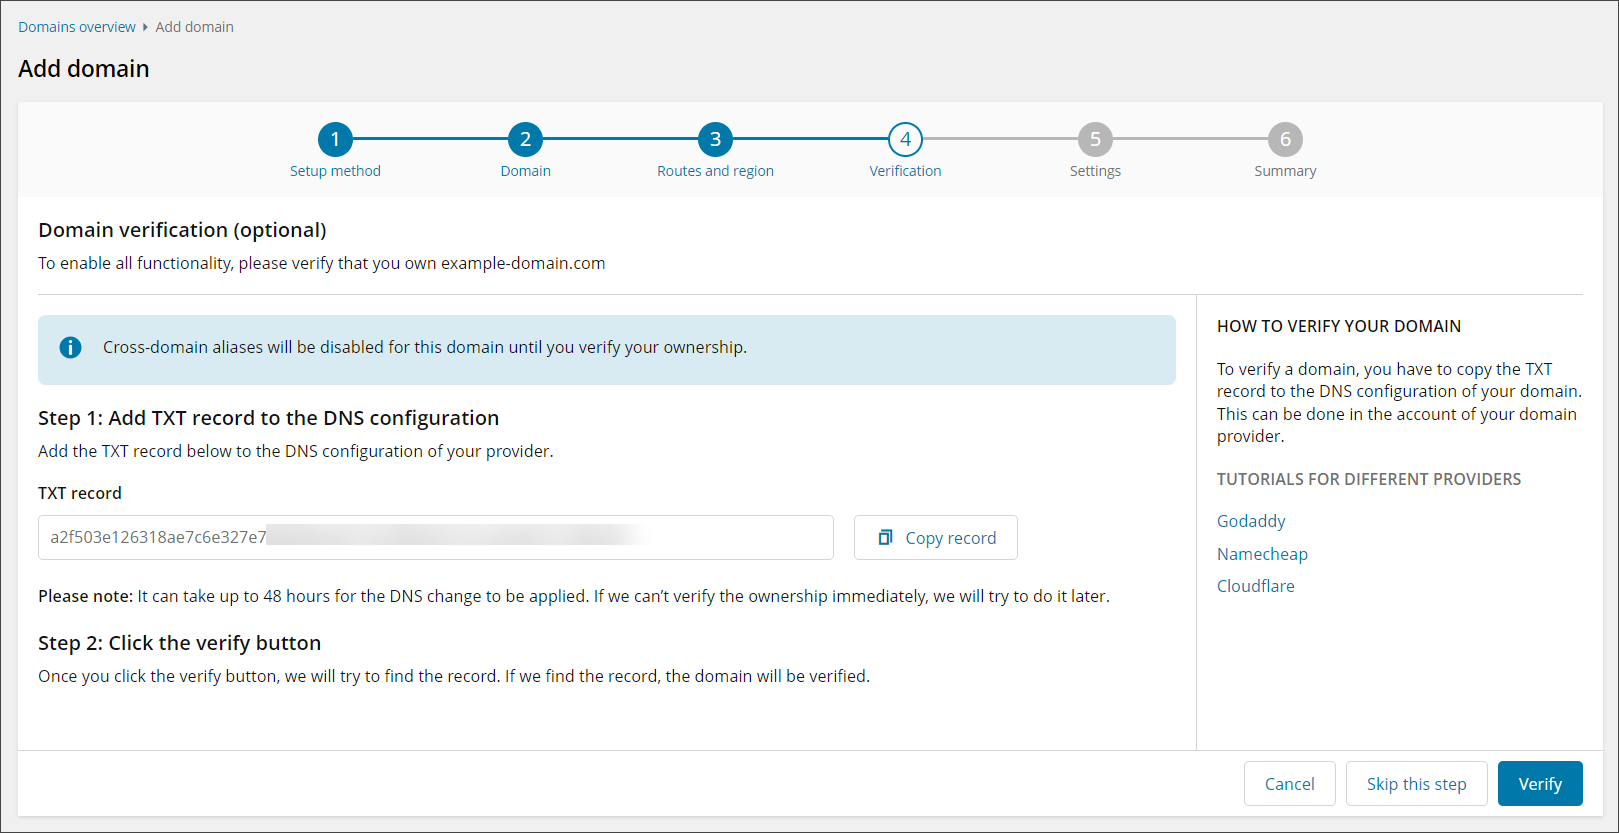
Cross-domain aliases will be disabled for this domain until you verify ownership
- After Verification, you will see the Settings tab.

On this page, configure the Default settings for the domain:
- Incoming Filtering - If enabled, all inbound email will be filtered
- Email Scout Reports - This will automatically enable Email Scout Reports so that they are sent to each recipient in your domain, up to 3 times a day
- Only accept email to your defined mailboxes - If enabled, inbound mail will only be accepted to mailboxes that appear in Mail Assure
- Email archiving - If enabled, a backup of all your organizations mail will be taken
- Default Private Portal Policies - If enabled, four policies will be created automatically every time the sync runs, to send emails that match the criteria to the Private Portal:
- Messages where the subject contains 'Private'
- Messages where the subject contains 'Confidential'
- Messages where the subject contains banking information
- Messages where the subject contains the padlock emoji (unicode character "U+1f512", or shortcodes ":lock:", "(locked)" or ":locked:")
Please check with your provider for how to add this
- Timezone - Set the timezone the domain is based in
Automatically detected from the browser, but can be changed here
- Date format - Select a date format
- Time Format - Select a time format
- Click Finish and configure mailboxes
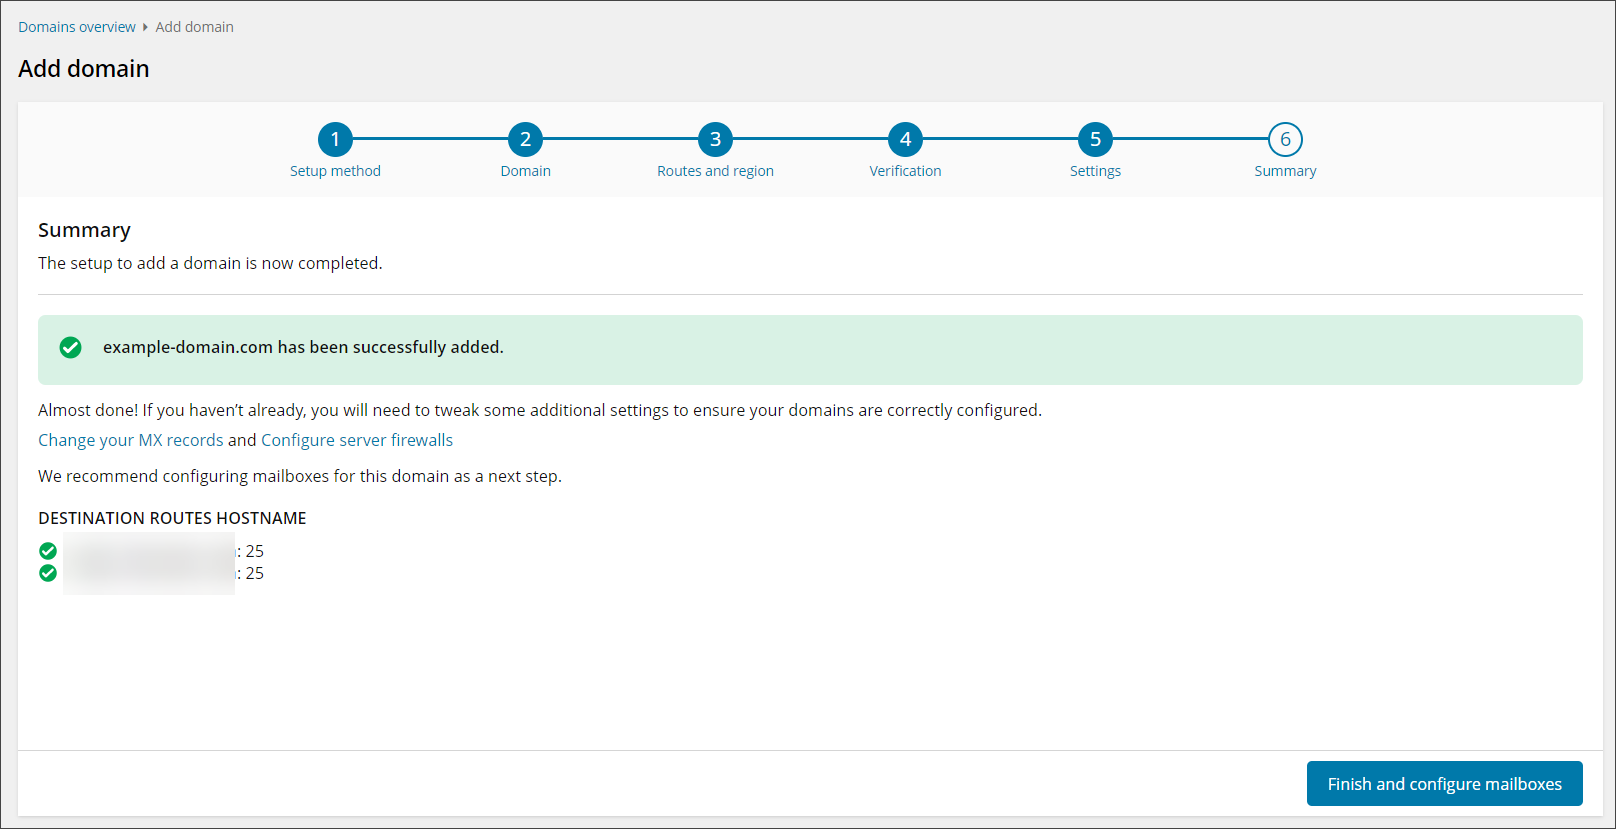
The summary page will also advise to update your MX records and configure Firewalls once the domain has been added. These steps must be completed
If the domain entered returns a destination of onmicrosoft.com or outlook, a prompt will be given which will either take you to Configure Microsoft 365 Sync for the domain, or to continue adding the domain manually.
- Login to Mail Assure as an Admin Level user
- Navigate to General > Domains Overview
- Click Add domain
- Select Import from CSV and click Next
- Drag and drop the CSV file into the upload section of the dialog or use browse to navigate to its location on the local computer
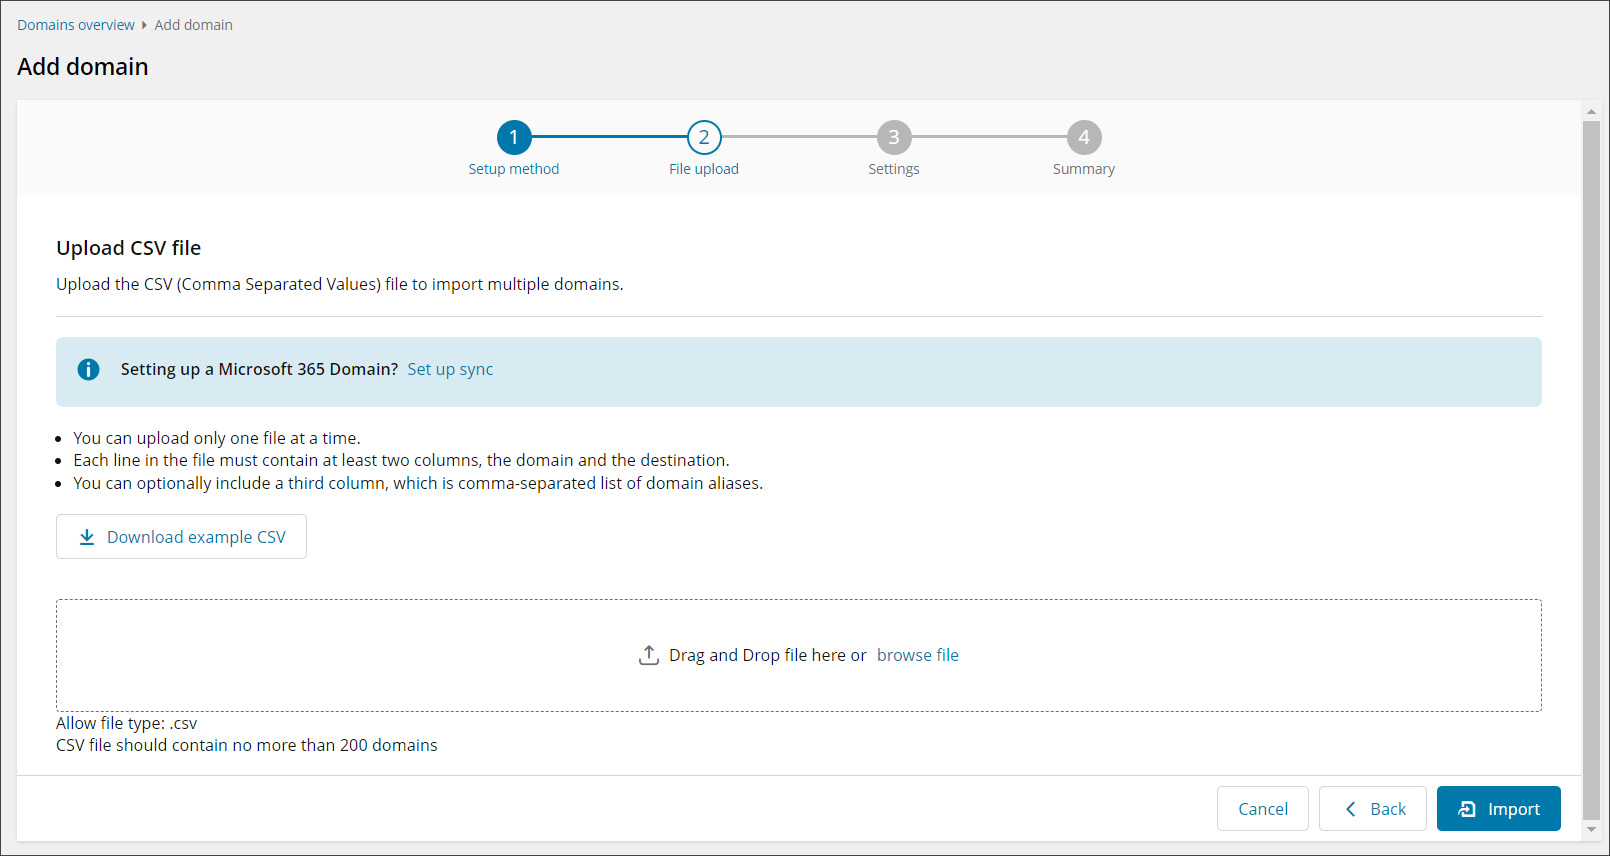
You may download an example CSV file by clicking this button to confirm the file format used in your own CSV is correct
- Select Import to import the file
Any issue identified with the file are reported in the "Upload CSV file" section. For example it was not a CSV file
If the domain entered returns a destination of onmicrosoft.com or outlook, a prompt will be given which will either take you to Configure Microsoft 365 Sync for the domain, or to continue adding the domain manually.
- You will see the Settings tab
Here you can configure the Default settings for the imported domains:
- Incoming Filtering - If enabled, all inbound email will be filtered
- Email Scout Reports - If enabled, Email Scout Reports will be automatically enabled so that they are sent to each recipient in your domain, up to 3 times a day
- Only accept email to your defined mailboxes - If enabled, inbound mail will only be accepted to mailboxes that appear in Mail Assure
- Email archiving - If enabled, a backup of all your organizations mail will be taken
- Default Private Portal Policies - If enabled, four policies will be created automatically every time the sync runs, to send emails that match the criteria to the Private Portal:
- Messages where the subject contains 'Private'
- Messages where the subject contains 'Confidential'
- Messages where the subject contains banking information
- Messages where the subject contains the padlock emoji (unicode character "U+1f512", or shortcodes ":lock:", "(locked)" or ":locked:")
Please check with your provider for how to add this
- Timezone - Set the timezone the domain is based in
Automatically detected from the browser, but can be changed here
- Date format - Select a date format
- Time Format - Select a time format
- Click Finish and configure mailboxes
The summary page will also advise to update your MX records and configure Firewalls once the domain has been added. These steps must be completed

Step 2 - Create a partner connector and rule in Exchange Online to accept filtered mail
For further details about creating a partner connector and rule in either the Classic EAC or the New EAC in Microsoft 365, ensure you fully read the Microsoft documentation page.
Before beginning, ensure you are a member of the Organization Management role groups in the Microsoft 365 defender portal and Exchange Online.
Step 2:1 - Create the Partner Connector in the Exchange Admin Center
- Log in to the Exchange Admin Center with Organization Management admin credentials
- Click on Mail Flow > Connectors
- Click the + button to add a connector
- Choose the following:
- Connection From - Partner organization
- Connection To - Microsoft 365
- Click Next
- Give the connector a Name you will recognize in Step 2:2 #5 and optionally, provide a description
- Ensure the What do you want to do after connector is saved setting, Turn it On is selected
- Click Next
- Choose By verifying that the IP address of the sending server matches one of the following IP addresses, which belong to your partner organization
- Add the following Mail Assure delivery IP ranges one at a time and click the + symbol:
130.117.251.9/25185.201.16.0/24185.201.17.0/24185.201.18.0/24185.201.19.0/24
- Add the following Mail Assure delivery IP ranges one at a time and click the + symbol:
- Click Next
- Ensure that Reject email messages if they aren't sent over TLS is ticked and click Next
- Verify the settings and click Create Connector
- Click Done
Step 2:2 - Create the Rule in the Microsoft 365 Defender Security Portal
- Login to the Microsoft 365 defender security portal with Organization Management admin credentials
- Under the Email & Collaboration section of the left-hand menu, select Policies & Rules
- Click Threat Policies
- Scroll to the Rules section and select Enhanced Filtering
- Select the Connector Name as created in step 2:1
- Select Skip these IP addresses and input the following:
185.201.16.0/22130.117.251.9/25Once added, this IP address may update to
130.117.251.0/25. This is acceptable behavior as both IP's fall under the same subnet.
You must click the IP address that matches what is typed in order for it to be added successfully:
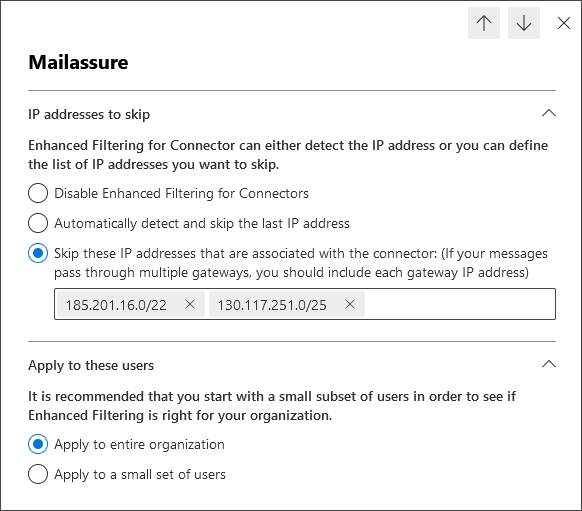
- Under Apply to these users, select Apply to Entire Organization
- Click Save
Failing to setup the partner connector correctly will cause messages to be incorrectly rejected by the Microsoft systems.
Step 3 - Change MX record for the domain to point to incoming servers
Once you have verified configuration as above, update the domain's MX records to route mail through Mail Assure. For full details on MX records (including region specific MX records), see MX Records.
Step 4 - Disable Safe Links Processing to permit Email Scout Reports and Protection Reports
When using Mail Assure and Microsoft 365, Microsoft Advanced Threat Protection scans all links within messages, including the links within Email Scout Reports and Protection Reports and triggers the links to release or release and train messages.
Disable this by:
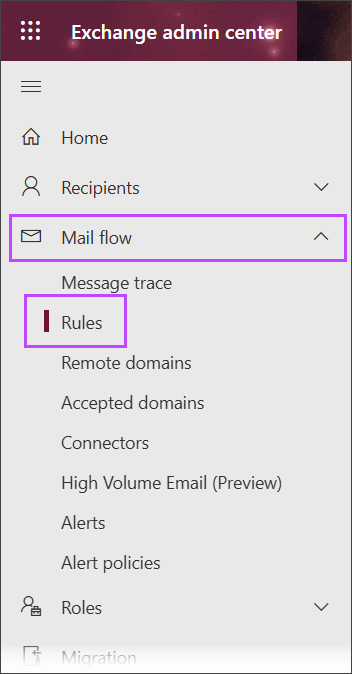
- Log in to the Exchange Admin Center with Organization Management admin credentials
- In the left-hand menu, expand the Mail flow heading and open the Rules page
- Select Add a rule, then choose Create a new rule from the list
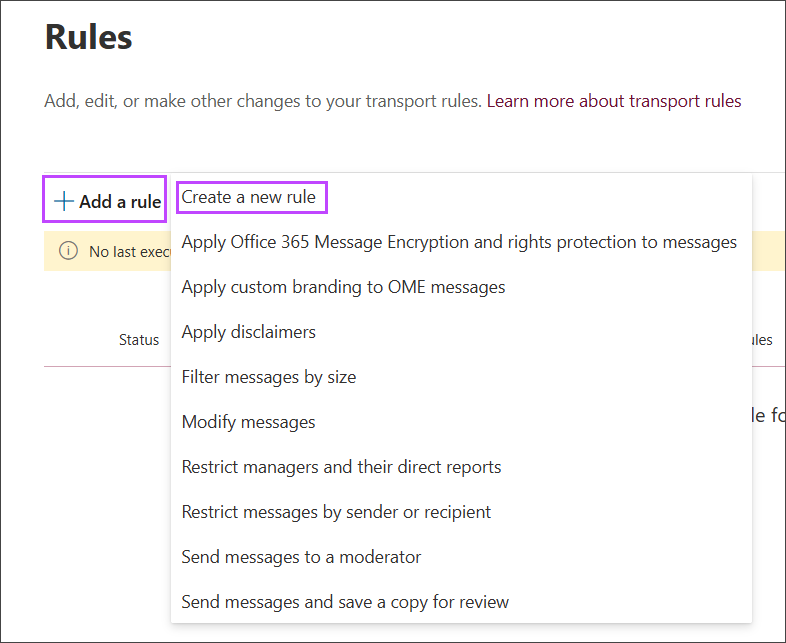
- Select the conditions and actions for this rule:
- Name - Give the rule a memorable name so that you can easily find it in the list

- Apply this rule if… - select the following condition criteria:
- From the first dropdown, select The message headers...
- From the second dropdown, select Includes any of these words
A new line will appear below the dropdown boxes in this section which states "Enter text message header includes Enter words"
- Click Enter text and in the specify header name field, type List-Unsubscribe
- Save this change
- Click Enter words and in the specify words of phrases field, type lazaretto
- Click Add and Save this

- Do the following… - select the following condition criteria:
- From the first dropdown, select Modify the message properties
- From the second dropdown, select Set a message header
A new line will appear below the dropdown boxes in this section which states "Set the message header Enter text to the value Enter text"
- Click the first enter text and in the Message header field, type X-MS-Exchange-Organization-SkipSafeLinksProcessing
- Save this change
- Click the second Enter text and in the Message header field, type 1
- Save this change

- Except if - Leave these fields empty
- Name - Give the rule a memorable name so that you can easily find it in the list
- Click Next
- Set the rule settings as appropriate for your environment
- Click Next
- Review the rule conditions and settings, and click Finish

- Click Done to return to the Rules page
- Ensure the rule Status is Enabled. If it is not, click the Disabled status and enable it using the toggle

Once this rule is created and enabled, Microsoft will no longer scan (and trigger) the links within Email Scout Reports.