
What is an identity?
An Identity differs from an Outgoing user/Authentication method in that an identity is an individual sending address while an Outgoing user/Autentication method is a way of authentication for all users on the sending server.
Locking an identity will prevent a single sending address or sending user from being able to relay mail through the outbound filter, but not affecting other sending addresses using the same Outgoing user/Authentication mechanism.
Locking an Outgoing user/Authentication method will stop all mail from being relayed through the outbound filter.
Identities can be managed automatically or manually. To manage identities, you can add and manage the identities that you have previously set up manually in the Manage Identities page, or automatically identifying identities within the Outgoing Users/Authentication Methods section. For example, if you see an identity (individual sender) sending Spam, which was automatically detected using the Identity Detection tool in Manage Outgoing Users, you can lock the identity on the Manage Identities page without manually creating each identity. Doing this, prevents the identity sending any further messages while you investigate the cause of the issue.
View Existing Identities
- In the Admin or Domain Level Control Panel, select Outgoing > Manage Identities
- Use the Query Rules panel to search for the identities you have set up in your domain(s)
- Use the Customise dropdown to choose which columns you want to show in your results. At least one of the following columns must be checked:
- Domain - The domain the identity is associated with
- User - The outgoing user/authentication method where the identity is allocated
- Identity - The sending address
- Lock time - The time that the identity was locked
- Reason - The reason the identity has been locked
- Locked - Yes or No
- Automatic unlocks - The number of times the identity has been automatically unlocked (If enabled)
You can enable automatic locking of identities. This means that if an identity exceeds the cluster admin specified threshold of spam messages, it will be locked automatically, preventing further outgoing messages from sending. You can configure automatic identity locking in the Outgoing User Settings page:
- Go to Outgoing > Manage Users
- Select Edit from the dropdown alongside the user
- The Outgoing User Settings page is displayed. Select Yes in the Lock identities automatically dropdown
See Manage Outgoing Users/Manage Authentication for more information on locking.
- Click on Show results to display the matching results
- The identities are listed. Click on the dropdown to the left of an identity to choose from the following tasks:
- Lock - If you select this, the identity will not be able to relay any emails outbound until it is unlocked
- Unlock - Select this to unlock the identity and allow this address to send mail
- Reset the count of automatic locks - Resets the automatic lock counter back to 0
Manually Add Identities
- Use the Add Identity button in the top banner
- Domain (Only available on the Admin Level Control Panel) - This is the domain for which you wish to add the identity. All domains you have access to as an administrator will be displayed in a dropdown
- User - The authenticating user for the specified domain as configured in Outgoing Users/Authentication Methods. This should be the Authenticating IP or range
- Identity - This is the local part of the address of the email user you wish to add to the list
- Domain - @testing.invalid
- User - 1.2.3.45
- Identity - test-email
For example, if you wish to add test-email@testing.invalid which uses the authenticating IP of 1.2.3.45, the details to add are:
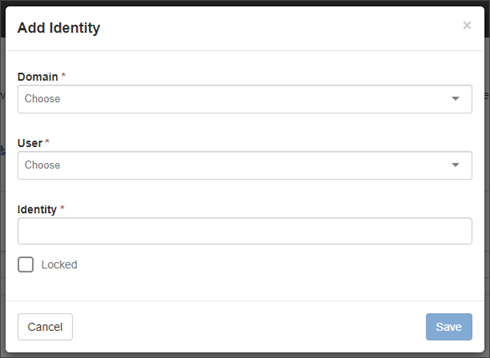
- If you would like to lock the identity immediately, tick the locked option
Locking the identity manually will stop it from being able to relay any emails outbound until it is manually unlocked.
- Click Save