
Storage Node Installers are available in the Downloads section of the Management Console. They can also be downloaded from the N-able additional downloads page.
- Download the Storage Node Installer for Windows
- Double click the installer file to run the wizard
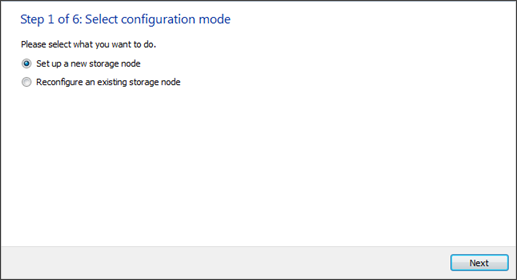
- Choose Set up a new storage node
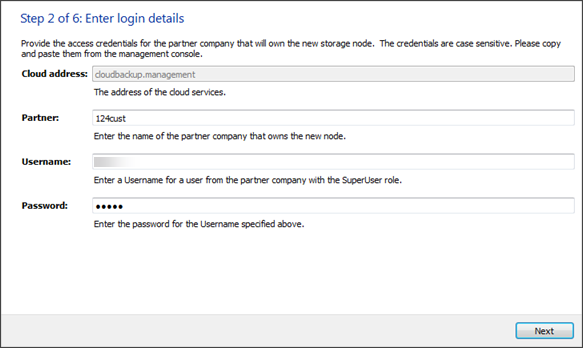
- Enter your login credentials for access to the cloud, an account with the SuperUser role is required
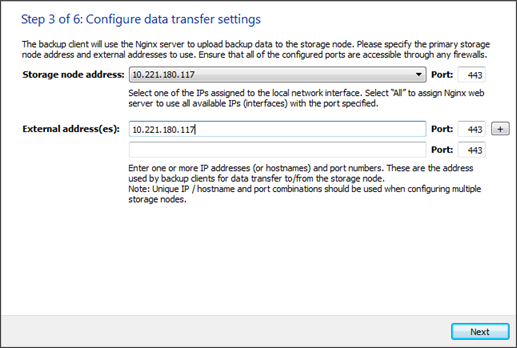
- Select the IP address you want to use for the storage node. You can enter the same IP address to the External address(es) field. If the external address differs from the primary storage node address, it should forward incoming traffic there (this is achieved with the help of a network adapter)
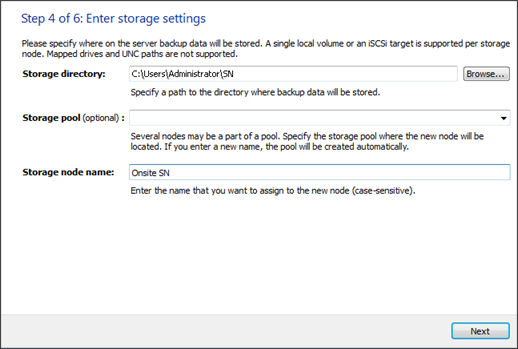
- Enter information about the new storage location
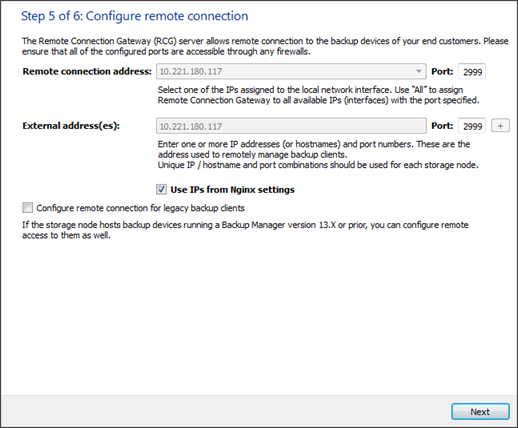
- Select the IP address for remote connections to backup devices. You can enter the same address to the External address(es) field. If the external address differs from the primary remote connection address, it should forward incoming traffic there (this is achieved with the help of a network adapter)
- Check the settings you have entered. Use the arrow button at the top to go back to the previous steps and edit the settings. You can save the settings to a text document for further reference (Save to)
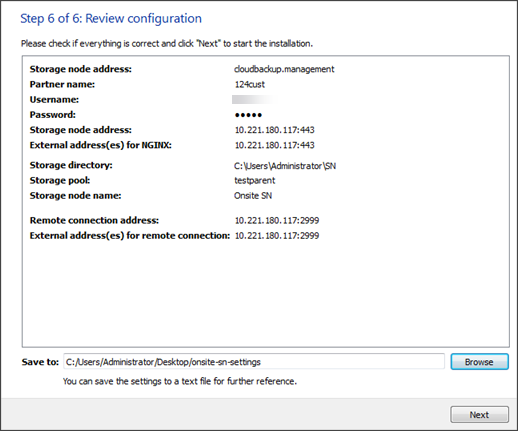
- Click Next to complete the installation
When setting up the storage node, you must use the email address in the Username field. You can use the email associated to the root account or you can create a separate user account for use by the Storage node.
When installing storage nodes, please be aware that you must use IPv4 as IPv6 is not supported.
The DNS record can be used in place of the IP address by entering the domain name in the External Address(es) field.
In case other external addresses are used, the DNS record should be listed first.
Do not replace the IP addresses for the Remote connection address, External addresses for remote connections, Remote connection address for legacy backup clients and External address(es) for remote connections to legacy backup clients fields.
After the installation, you can locate the new node among the partner's storage nodes in the Cloud Management Console (Manage > View storage statistics).
Each storage node requires a unique IP/port combination. This applies both to the data transfer settings and remote connection settings.
Settings for storage node installation
Below is the full list of settings that you specify during storage node installation on Windows. For some of the settings older names are provided. They were used in versions prior to 16.2.
| Setting | Previous name (if applicable) | Definition |
|---|---|---|
| Partner | Partner name | The name of the partner you are installing the storage node for (can be copied from your Cloud management software) |
| Username | User | The email address of the user from the partner company who has full access to Customer Management in your cloud management software. The SuperUser role is required. |
| Password | The password associated with the username | |
| Cloud address | The address of the cloud services (detected automatically) | |
| Storage pool | Storage name |
The name of the storage pool where the new node will be located. You can choose an existing pool from the list or enter a new name (in that case the pool will be created automatically). |
| Storage directory | A path to the directory where backup data will be stored | |
| Storage node name | The name you want to assign to the new storage node | |
| Storage node address | Nginx Bind address |
The primary IP address and port number of the storage node. It will be used to upload data (namely cabinets and the Backup Register) to the storage node. The recommended port is 443 TCP. If you want the system to use all available IPs (interfaces) with the with the specified port, select All. |
| External addresses for data transfer | External addresses (for Nginx) |
The IP address (or hostname) and port number that will be used by Backup Managers for data transfer to and from the storage node. Advice: if the Backup Manager is installed in the same network as the storage node, you can speed up data transfer by entering several addresses. Avoid using the same external IP address for two or more servers in a local network (it can result in connectivity issues). |
| Remote connection address | Web RCG internal address |
The primary IP address and port number that will be used to establish remote connections to backup devices. The default port is 2999. If you want the system to use all available IPs (interfaces) with the specified port, select All. |
| External addresses for remote connections | Web RCG external address | The external IP address and port number that will be used to establish remote connections to backup devices. |
| Remote connection address for legacy backup clients | RCG internal address |
The primary remote connection IP address and port number for legacy backup clients running Backup Manager vs. 13x or earlier. The default port number is 1999. If you want the system to use all available IPs (interfaces) with the specified port, select All. |
| External addresses for remote connections to legacy backup clients | RCG external address |
The external IP address and port number for remote connections to legacy backup clients running Backup Manager vs. 13x or earlier. The default port is 1999. Advice: you can use the same IP address and port number combination that you provided in "External addresses (for Nginx)". |