Installing the Recovery Locations recovery service on an ESXi Host Server requires additional configuration during the setup of the environment:
Configuration
It is important to follow the installation steps in the order below.
- Sign in to the Management Console using a SuperUser account.
- Navigate to Continuity > Recovery Locations
- Click Add recovery location at the top of the page
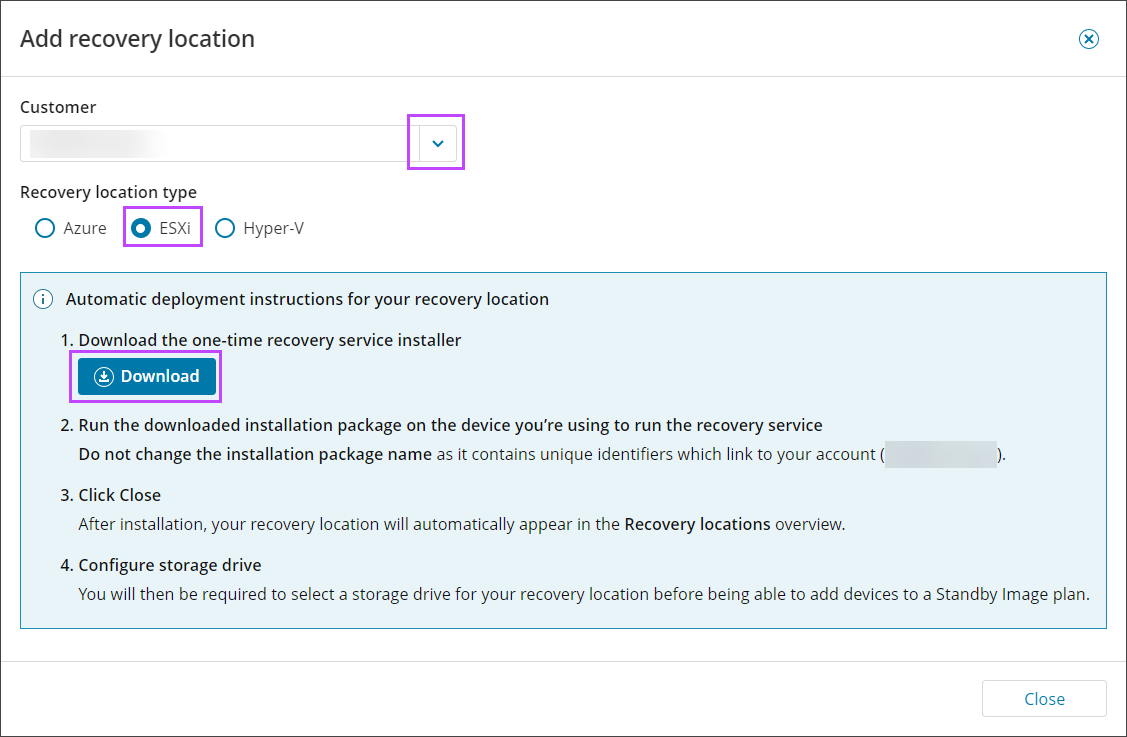
- In the Add Recovery Location wizard, select the customer to attribute the recovery location to from the dropdown
- Select ESXi as the recovery location type
- Download the recovery service installer
Do not change the installation package name. The installation package name contains unique identifiers to your account.
This is a one-time installer and can only be used to install a single instance of the recovery service. The installer will fail if you attempt to use the same package for another installation.
Do not run the installer at this point, there are additional changes that are required first.
If you want to restore to Local VMDK format go now to Step 4. As you will not restore to an ESXi server, is not obligatory to configure vSphere Client user and Virtual Machine in vCenter.
- Login to the vCenter Server by using the vSphere Client
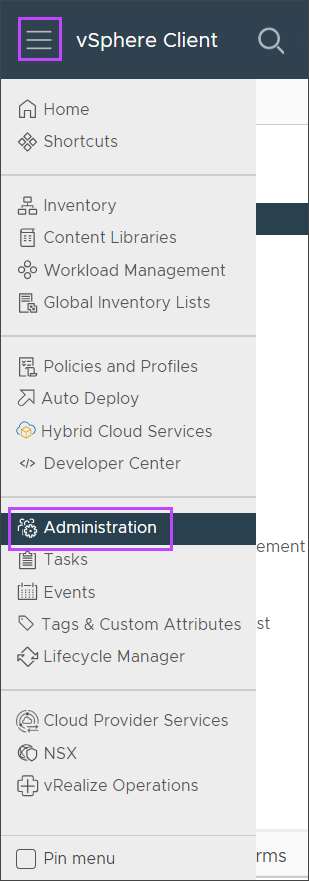
- Open the menu and navigate to Administration
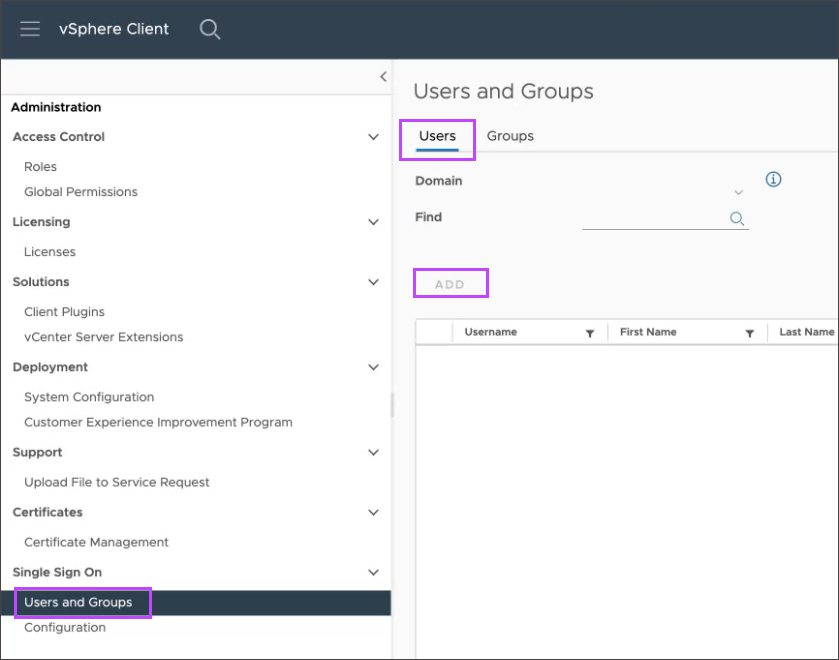
- In the Users and Groups page, select the Users tab and click Add
- Fill in the user details and Save the new user
- Once the new user has confirmed access, assign the Administrator role to the user
The user must be assigned the Administrator role for Standby Image to ESXi to function appropriately. Do not use a custom role with lesser privileges.
There are two options for where to install the Recovery Service:
- Create a recovery location Virtual Machine within the ESXi server/host (recommended)
This option is recommended as performance is increased as data doesn't have to transfer over the network during the restore
To use this option, follow the instructions in Step 3: Create Recovery Location Virtual Machine
- If you have multiple vCenter servers and want to restore to multiple ESXi servers/hosts directly (not to vSphere) it is recommended to create a recovery location on a dedicated server/host
This option doesn't require the server to be stored anywhere but it must have access to vSphere
To use this option, skip straight to Step 4: Install Recovery Service On VM
- In the vCenter Server now navigate to Inventory in the menu
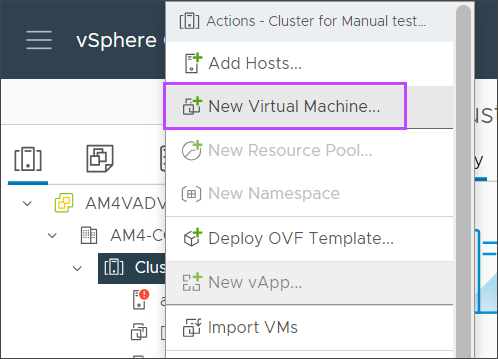
- Right click the cluster and select New Virtual Machine
- In the Creation Type list, select Create a new virtual machine then click Next
- Give the Virtual Machine a name and select a location for the virtual machine from the resource tree
- Click Next
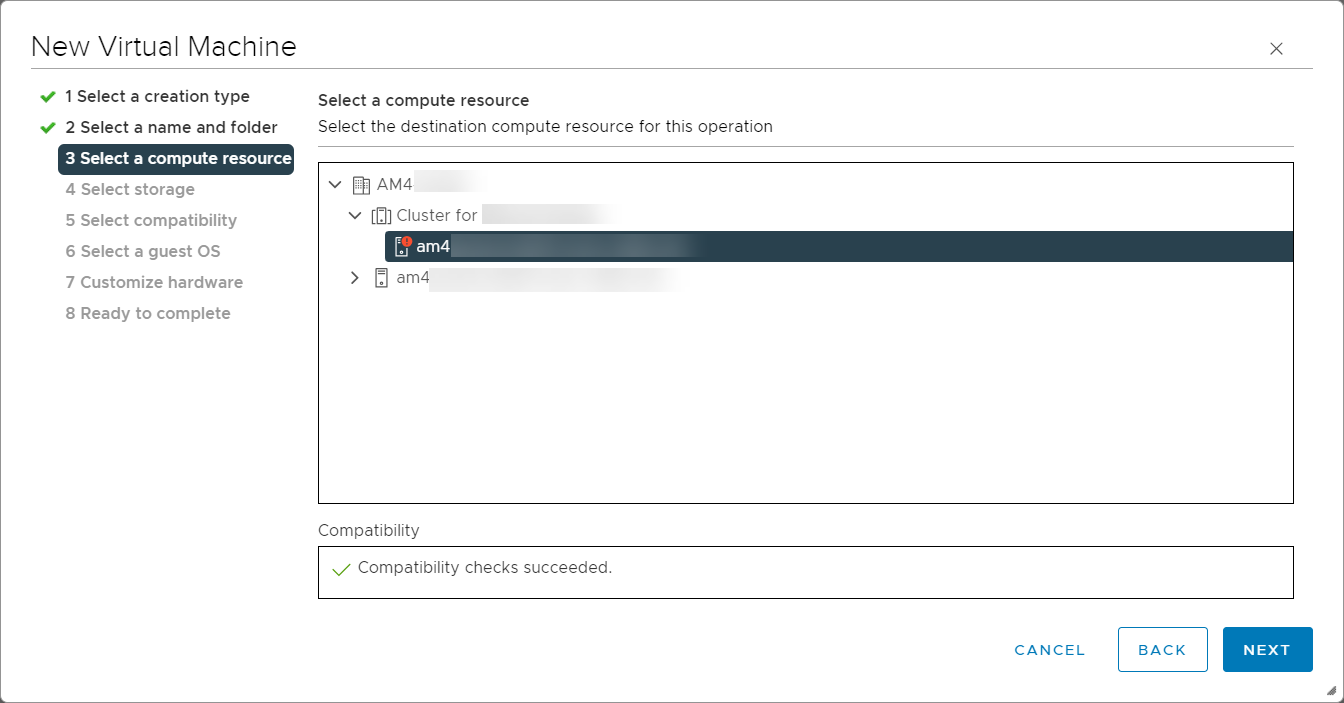
- From the resource tree, select a compatible destination compute resource and click Next
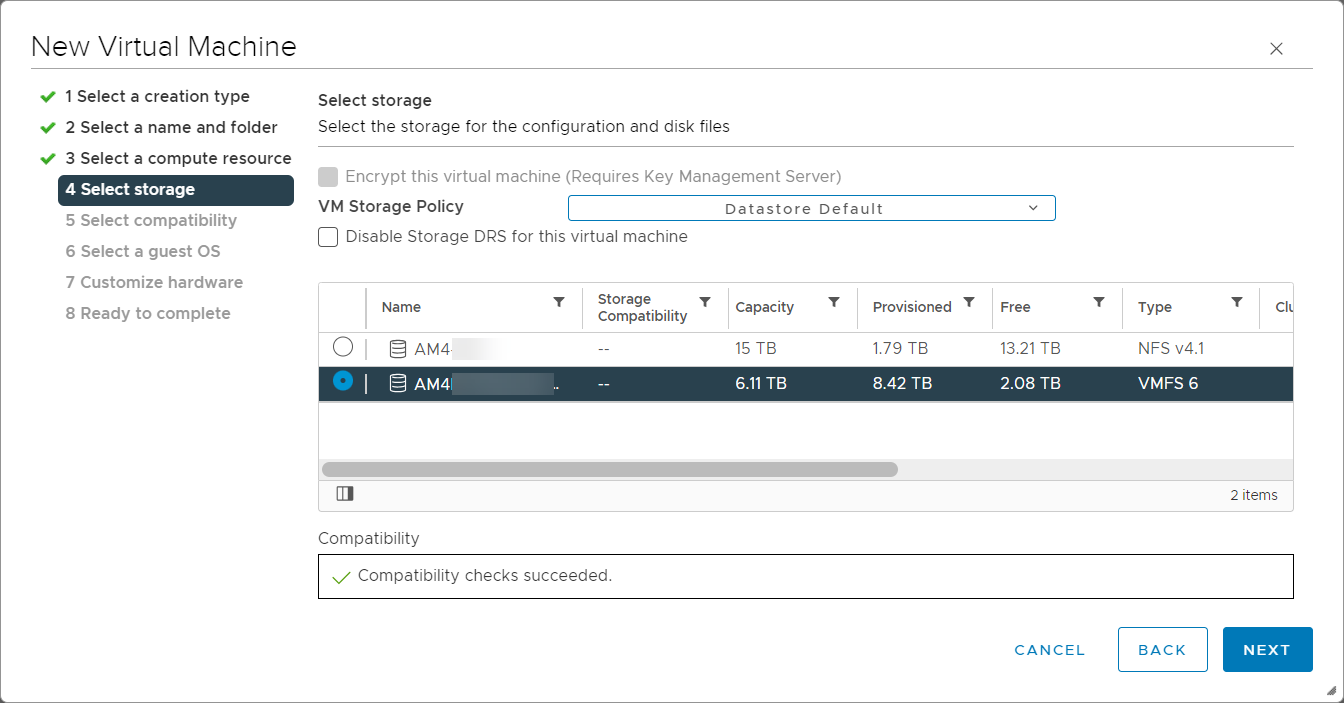
- Select the data store from the available options for the configuration and disk files and click Next
The selected storage must have enough capacity to run the restores and store Virtual Machine data
- Select the ESXi version to ensure the new Virtual Machine is compatible with the host in your environment and click Next
- Configure the guest Operating System from the dropdowns provided and click Next
Microsoft Windows Server 2019 is recommended
- Customize the virtual hardware as per our requirements:
See the Minimum Requirementsfor our default hardware configuration recommendations
It is possible to run multiple parallel restores so long as the virtual hardware is configured to handle this amount of traffic
- Click Next
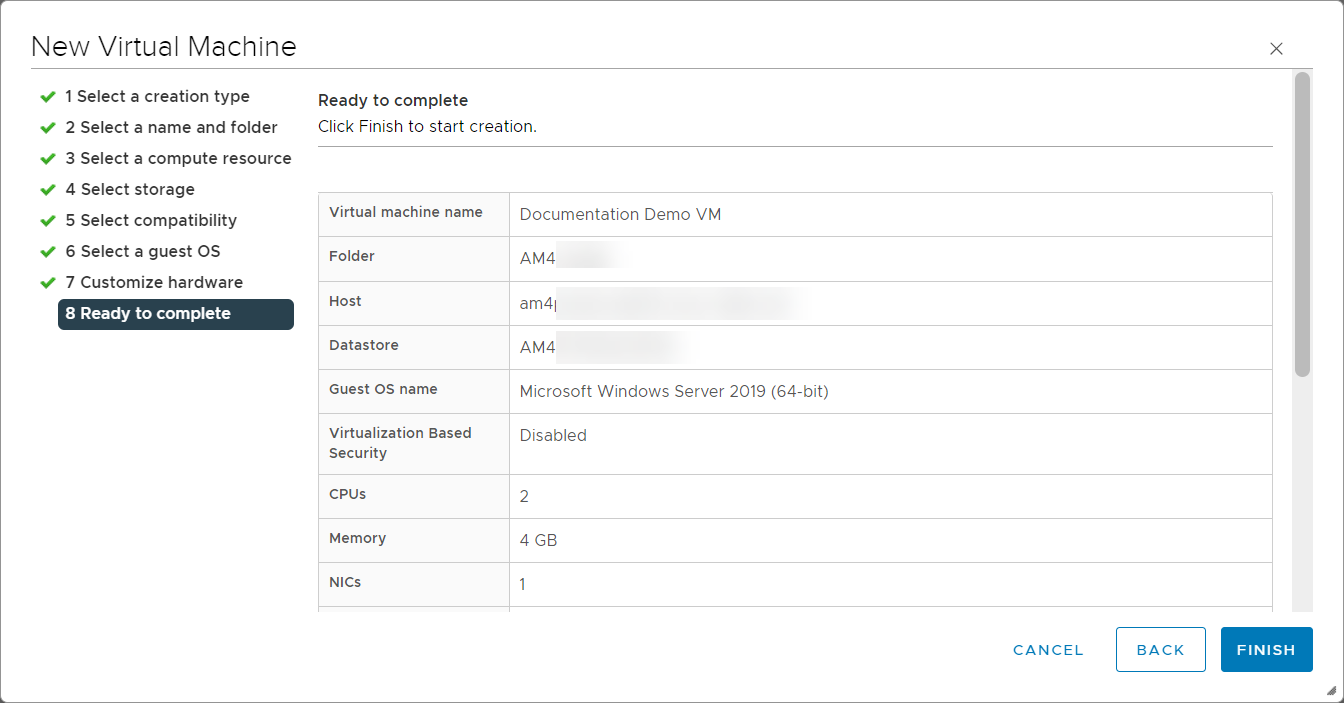
- Confirm the details of the new Virtual Machine and click Finish to begin creation of the new Virtual Machine
- Select the newly created Virtual Machine from Step 3 in the Inventory list, power it on and click Launch remote console or move to the dedicated server/host if restoring to the ESXi server/host directly
- Transfer the downloaded recovery service file to the machine
- Run the installation package
The recovery location will appear in the list on the Management Console after installation is complete
- Sign in to the Management Console using a SuperUser account.
- Navigate to Continuity > Recovery Locations
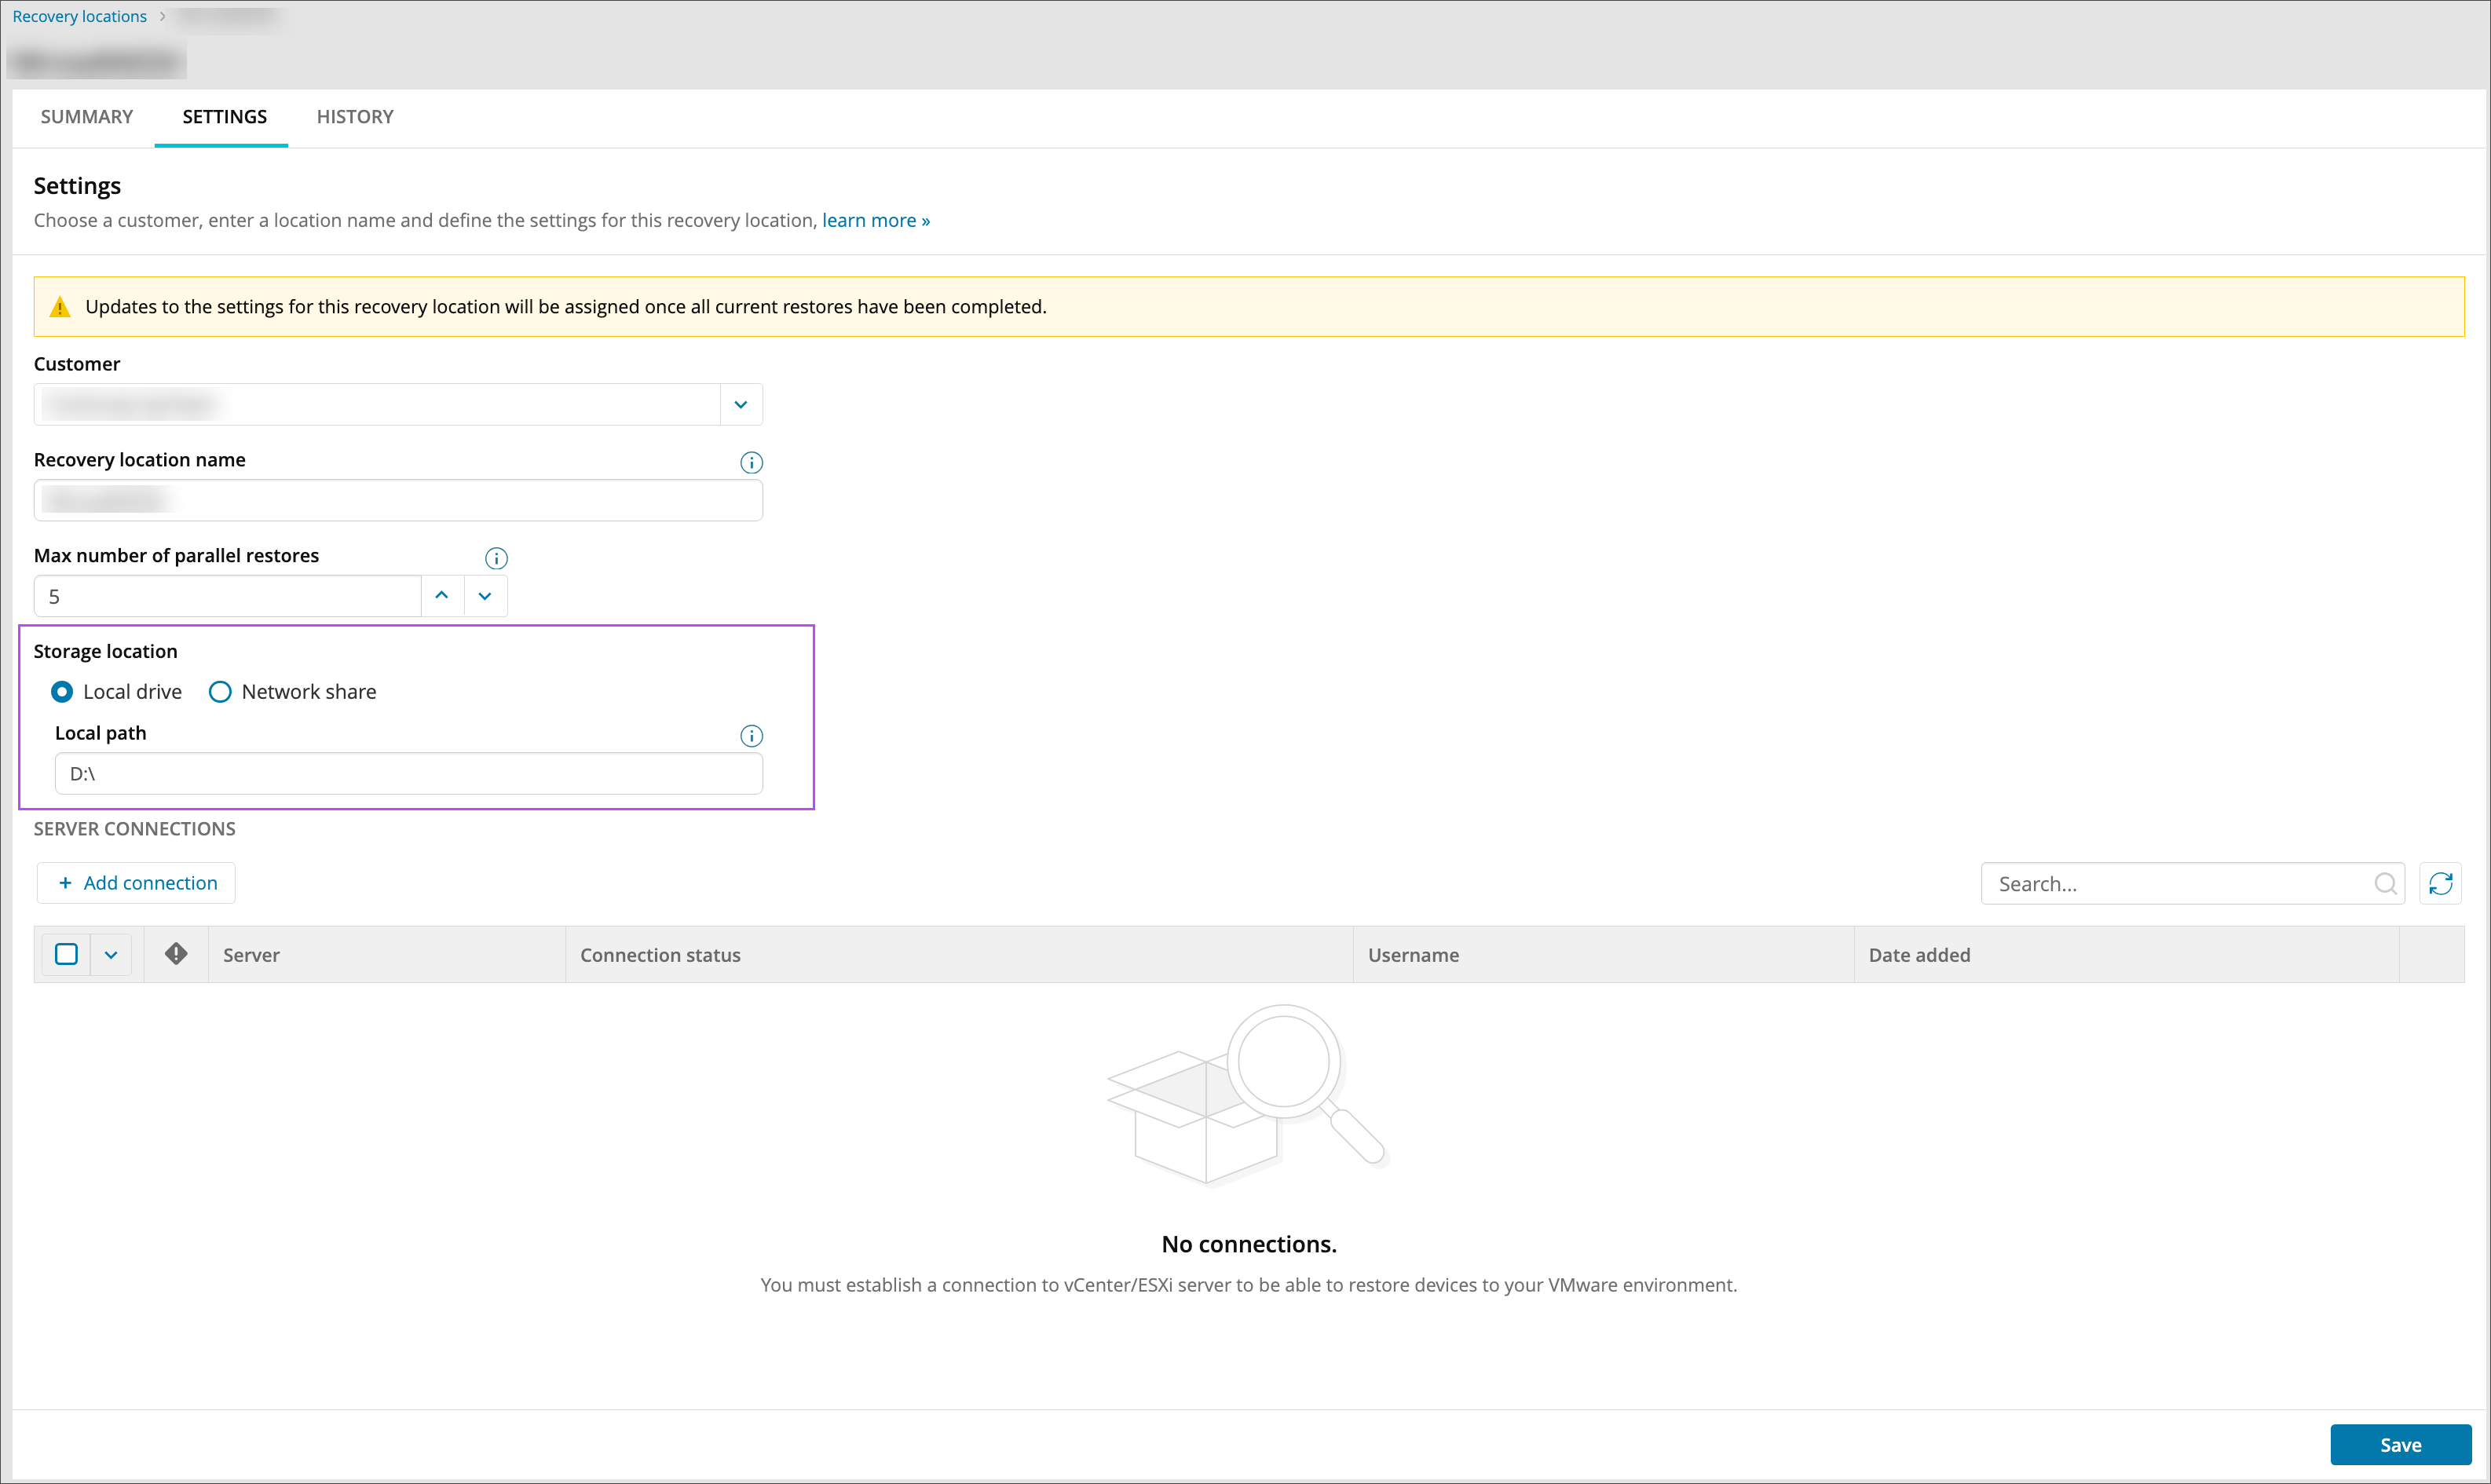
- Find the new recovery location in the list and click Add storage location
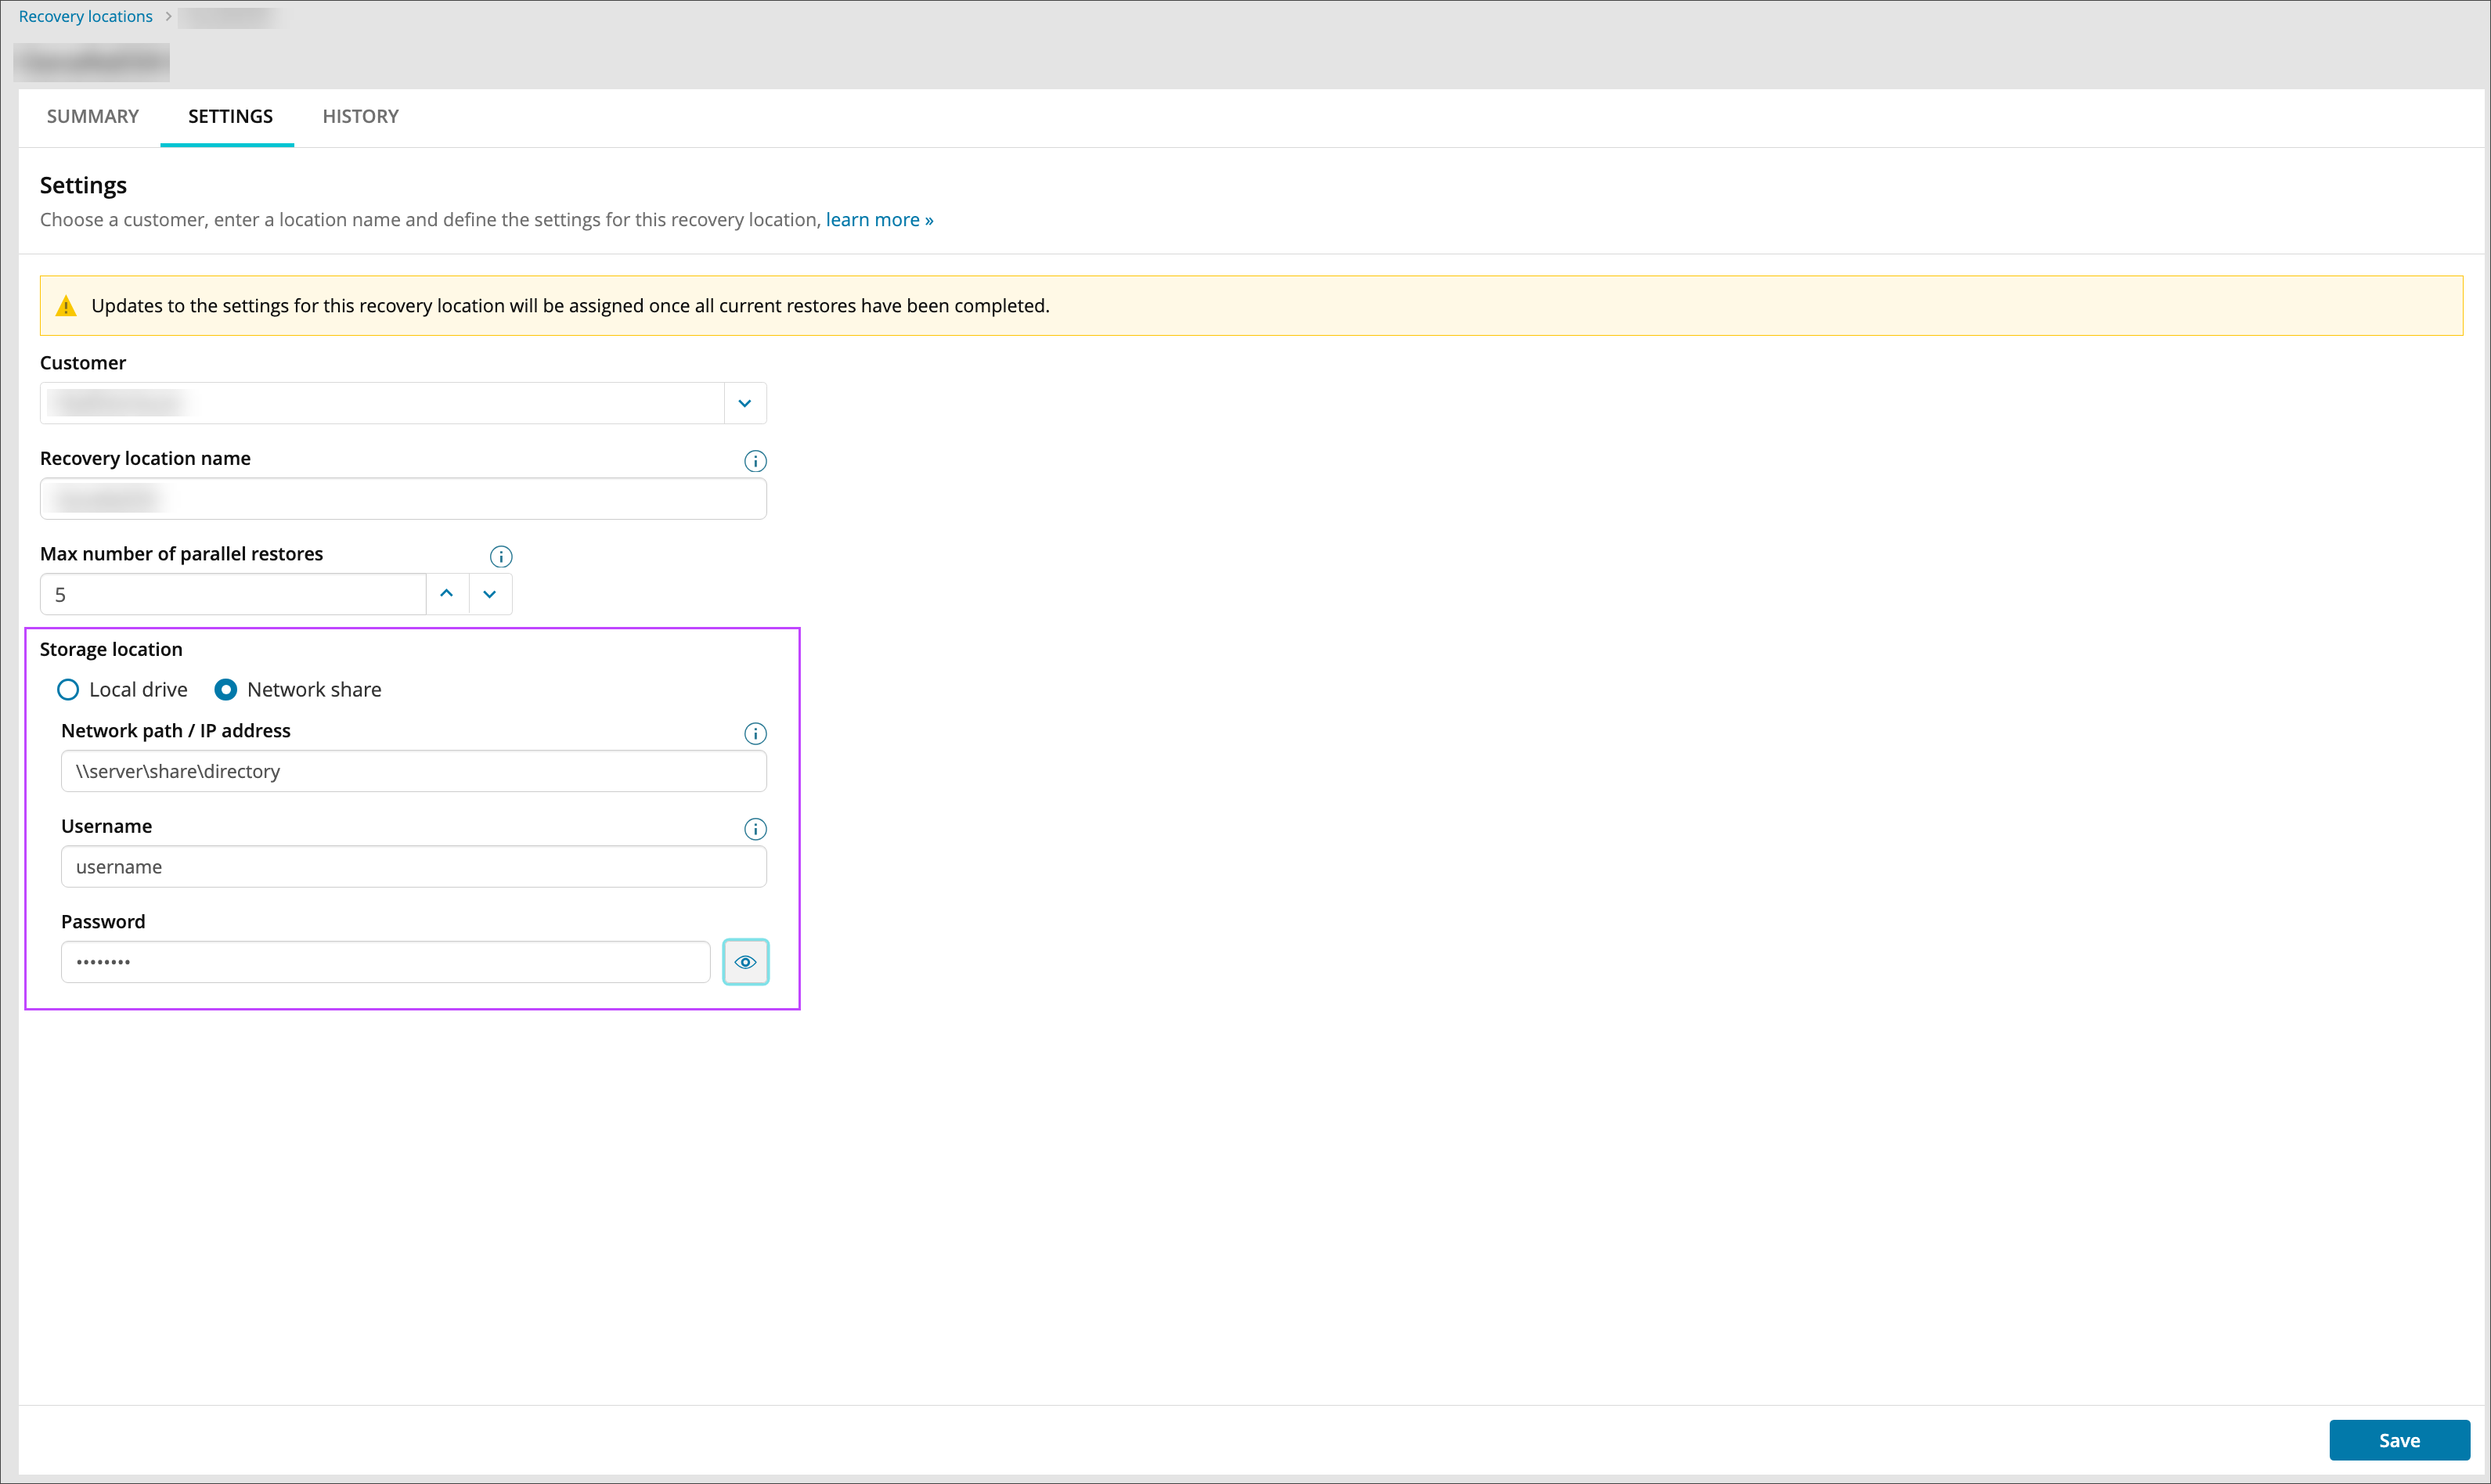
- Provide local file path for the storage location
- Local Drive (only available for Hyper-V and ESXi locations):
Without a storage location, connections cannot be made to any of the added servers. If you want to restore to Local VMDK is not obligatory to configure server connections. The VMDK file will be restored directly to the storage path, and not on the ESXi server.
- Network Share:
Recovery Locations using Network Shares will not see the option to configure any server connections as the restore will not be done on an ESXi server, and will be done on the Network Share to a Local VMDK restore format.
- Local Drive (only available for Hyper-V and ESXi locations):
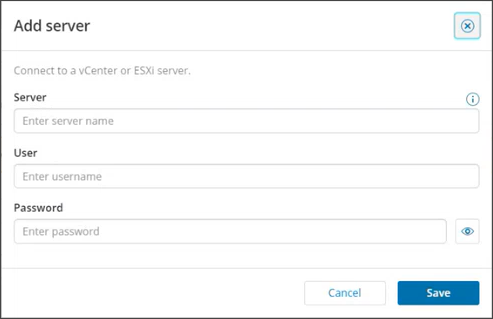
- Click Add Connection to connect to the vCenter or ESXi server
If using a connection to the vCenter server, you will be able to restore to any ESXi host connected to the vCenter server
- Enter the vCenter or ESXi server name or IP address, and your username and password for this
- Click Save
Multiple server connections can be added to the recovery location, but must be done one at a time. Doing so will allow you to connect and restore to several ESXi hosts which are not connected to one vCenter Server
You must click the refresh button to above the list of server connections to update the status from 'connecting' to 'connected'. The connection may take a few minutes.
Once the server connections are added, you may now add devices to the Standby Image to ESXi recovery plan by following the instructions in Enable Standby Image to ESXi


