Before starting a One-Time Restore to Hyper-V, ensure you have checked all requirements and limitations, including setting up a Recovery Location.
From Backup Dashboard
- Sign in to the Management Console using a SuperUser account.
- In the Backup Dashboard, tick the checkbox to the left of the device(s) to restore
- Click One-Time Restore

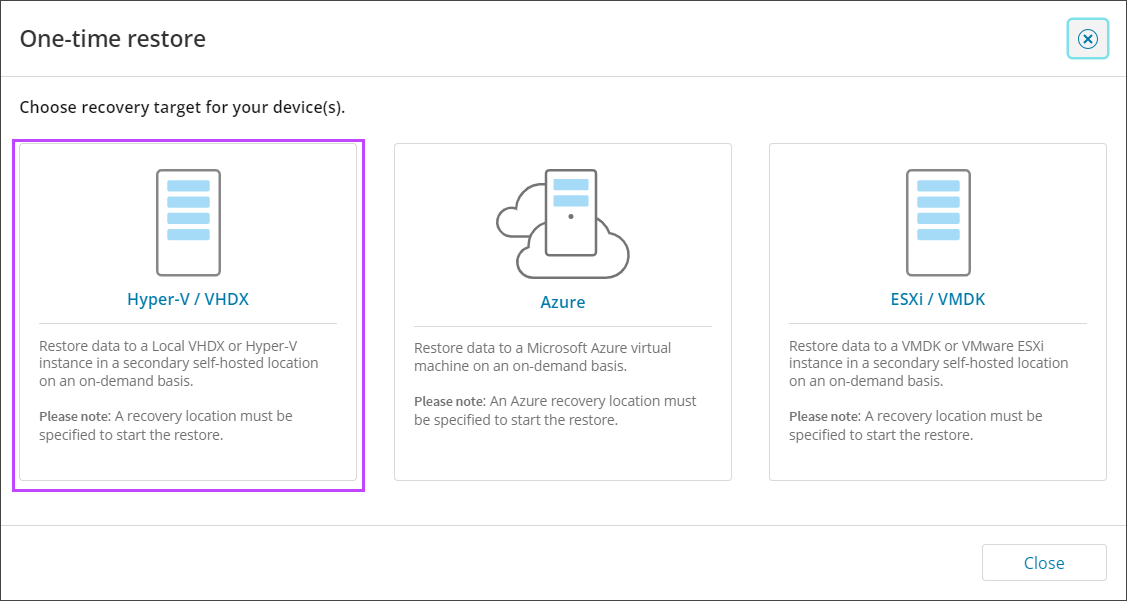
- Select the Hyper-V / VHDX / VHD target
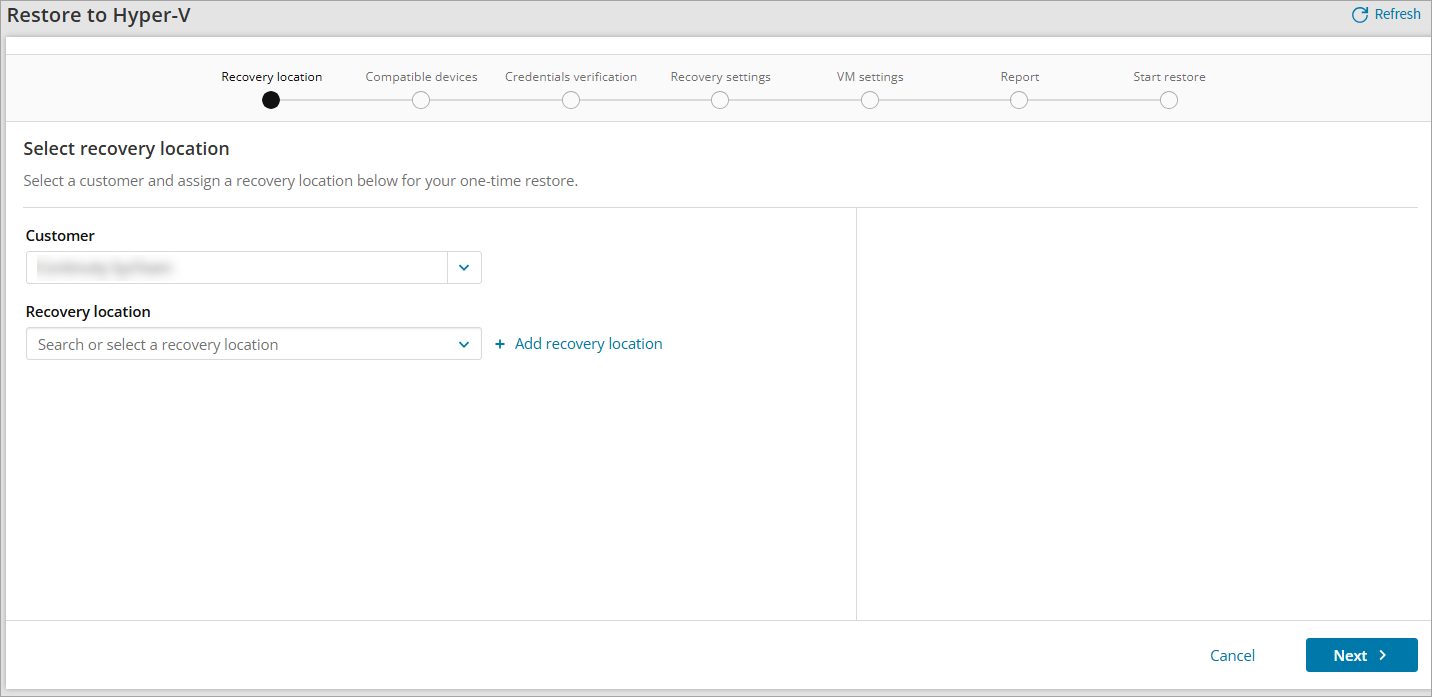
- Select the Customer
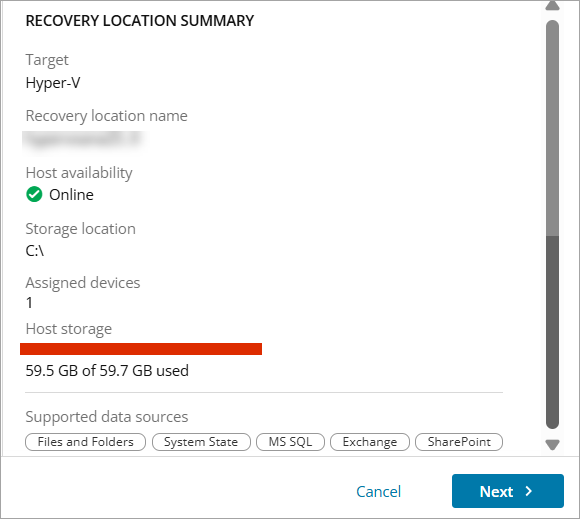
- Select the Recovery Location for the restore or click + Add recovery Location to follow the steps to create a new Recovery Location
You can see Recovery Location Summary in the sidebar.
- Click Next
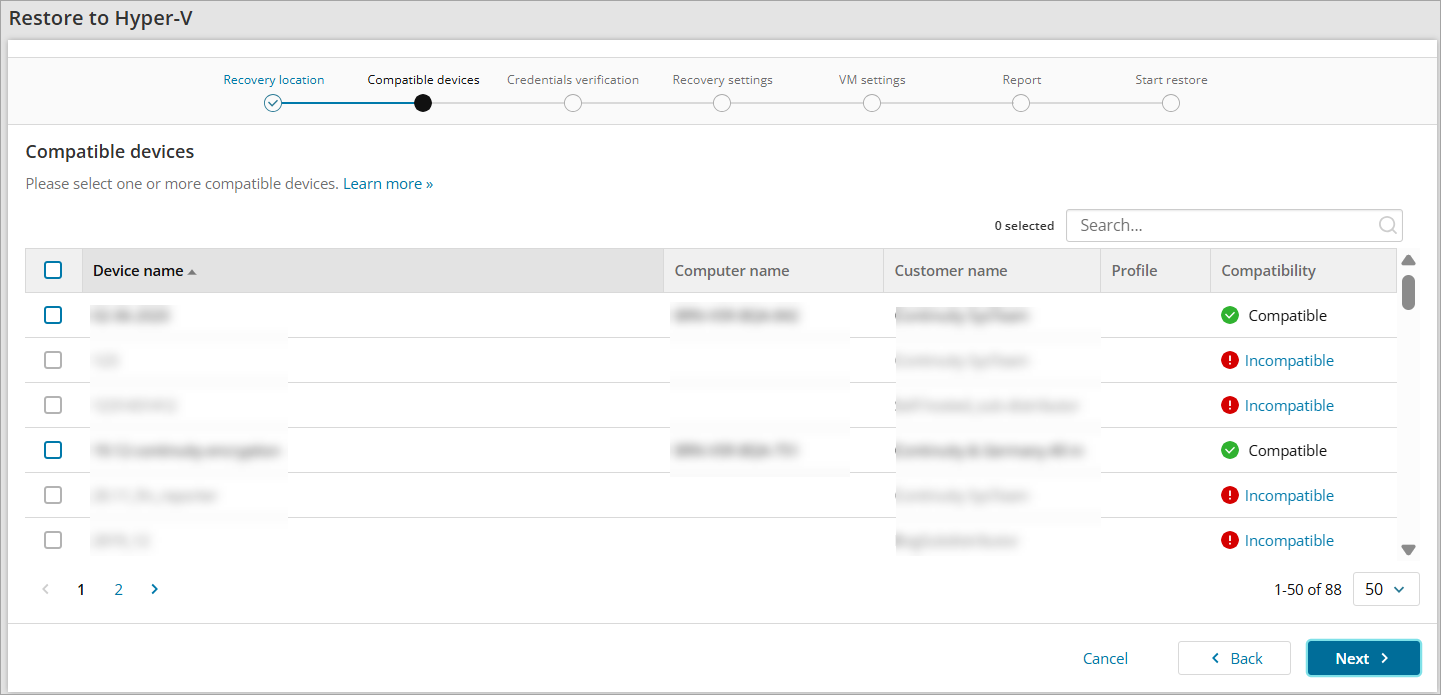
- Confirm compatibility of device(s) and click Next
- If the device(s) use Self-Managed encryption, enter the Encryption Key/Security Code. If the device(s) use Managed encryption, enter the Passphrase.
If you have lost the Encryption Key/Security Code for the device, you will need to Convert Devices to Passphrase-Based Encryption.
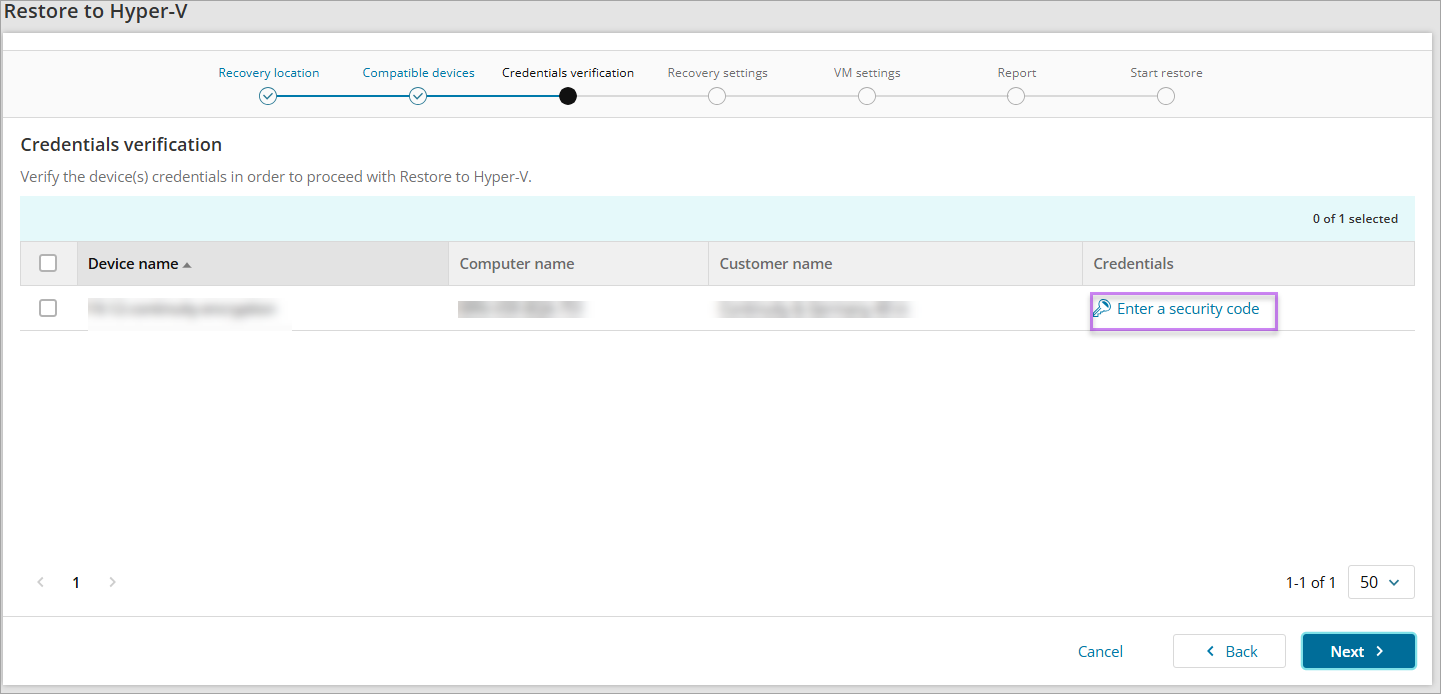
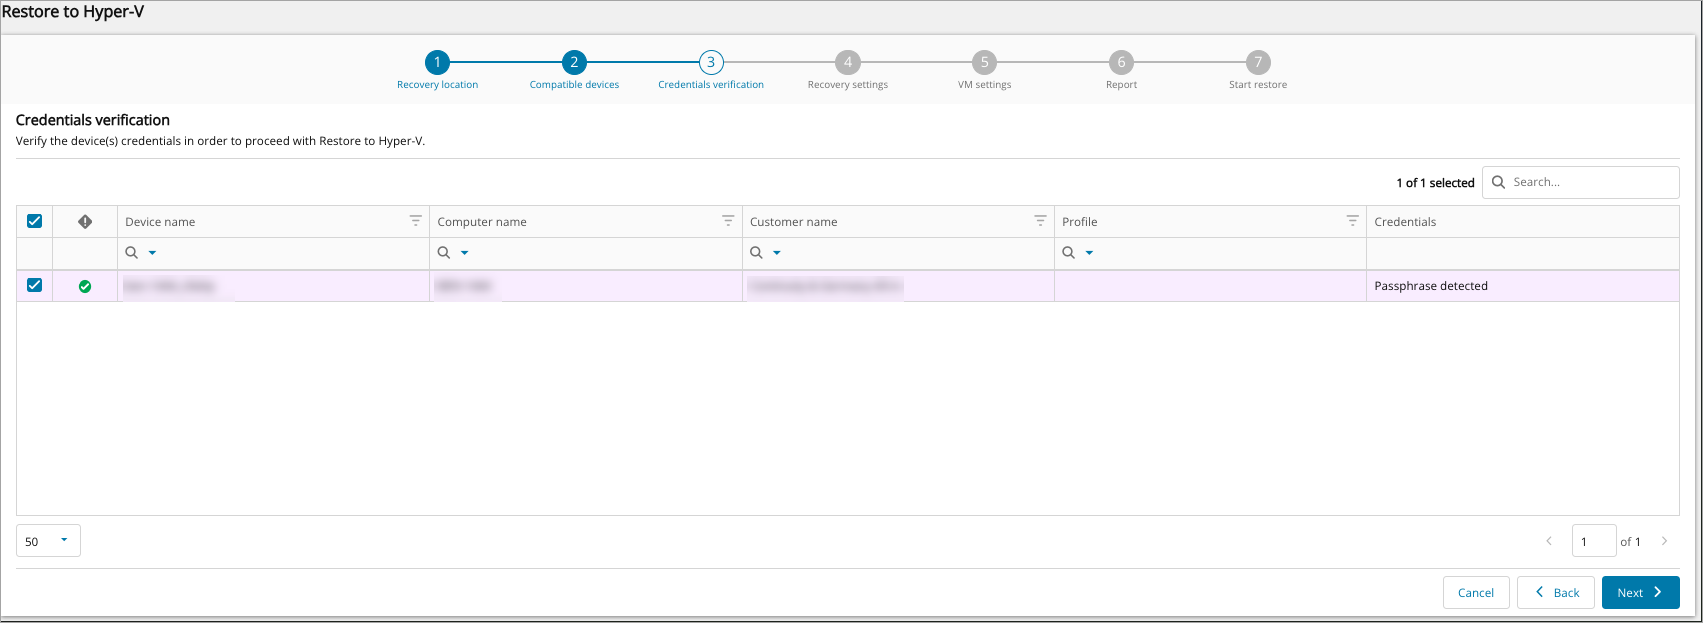
If you are logged in as a security officer, this will be detected automatically.
- Click Next
- Select the date and time of the backup session to restore
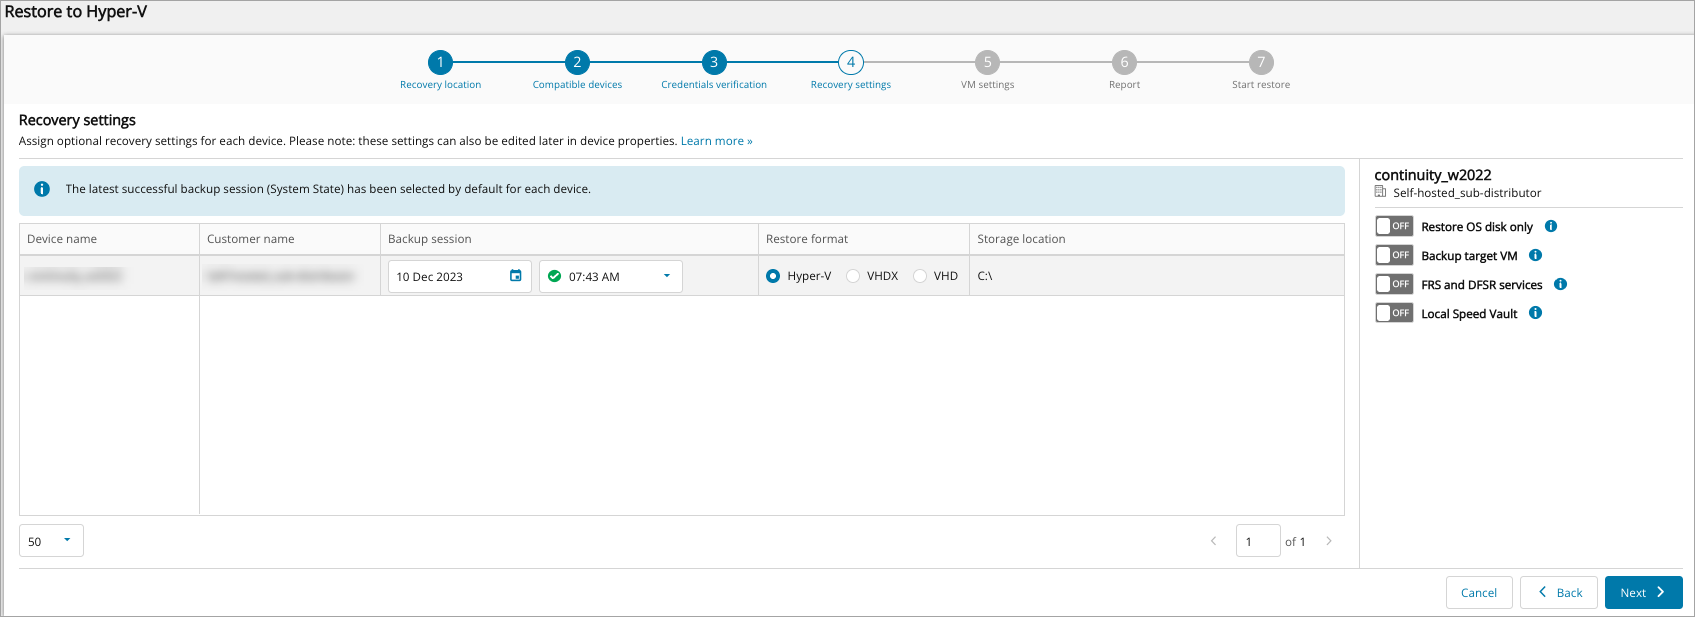
During this step, all available sessions for all devices listed will be loaded in the backup session column. Please allow time for these to load, if the load of sessions fails, a message stating so will be displayed with a refresh button to try again.
If the Backup Target VM option is enabled for one or more devices, be aware that if the backup agent is still running in backup mode on the source VM, this will lead to corrupted backup data for both the source and target VMs.
- Choose the restore format:
- Hyper-V: Ready-to-run virtual machine. Allows you to start the system immediately after recovery and resume the operations in a virtualized environment.
- Local VHDX: Modern Virtual Hard Disk v2 file. Recommended for modern Hyper-V environments, it supports large disk sizes and better reliability. Requires manual attachment to a VM before use.
- VHD - Legacy Virtual Hard Disk v1 file. Useful for compatibility with older tools and other hypervisors. Limited to a maximum size of 2TB. Must be manually attached to a VM for use.
- Configure the Recovery Settings for the restore format selected:
- Hyper-V settings:
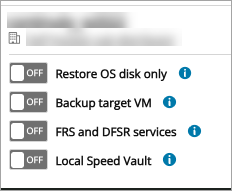
- Restore OS disk only - Restoring the OS disk only will speed up restores
- Backup target VM - Continuing to backup your target VM will protect the device according to its existing backup schedule
- FRS and DFRS services - If you are restoring Active Directory with multiple domain controllers, you should change the FRS and DFSR services to authoritative in the domain controller that will be started in the first place. Avoid marking several FRS/DFSR services as authoritative in the production environment as it can result in data loss. When the feature is on, the FRS and DFSR services are started on the target VM in the authoritative mode. The NETLOGON and SYSVOL shares become available, so the Active Directory and DNS services become functional again
More information about FRS/DFSR is available in the Microsoft Knowledge Base. Article IDs: KB2218556 and KB290762
- LocalSpeedVault - If a LocalSpeedVault (LSV) is enabled on a backup device, the data is sent to both the LSV and the cloud or private storage location. During a restore, data is automatically downloaded from the LSV first to the local device which makes restore faster. If the LSV is not available or not synchronized, the restore data will be pulled from the cloud or private storage location. This takes place automatically and cannot be reconfigured
- VHDX/VHD settings:
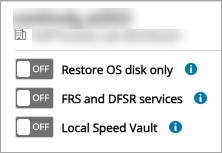
- Restore OS disk only - Restoring the OS disk only will speed up restores
- FRS and DFRS services - If you are restoring Active Directory with multiple domain controllers, you should change the FRS and DFSR services to authoritative in the domain controller that will be started in the first place. Avoid marking several FRS/DFSR services as authoritative in the production environment as it can result in data loss. When the feature is on, the FRS and DFSR services are started on the target VM in the authoritative mode. The NETLOGON and SYSVOL shares become available, so the Active Directory and DNS services become functional again
More information about FRS/DFSR is available in the Microsoft Knowledge Base. Article IDs: KB2218556 and KB290762
- LocalSpeedVault - If a LocalSpeedVault (LSV) is enabled on a backup device, the data is sent to both the LSV and the cloud or private storage location. During a restore, data is automatically downloaded from the LSV first to the local device which makes restore faster. If the LSV is not available or not synchronized, the restore data will be pulled from the cloud or private storage location. This takes place automatically and cannot be reconfigured
- Hyper-V settings:
- Click Next to configure the VM settings.
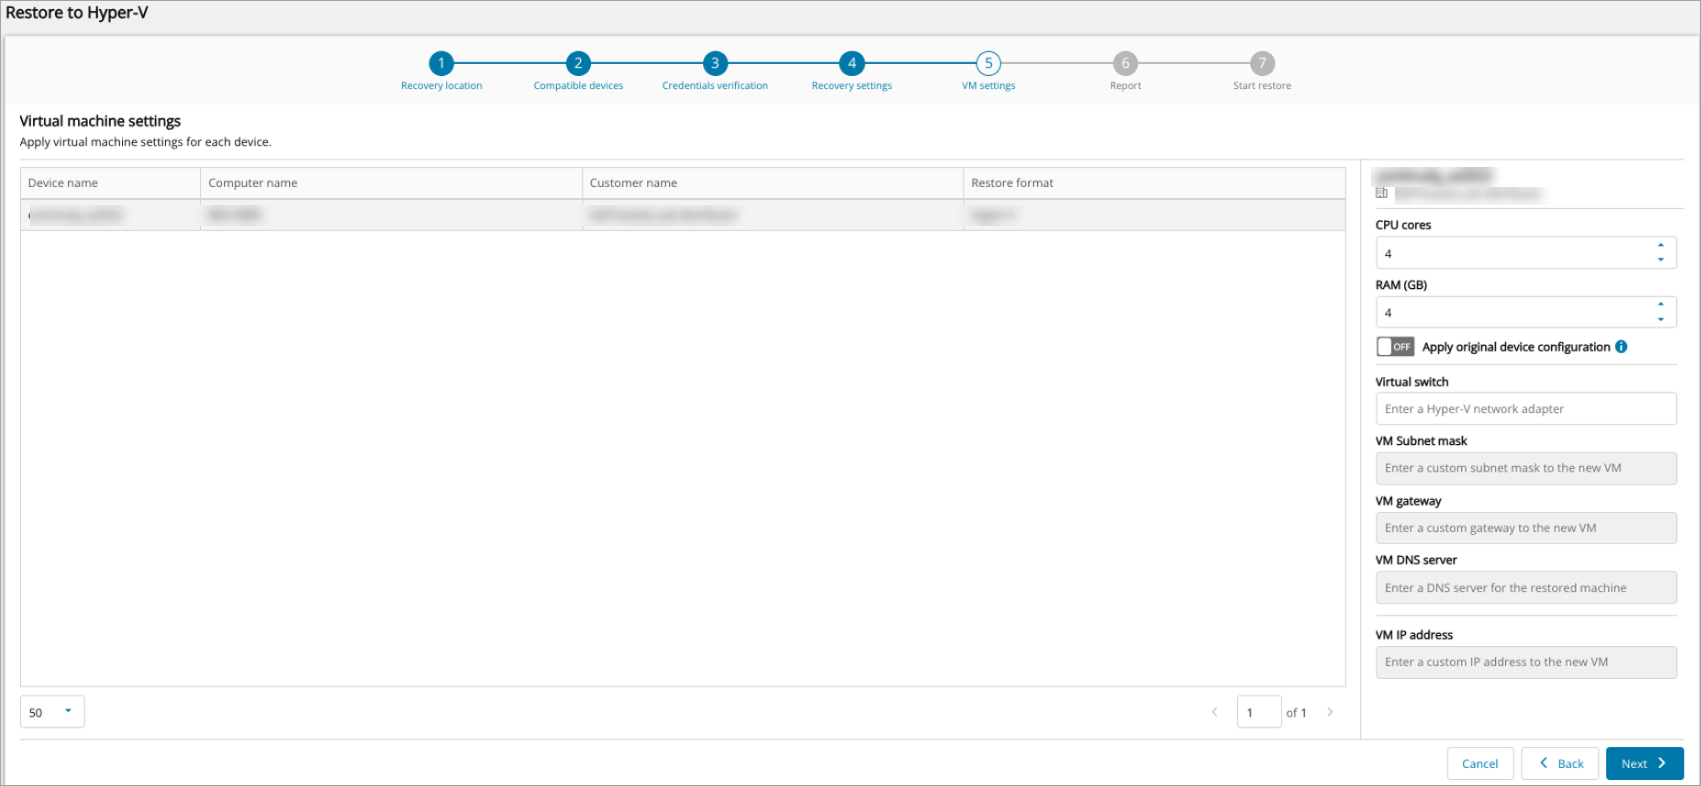
- CPU cores - Select the number of CPU Cores to be allocated to the new virtual machine
- RAM (GB) - Select the amount of RAM in Gigabites to be allocated to the new virtual machine
- Virtual Switch - Enter the Hyper-V network adapter that will be used by your new virtual machine
- VM Subnet mask - Assign a custom subnet mask to the virtual machine
- VM gateway - Assign a custom gateway to the virtual machine
- VM DNS Server - Assign the list of custom DNS servers (separated by comma), Example:
8.8.8.8 or 8.8.8.8,7.7.7.7
- VM IP address - Assign a custom IP address to the virtual machine
- Click Next to progress to the Report window to enter one or more email addresses to receive a report when:
- The recovery is complete (Successful or Failed)
- The recovery was successful
- The recovery failed
Multiple addresses should be separated using a comma or semi-colon
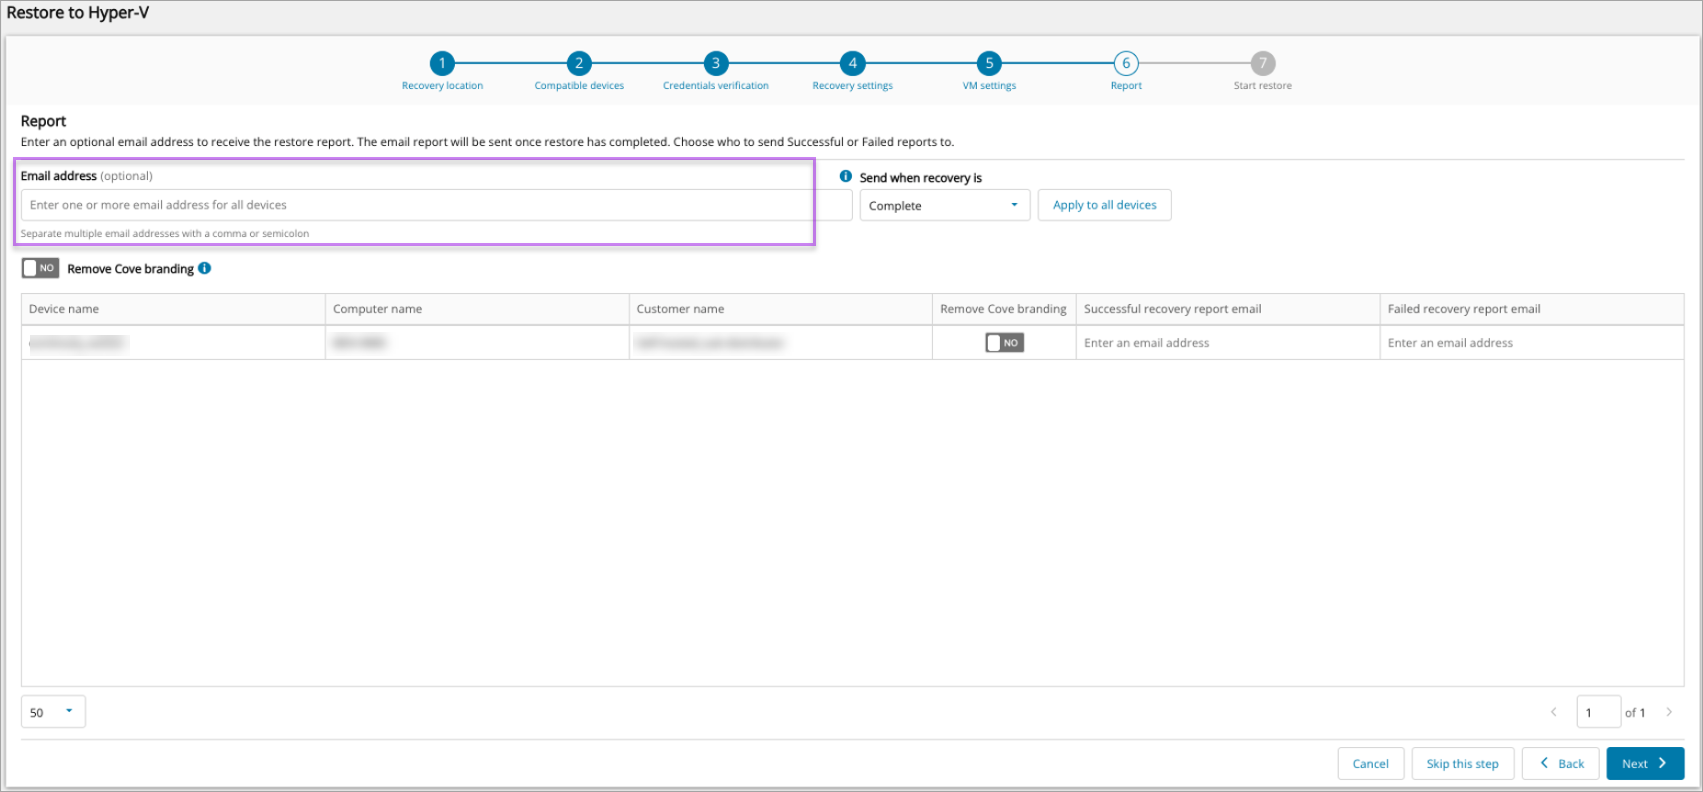
If you do not want to add an email address to receive reports, click Skip this step
- To remove all branding from the reports, use the Remove Cove branding toggle per device, or above the device list to apply the changes to all devices in this window

- Confirm initiating the restore for the device(s)
- Wait for the restore to be started until you see a confirmation banner on the page
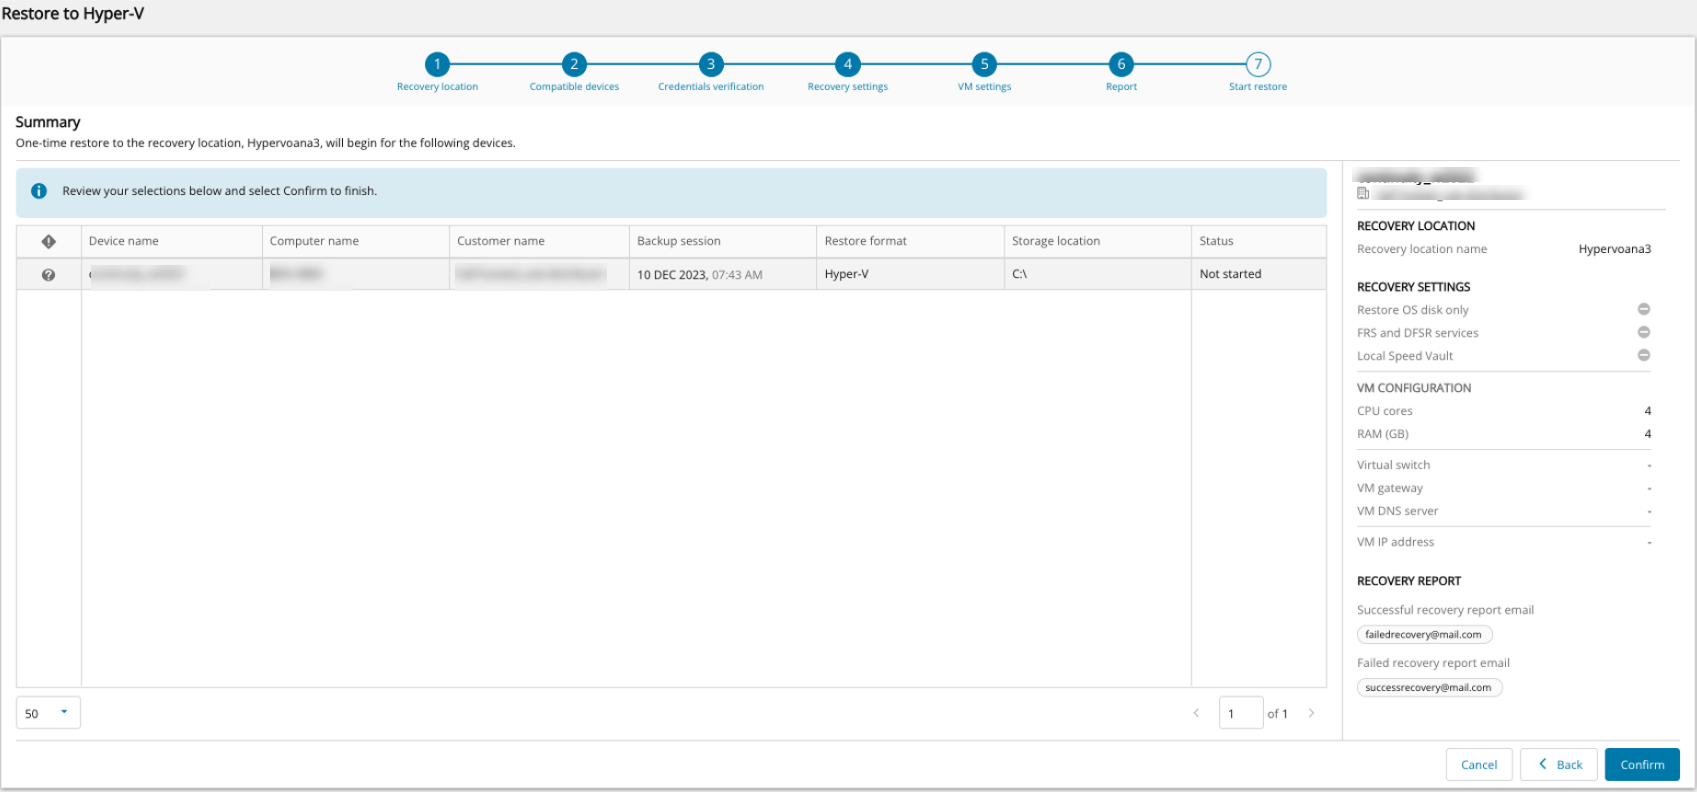
- Click Finish
From One-Time Restore Overview
- Sign in to the Management Console using a SuperUser account.
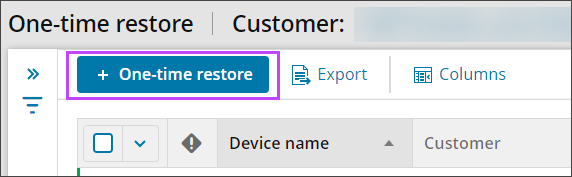
- Navigate to the One-Time Restore overview by selecting Continuity > One-time Restore from the vertical menu on the left hand side
- Click One-time restore from the top bar
- The wizard will open to target selection window, follow the above steps from Step #4 onwards
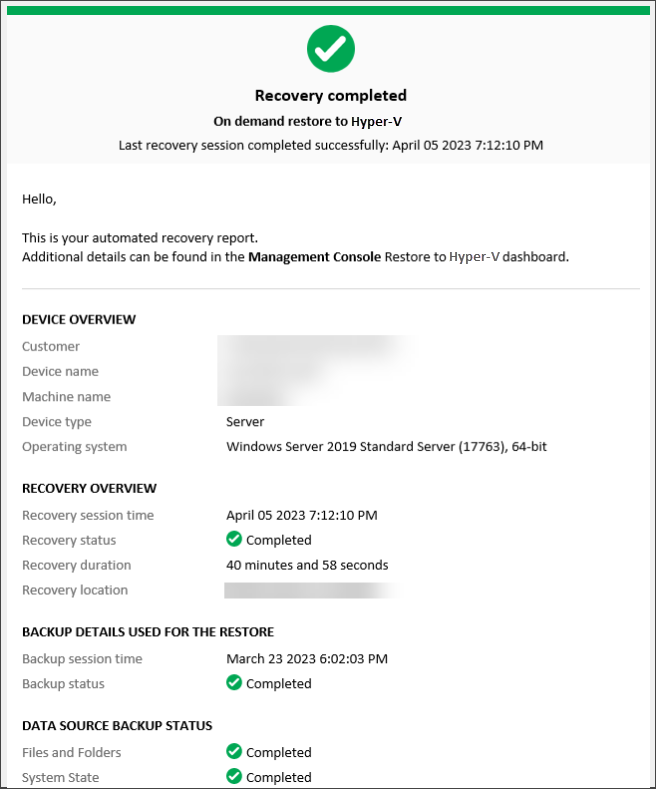
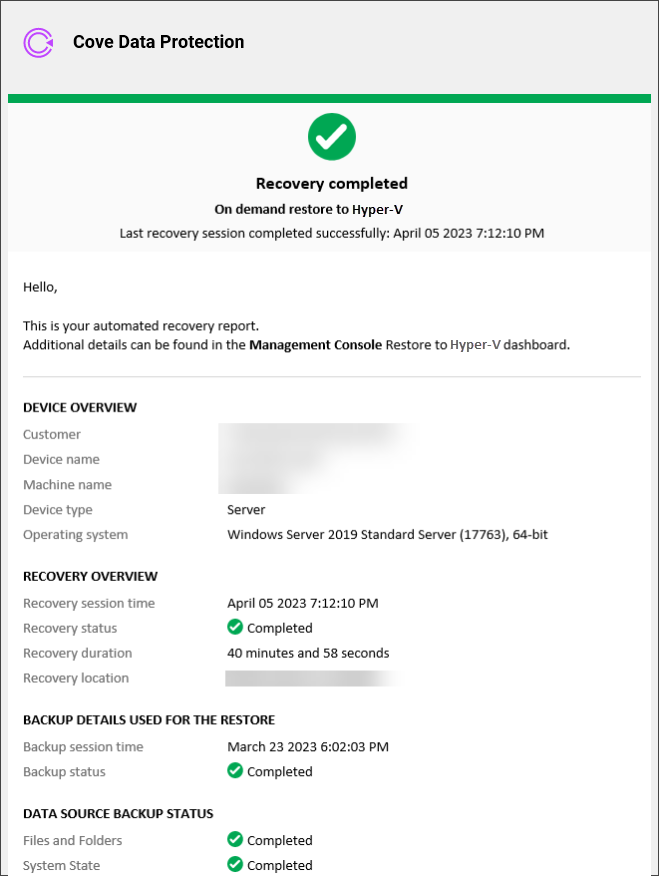
Recovery Reports
When the device(s) assigned to the plan have Successful recovery report email or Failed recovery report email recipient address(es) configured, and once the test has completed, those recipients will receive the report in their email inbox.Here is an example report with Cove branding:
Here is an example without Cove branding: