
We strongly do not recommend downgrading Backup Manager to a lower version after installation is complete. In cases where the Backup Manager has been downgraded, we cannot guarantee the application will function correctly.
System administrators can quickly install the Backup Manager on multiple machines using the Managed installation method (previously known as Automatic Deployment or quick installation).
This automates the operations for device creation, installation and setup on multiple machines.
A single executable file supports multiple installations for the specified customer.
Managed Installation is available on Windows, macOS and Linux operating systems.
Requirements
- A SuperUser account is required at the Reseller or End Customer level.
Please request assistance from your service provider if your access permissions are insufficient.
- The Automatic Deployment option must be enabled at the customer level. See Enable Automatic Deployment in Management Console for further details.
Instructions
Step 1: Add device
Adding devices for installation:
- Sign in to the console under a SuperUser account belonging to a Reseller or End Customer.
- Click Add devices, select Servers and Workstations.
- Select the Customer to install the device for, from the drop down.
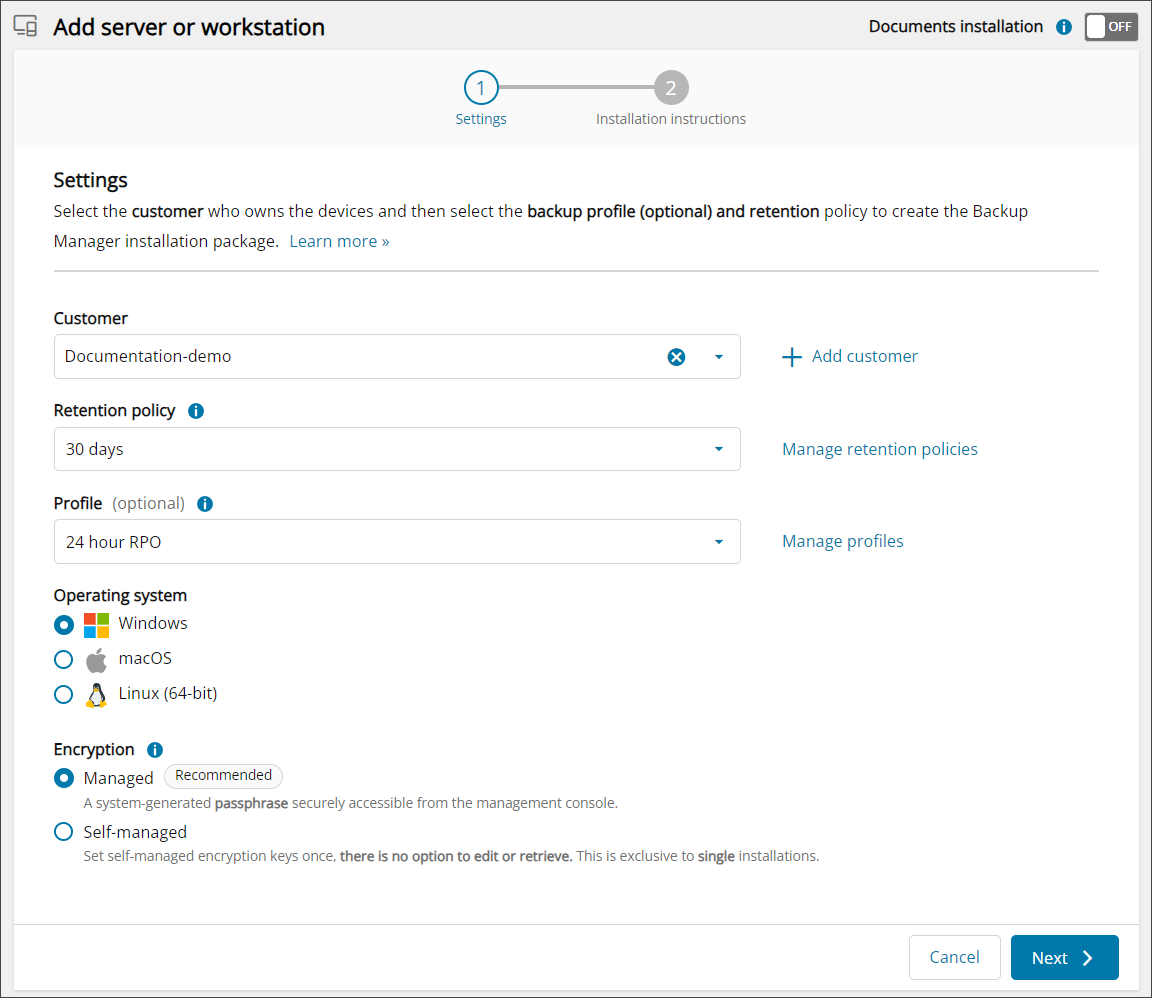
- Select a Retention Policy to apply to the device.
Classic Retention Policies (previously created Products) may also be used, though we would recommend switching to New Retention Policies at your earliest convenience. See Retention Policies for full details.
- Select a Profile to apply to the device.
This is optional. If none is selected, the default is a 24 Hour RPO.
See Profiles for full details.
- Select the Operating System:
- Windows
- macOS
- Linux (64-bit)
- Select the ManagedEncryption method.
- You can also set installation options in Advanced settings:
- Optionally, specify a device name. If you do, the Number of Devices field is disabled.
- To set an installation deadline, select a date in Installer Expiry Date.
- To set how widely the software is deployed, specify the Number of Devices to install the software on. You can specify up to 100 devices.
- Click Next
- Confirm the settings, then Download the Backup Manager installer for the device(s)
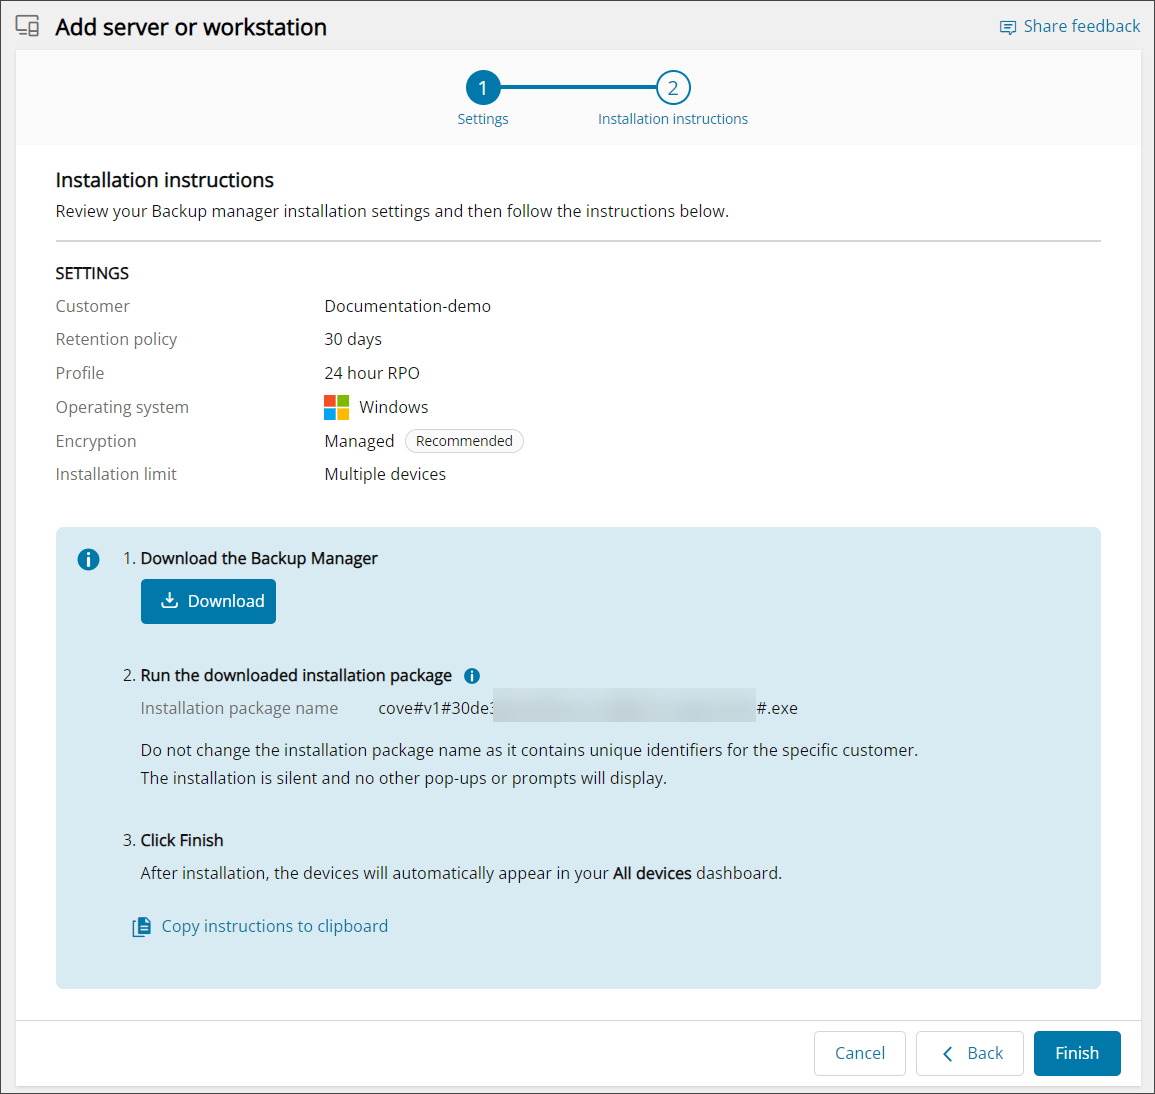
A single executable file supports multiple installations for the specified customer.
Do not change the name of the installation package. It contains unique information relating to the installation.
- Click Finish.
- Run the Installation package on the device(s) where the backup is required.

If the installer doesn’t run after downloading, check the file’s properties to make sure it hasn’t been blocked by your system. You can also try running it as an administrator.
The installation runs silently, so no additional pop-ups or prompts appear on the device.
Step 2: Run the installer
To run the installation package, do one of the following:
- Double-click the installer executable.
- Enter the name of the installer in a command line, terminal emulator or a software distribution system. For example:
cove#24.10.102#ab1234c5-67d8-9ef0-g1h2-i34j56k789lm#.exeorcove#24.10.102#ab1234c5-67d8-9ef0-g1h2-i34j56k789lm#.run
The installation runs silently, so no additional pop-ups or prompts appear on the device.
Do not change the name of the installation package. It contains unique information relating to the installation.
Optional: Include Additional Parameters (Windows and Linux)
On Windows and Linux devices you can run the installation command with additional optional Proxy parameters if required.
Proxy Settings Parameters
| Windows Parameter | Linux Parameter | Description | Supported Values (Windows) | Supported Values (Linux) |
|---|---|---|---|---|
-use-proxy
|
--use-proxy
|
This setting prompts the Backup Manager to connect to the Internet through a proxy server. |
|
|
-proxy-type
|
--proxy-type
|
The type of the proxy server |
|
|
-proxy-address
|
--proxy-address
|
The host name or IP address of the proxy server | IP address or host name, for example 192.188.33.55 or some.server.com |
IP address or host name, for example 192.188.33.55 or some.server.com |
-proxy-port
|
--proxy-port
|
The port number of the proxy server | Number (0 by default) | Number (0 by default) |
-use-proxy-authorization
|
--use-proxy-authorization
|
Prompts the Backup Manager that the proxy requires authorization by username. |
|
|
-proxy-username
|
--proxy-username
|
A username for access to the proxy server | Text, for example domain\username or username |
Text, for example domain\username or username |
-proxy-password
|
--proxy-password
|
A password for access to the proxy server | Text | Text |