Restore-only installation steps
If you want to install the device in restore-only mode, installation is done through an interactive installation process.
- Log in to the system as a root:
- Download the RUN installer suitable for your distribution from the Management Console's Downloads page:
- Grant the installer execute permissions:
- If required, you may change the predefined installation folder:
- Start the installer without additional installation parameters:
- You will be asked to provide parameters for the installation including device name, installation key (previously known as password) and Encryption Key/Security Code or Passphrase
- If a previous installation is detected for the device details given, you will receive a message stating:
- u: use contract for normal backup install
- a: abort the configuration
- R: install device using restore-only mode
- Select R here for Restore-Only mode installation
- Allow the installation to complete, this will display -- Done once finished
% sudo -i
# wget https://cdn.cloudbackup.management/maxdownloads/mxb-linux-i686.run
# chmod +x mxb-linux-i686.run
By default, the Backup Manager is installed to /opt/MXB. If you wish to install the software to the /usr mount (for example because it has more free space), you should create symlinks for it. For example:
# ln -s /usr/local/MXB /opt/MXB
# ./mxb-linux-i686.run
The device name and installation key can both be found in the Settings tab of the device in the Management Console.
You can either use this contract, abort configuration or install application in restore only mode [u/a/R]:
Enable Restore-Only Mode
If you have installed Backup Manager on the device using the normal Backup Manager Restore-Only Mode - Linux above and wish to convert this normal version of backup to use restore-only mode, you can do this by following the below steps:
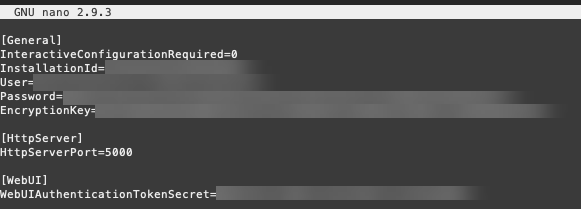
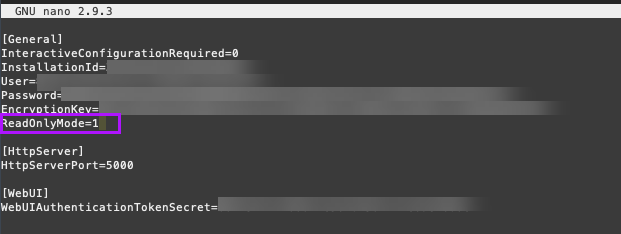
- Open the config.ini file. The following example command with Nano installed will open the config.ini file for editing:
- Under the [General] section check for an instance of
RestoreOnlyMode=0 - If this exists change
=0to=1 - If this does not exist, add it as above to the [General] section
- Close the file by using Ctrl+X
- Save the changes to the file
- Restart the service using one of the following commands:
- Restart the service with systemctl:
$ sudo systemctl restart ProcessController
- OR restart with service:
$ sudo service ProcessController restart
- OR restart with SysV script:
$ sudo /etc/init.d/ProcessController restart
- Restart the service with systemctl:
sudo nano -w /opt/MXB/etc/config.ini


This is case sensitive so please ensure it is added correctly and without spaces.
Y

Disable Restore-Only Mode
If you have a device which has had Backup Manager installed in restore-only mode and you wish to convert this to a normal version of backup, this can be done by following these steps:
- Open the config.ini file. The following example command with Nano installed will open the config.ini file for editing:
- Under the [General] section check for an instance of
RestoreOnlyMode=1 - If this exists change
=1to=0or remove the line entirely - Close the file by using Ctrl+X
- Save the changes to the file
- Restart the service using one of the following commands:
- Restart the service with systemctl:
$ sudo systemctl restart ProcessController
- OR restart with service:
$ sudo service ProcessController restart
- OR restart with SysV script:
$ sudo /etc/init.d/ProcessController restart
- Restart the service with systemctl:
sudo nano -w /opt/MXB/etc/config.ini


Y

