
We strongly do not recommend downgrading Backup Manager to a lower version after installation is complete. In cases where the Backup Manager has been downgraded, we cannot guarantee the application will function correctly.
Some system administrators prefer using alternative installers instead of the recommended RUN installer. There are two alternative installers to chose from, the file format you need depends on your Linux distribution:
- DEB Instructions – This method is available for modern Debian and Ubuntu distributions
- RPM Instructions – This method is available for modern CentOS, RHEL and SUSE distributions
Both of the installers come in 32- and 64-bit versions.
Backup on devices using Operating Systems which are not officially supported may still work, but as we no longer test these versions, we cannot guarantee full functionality. In situations where the device cannot be upgraded to a supported OS, you may encounter issues with new features, or there may be abnormalities so please test the backup by doing a restore as soon as possible.
Precursor check:
Before beginning, check the bitness of your system first by running the following command in the command line of the device:
# uname -m
The response will be one of the following:
amd64for DEB - if you have a 64-bit DEB system you will require the amd64 installerx86_64for RPM - if you have a 64-bit RPM system you require the x86_64 installeri386- if you have an older 32-bit system you require the i386 installer
Installation steps
DEB Instructions
These steps detail running commands for a 64-bit system. If your device is a 32-bit system, replace amd64 everywhere below with i386
- Download the 32- or 64-bit installer from the Management Console's Downloads page
% wget https://cdn.cloudbackup.management/maxdownloads/mxb_~linux-1_amd64.deb
- Run the installer you have downloaded
# dpkg -i mxb_~linux-1_amd64.deb
- Run
configure-fp.shand submit parameters for the current installation. Additional parameters can be found in the Installation parameters on GNU/Linux pageDo not forget to enclose values containing spaces or punctuation inside quotation marks.
# /opt/MXB/sbin/configure-fp.sh --user="admin-ubuntu-3a" --password=f701a2ca3255 --encryption-key="SECUR_ITY2014a" --use-proxy=false
- If you submit without entering the parameters, you will be prompted to enter them one at a time at the next step
- Once all parameters have been entered the installer will run
RPM Instructions
These steps detail running commands for a 64-bit system. If your device is a 32-bit system, replace x86_64 everywhere below with i386
- Install the "libaio" library if you don't have it on your machine
- Download the 32- or 64-bit installer from the Management Console's Downloads page
% wget https://cdn.cloudbackup.management/maxdownloads/mxb_linux-1.x86_64.rpm
- Run the installer you have downloaded
# rpm -ihv mxb-linux-1.x86_64.rpm
- Run
configure-fp.shand submit parameters for the current installation. Additional parameters can be found in the Installation parameters on GNU/Linux pageDo not forget to enclose values containing spaces or punctuation inside quotation marks.
# /opt/MXB/sbin/configure-fp.sh --user="admin-ubuntu-3a" --password=f701a2ca3255 --encryption-key="SECUR_ITY2014a" --use-proxy=false
- If you submit without entering the parameters, you will be prompted to enter them one at a time at the next step
- Once all parameters have been entered the installer will run
# yum -y install libaio
Restore-only installation steps
If you want to install the device in restore-only mode, installation is done through an interactive installation process.
- Log in to the system as a root:
- Download the RUN installer suitable for your distribution from the Management Console's Downloads page:
- For DEB
% wget https://cdn.cloudbackup.management/maxdownloads/mxb_~linux-1_amd64.deb
- For RPM
# wget https://cdn.cloudbackup.management/maxdownloads/mxb_linux-1.x86_64.rpm
- For DEB
- Grant the installer execute permissions:
- For DEB
# chmod +x mxb_~linux-1_amd64.deb
- For RPM
# chmod +x mxb_linux-1.x86_64.rpm
- For DEB
- If required, you may change the predefined installation folder:
- Start the installer without additional installation parameters:
- For DEB
# mxb_~linux-1_amd64.deb
- For RPM
# mxb_linux-1.x86_64.rpm
- For DEB
- You will be asked to provide parameters for the installation including device name, installation key (previously known as password) and security code/encryption key/passphrase
- If a previous installation is detected for the device details given, you will receive a message stating:
- u: use contract for normal backup install
- a: abort the configuration
- R: install device using restore-only mode
- Select R here for Restore-Only mode installation
- Allow the installation to complete, this will display -- Done once finished
% sudo -i
By default, the Backup Manager is installed to /opt/MXB. If you wish to install the software to the /usr mount (for example because it has more free space), you should create symlinks for it. For example:
# ln -s /usr/local/MXB /opt/MXB
The device name and installation key can both be found in the Settings tab of the device in the Management Console.
You can either use this contract, abort configuration or install application in restore only mode [u/a/R]:
Convert to restore-only mode
If you have installed Backup Manager on the device using the normal Installation steps steps above and wish to convert this normal version of backup to use restore-only mode, you can do this by following the below steps:
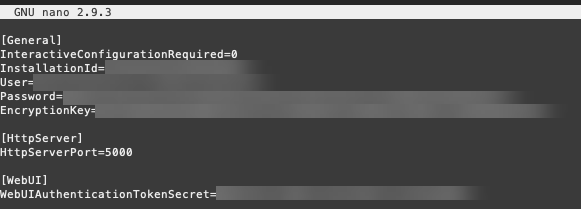
- Open the the config.ini file. The following example command with Nano installed will open the config.ini file for editing:
- Under the [General] section check for an instance of
RestoreOnlyMode=0 - If this exists change
=0to=1 - If this does not exist, add it as above to the [General] section
- Close the file by using Ctrl+X
- Save the changes to the file
- Restart the service
sudo nano -w /opt/MXB/etc/config.ini
This is case sensitive so please ensure it is added correctly and without spaces.
Y

$ sudo service ProcessController restart
OR
$ sudo /etc/init.d/ProcessController restart
Convert from restore-only mode to normal mode
If you have a device which has had Backup Manager installed in restore-only mode and you wish to convert this to a normal version of backup, this can be done by following these steps:
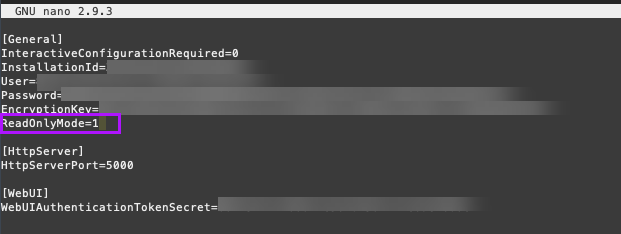
- Open the the config.ini file. The following example command with Nano installed will open the config.ini file for editing:
- Under the [General] section check for an instance of
RestoreOnlyMode=1 - If this exists change
=1to=0or remove the line entirely - Close the file by using Ctrl+X
- Save the changes to the file
- Restart the service
sudo nano -w /opt/MXB/etc/config.ini
Y
$ sudo service ProcessController restart
OR
$ sudo /etc/init.d/ProcessController restart