
You cannot start two failovers at the same time if the devices belong to different Customers.
Prerequisites
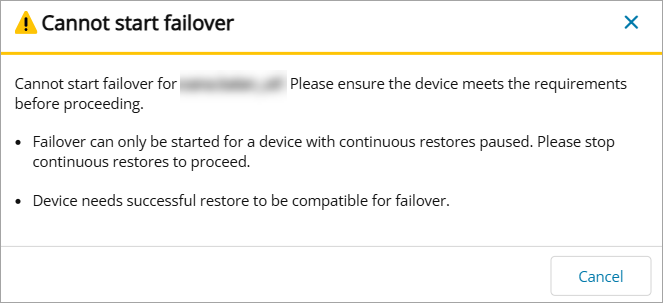
Before starting failover of a Cove Data Protection (Cove) Disaster Recovery As A Service (DRaaS) device, ensure:
- No restore is in progress
If a restore is in progress, we recommend you wait until it finishes before starting failover. Alternatively, you can Cancel the restore in progress but then you must Rollback to the latest backup session.
- The last restore session was successful (green)
- The failover devices belong to the same customer
- Continuous restores are paused
If adding a new device to an existing failover where the existing device's failover failed, the new device will show as incompatible with the failover. A successful failover must exist to add a new device to it.
Instructions
- Sign in to the Management Console using a SuperUser or Manager account.
- Navigate to Continuity > DRaaS > Overview
- Select the device(s) to failover and then click Start Failover from the top bar
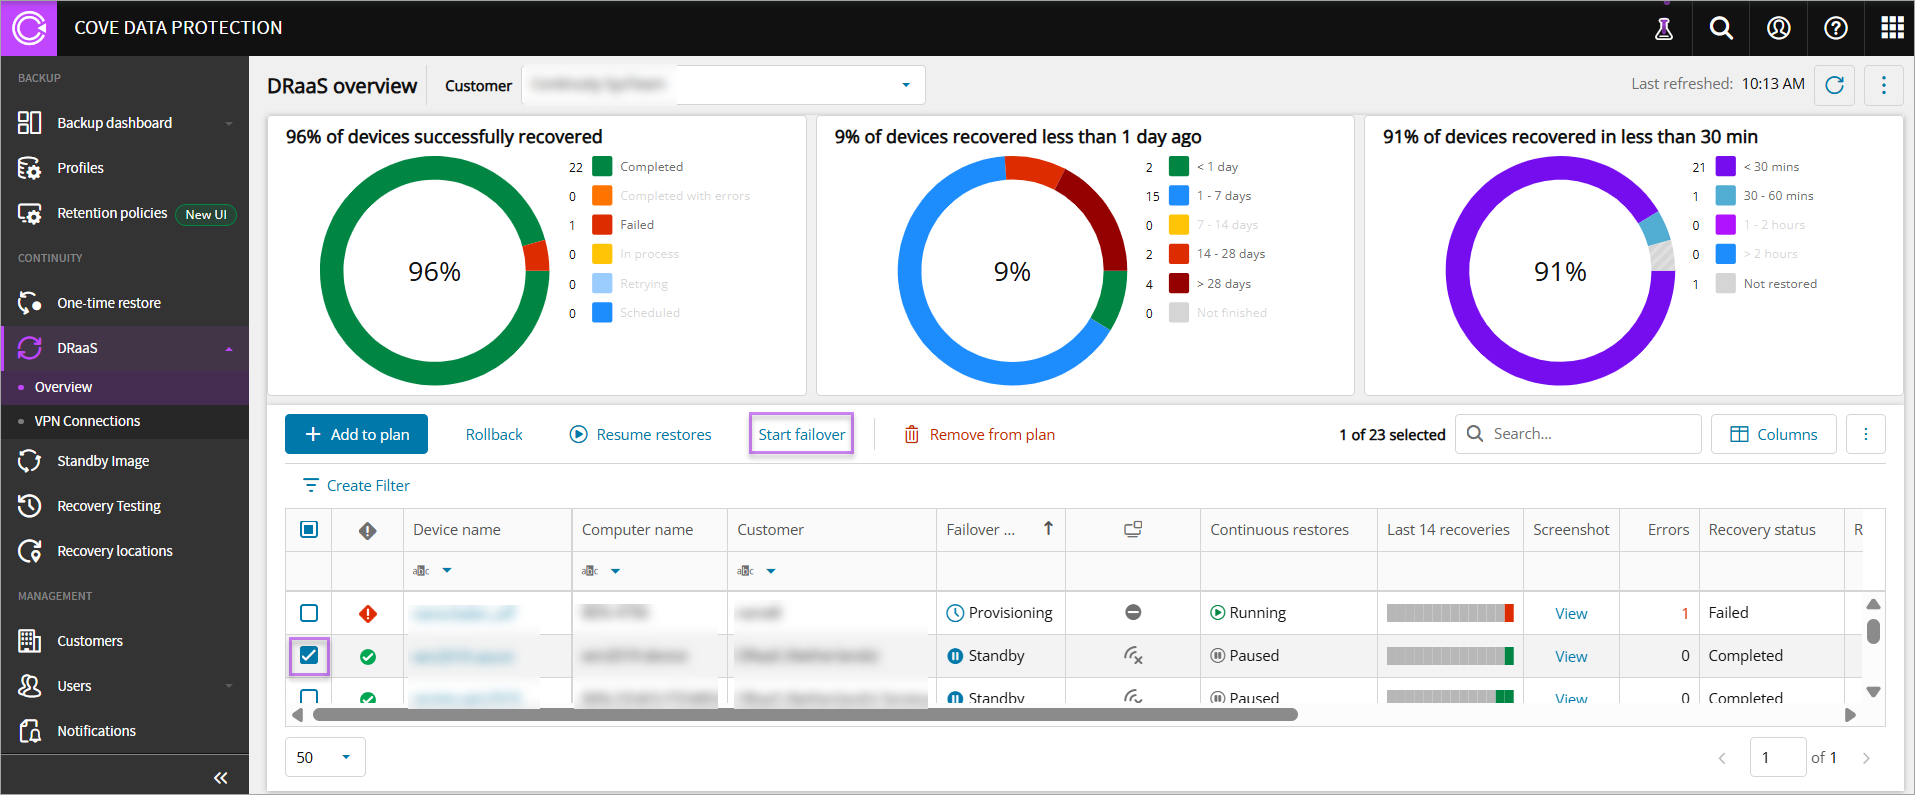
The Start Failover button is greyed out in cases where the devices selected belong to different customers
- Select the failover type from:
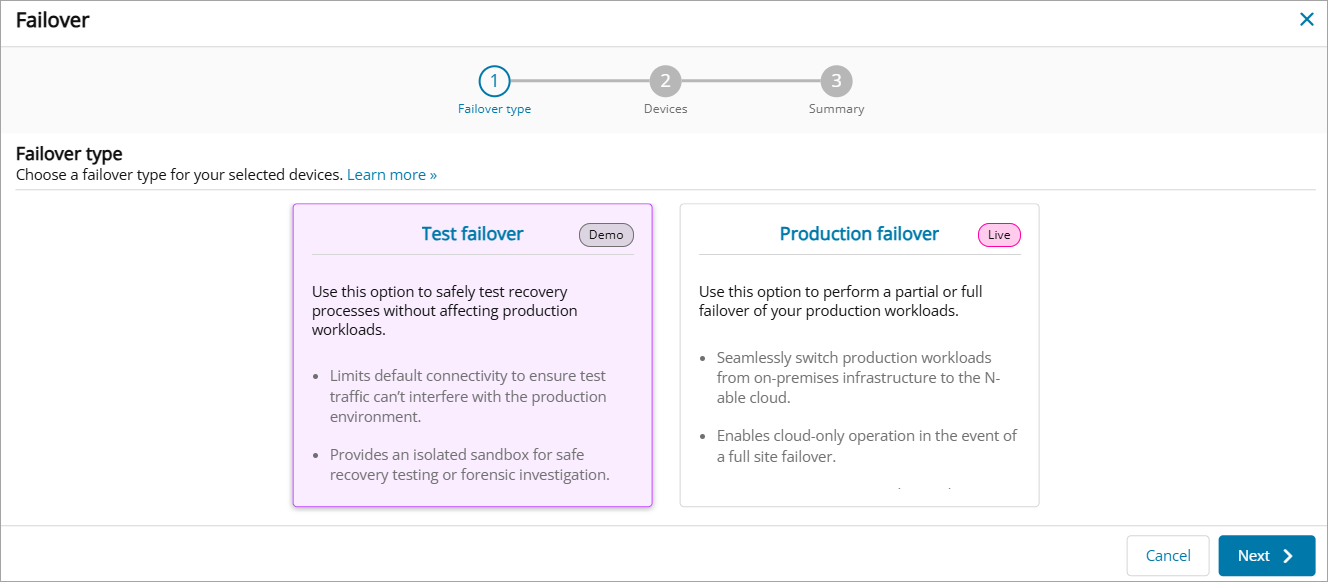
- Test failover: Use this when you simply need to start the machine for access to file system or when you want to simulate failover scenarios
- Production failover: Use this in a real disaster scenario for partial or full failover. Partial failover temporarily replaces some production servers with disaster recovery servers, full failover starts the entire infrastructure in our Disaster Recovery (DR) facility to maintain business continuity
For Production failover, the subnet and IP settings work the same as in Test failover. Test failover use less powerful VMs (2 CPUs and 8GB RAM for Test vs 4 CPUs and 16GB RAM for Production) and may eventually auto-manage uptime (e.g., power off machines with no traffic), whereas for Production failover, you would be contacted before taking such action. You can request to resize the VMs to more powerfull by creating a support ticket and providing justification. It will be provisioned based on capacity up to 16 CPUs 64 GB RAM.
- Click Next
- Enter the subnet for the failover network. This is the network created in the DR site, where your machines will run as virtual machines.
If you plan to connect your on-premises site to the DR site with the VPN appliance (for example, for a partial failover), enter the same subnet as the on-premises network you are connecting. The VPN appliance extends that network into the DR site, so the two subnets must match. For example, if your on-premises network is 192.168.10.0/24, enter 192.168.10.0/24.
- Enter the IP address of the Cloud Gateway. Your VMs in the DR site use it as their default gateway, and it routes their internet traffic during failover.
Choose an unused IP address within the failover subnet. If you connect your on-premises site with the VPN appliance, the address must also be free on your on-premises network. Don't use your on-premises router's address. For example, if the subnet is 192.168.10.0/24 and your router is 192.168.10.1, you could use 192.168.10.254.
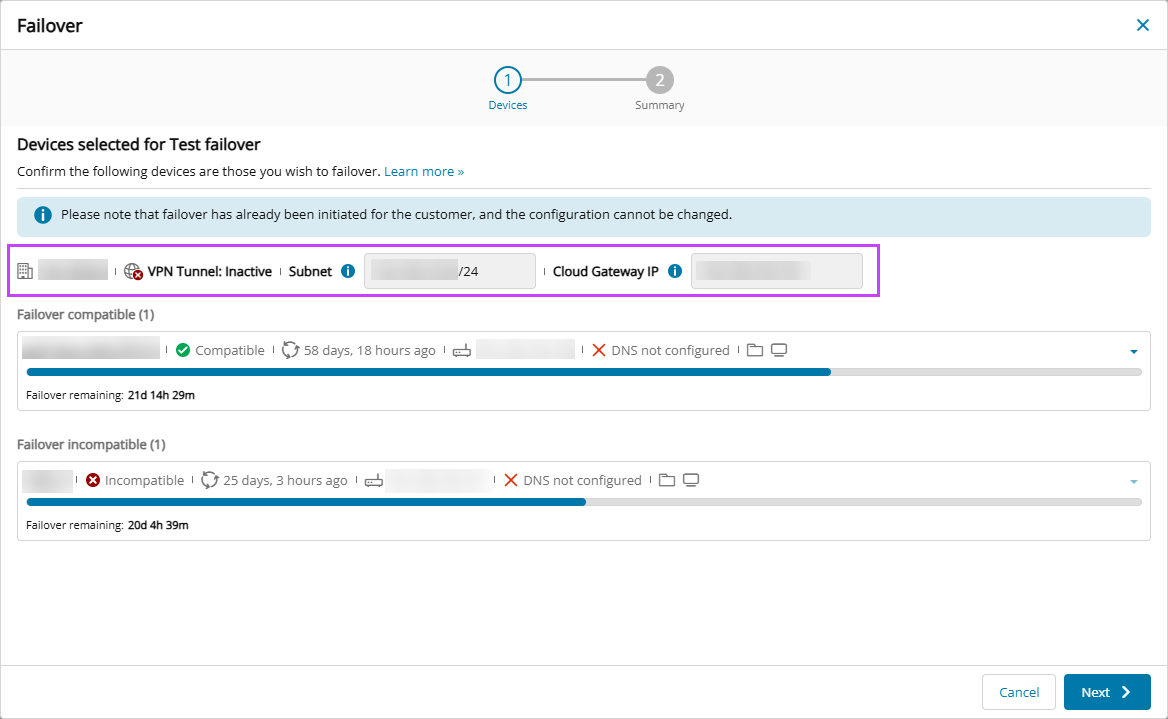
- Failover Compatibility is checked at this stage to confirm compatiblity for failover. If the device falls into one of the following scenarios, they will be incompatible for failover:
- The device added to the DRaaS plan is already in Failover.
- The device added to the DRaaS plan has a Failover state of Provisioning and a Recovery Status of one of the following:
- Failed - The device cannot start failover because it does not have a successful restore. Rollback the device to a previous restore point or ensure a restore completes successfully to proceed with failover.
If the last session failed, perform a rollback. Once rolled back, the device is paused and ready for a failover to be started.
- Scheduled - Failover cannot be started when another recovery is scheduled to start. Wait for the recovery to complete, or cancel the recovery and then initiate a rollback before starting failover.
- In Progress - Failover cannot be started while a recovery is in progress. Wait for the recovery to complete, or cancel the recovery and then initiate a rollback before starting failover.
- Retrying - Failover cannot be started while a recovery is in retrying mode. Wait for the recovery to complete, or cancel the recovery and then initiate a rollback before starting failover.
This is because the device must have had a successful restore to be compatible for failover.
- Failed - The device cannot start failover because it does not have a successful restore. Rollback the device to a previous restore point or ensure a restore completes successfully to proceed with failover.
- The device added to the DRaaS plan has a Failover state of Standby and a Recovery Status is one of the following:
- Failed - The device cannot start failover because it does not have a successful restore. Rollback the device to a previous restore point or ensure a restore completes successfully to proceed with failover.
If the last session failed, perform a rollback. Once rolled back, the device is paused and ready for a failover to be started.
- In Progress - Failover cannot be started while a recovery is in progress. Wait for the recovery to complete, or cancel the recovery and then initiate a rollback before starting failover.
- Retrying - Failover cannot be started while a recovery is in retrying mode. Wait for the recovery to complete, or cancel the recovery and then initiate a rollback before starting failover.
- Cancelling/Cancelled - Failover cannot be started due to an incompatible recovery status. Only devices with a recovery status of Completed or Completed with Errors are eligible for failover.
- Failed - The device cannot start failover because it does not have a successful restore. Rollback the device to a previous restore point or ensure a restore completes successfully to proceed with failover.
- Confirm each device has an appropriate amount of Failover time remaining
If you stop the Virtual Machine, but do not stop the failover, this is still counted towards the failover time used, and so reflected in the failover time remaining.
- Configure the Network Configuration settings per compatible device:
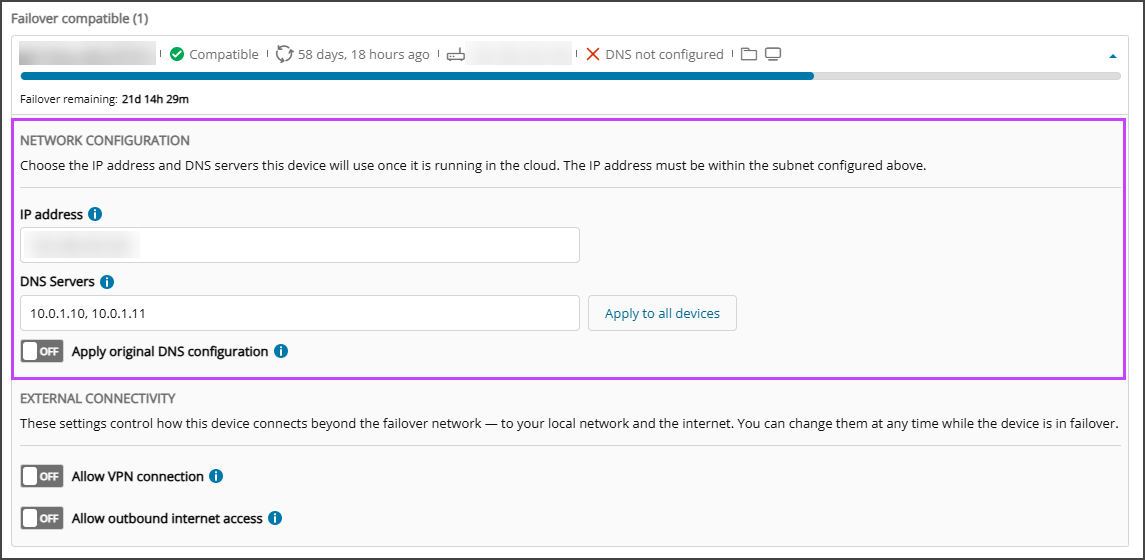
- Set the device's IP Address on the failover network is pre-populated with the default IP address of the device.
Confirm this is correct and within the subnet configured in step #6 before proceeding.
- Enter one or more IPv4 address in the DNS Servers field, separated by commas.
The first address must be the preferred DNS server, each subsequent address is used as secondary, tertiary and on in the order they are added.
- DNS Servers can be applied to all devices in the failover by selecting Apply to all devices.
- Enable Apply original DNS configuration to use the server values restored from the device's stored configuration
- Set the device's IP Address on the failover network is pre-populated with the default IP address of the device.
- Configure the External Connectivity settings per compatible device:
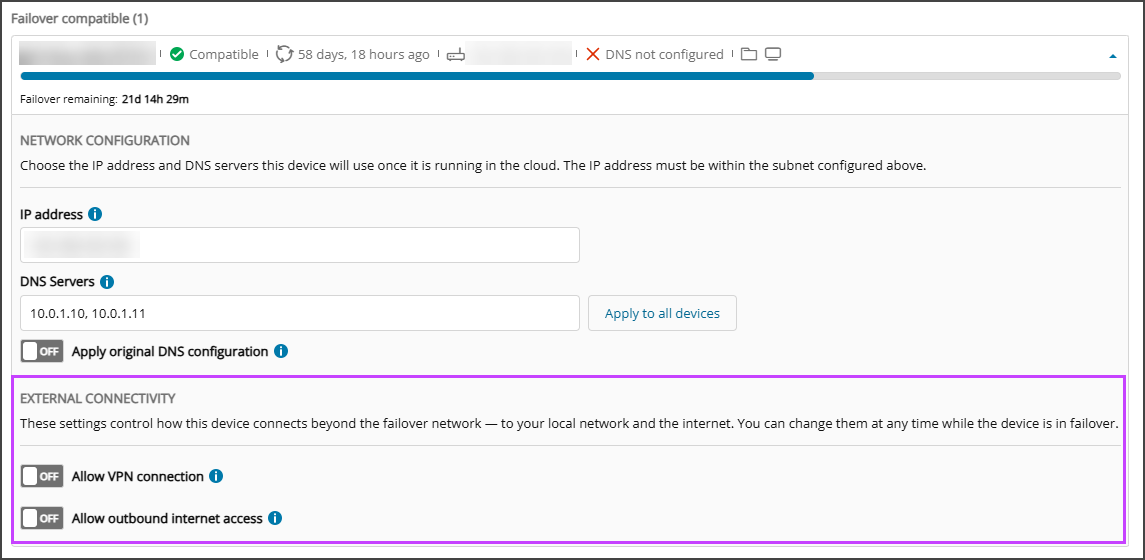
- Enable Allow VPN connection if the device needs to communicate with your on-premises network during failover. The device then joins your on-premises network over the VPN, so it and your on-premises devices can reach each other as if it were still on-site. You can change this setting at any time while in failover.
Enabling this setting does not create a VPN connection. The device connects only after you deploy the VPN appliance on your on-premises network and the VPN tunnel shows Active in VPN Connections. See Configure VPN Connections.
- Enable Allow outbound internet access to permit the device to access the internet through the cloud gateway when the device is in failover.
This allows Outbound traffic only.
- Enable Allow VPN connection if the device needs to communicate with your on-premises network during failover. The device then joins your on-premises network over the VPN, so it and your on-premises devices can reach each other as if it were still on-site. You can change this setting at any time while in failover.
- Click Next
- Confirm the Failover Summary details and select Start failover
- Once Failover has been initiated, you can now click Done to close the wizard. The device failover will appear in the dashboard once the wizard is closed:
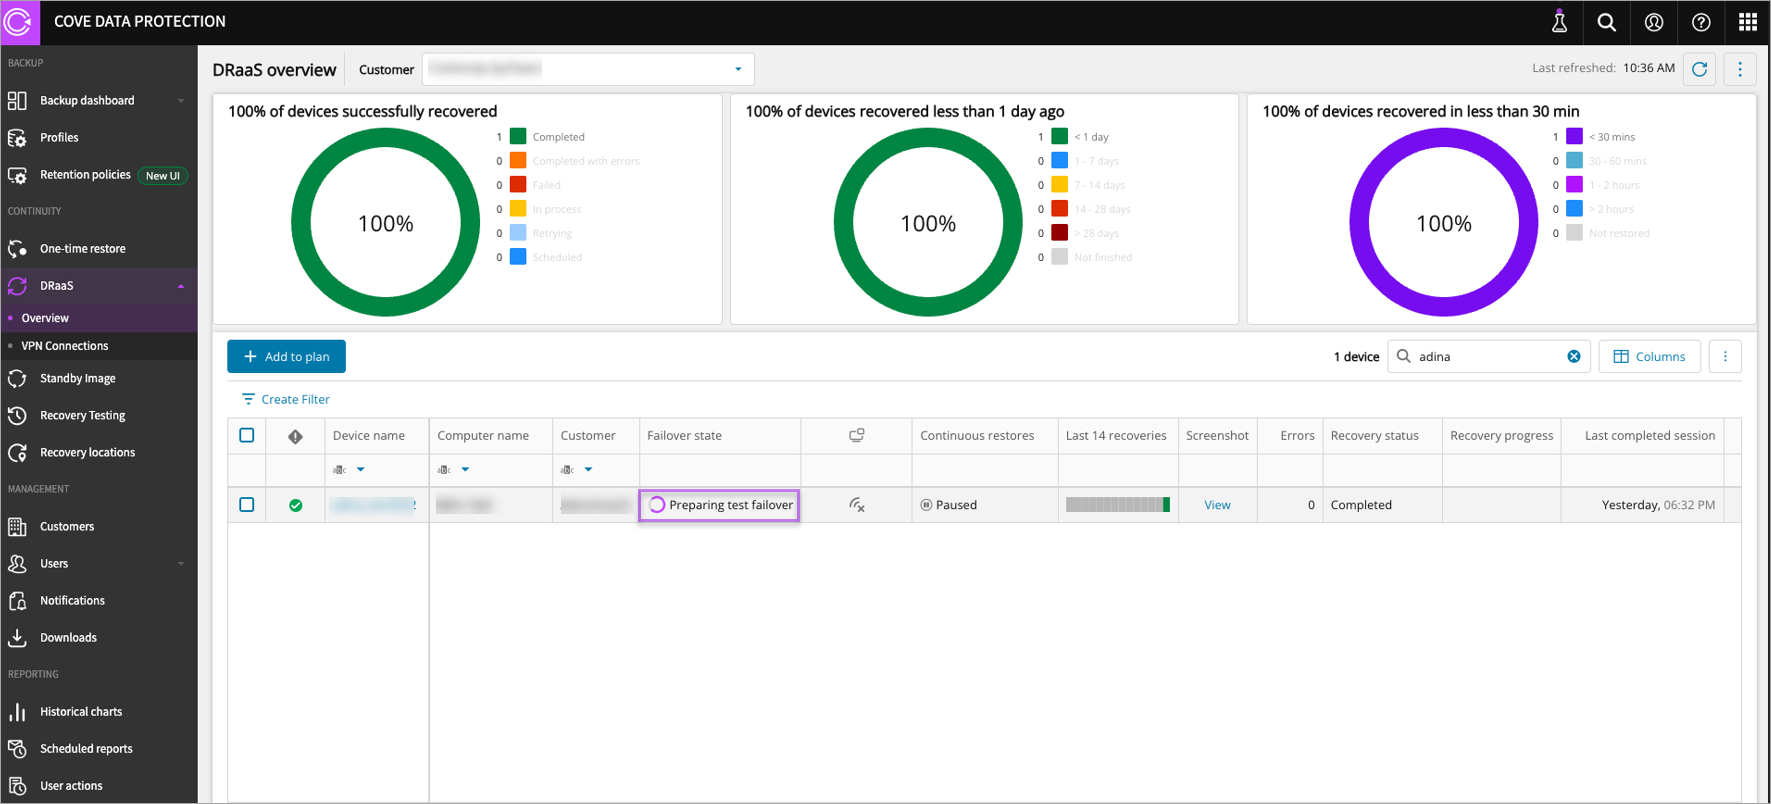
A Stop VM button appears only once the device is successfully in failover and the VM is started. The button changes to Start VM when the VM has been stopped.
: If machine does not start, please contact N-able support for assistance.
If there is a requirement to add one more device to a failover which is in progress, when you click Start Failover for this device, the subnet is going to be pre-populated (because failover is in progress already). However you can change/specify the device’s IP address.