
Cove Data Protection (Cove) offers an automatic file selection feature. It is a quick and easy way to populate your backup selection for the "Files and Folders" data source. It also brings to focus important files that you might have forgotten about.
What the feature does
When you install the Backup Manager, it automatically detects files that you may want to protect against loss and offers you to add them to your backup selection. There are 3 groups of such files:
- Documents (*.doc, *.docx, *.xsl, *.xslx)
- Images (*.png, *.jpg, *.jpeg)
- Videos (*.avi, *.mpg, *.mpeg, *.mkv)
You can change your initial choice of the file groups after the installation as well as refine your backup selection by checking/unchecking individual files and folders.
Feature availability
The automatic file selection feature can be activated on Windows devices:
- Windows 8 / 8.1
- Windows 10
- Windows 11
- Windows Server 2012 / 2012 R2 (limited)
- Windows Server 2016 (limited)
- Windows Server 2019 (limited)
- Windows Server 2022 (limited)
- Windows Server 2025 (limited)
Instructions
Making an initial selection
You can start using the feature during installation. At the "File selection" step, the installation wizard displays major file categories detected on the current computer. Next to the name of the category you can see the total size of files in it.
Select the categories that you want to include into your backup selection. You will be able to view and edit the selection after the installation.
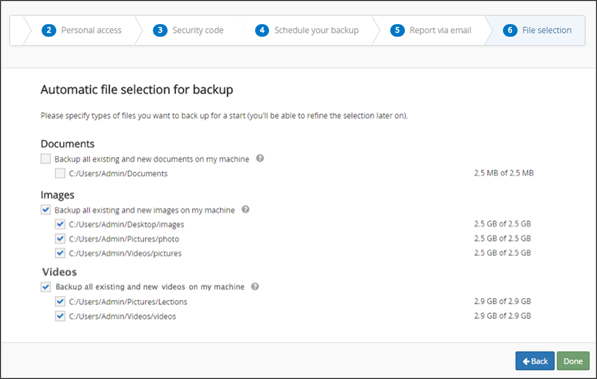
The "Images" category appears if there is at least one folder with the total size of image files reaching 20 MB. All its sub-folders are taken into account. Just the same is with "Videos". The minimum size limit keeps unneeded files such as application icons off your backup selection list.
Editing the selection
To edit the initial selection of the file categories for backup:
- Launch the Backup Manager for the device
- Navigate to the Backup tab
- Click Edit next to the "Files and folders" data source
- Switch from Edit file selection to Auto-populate file selection
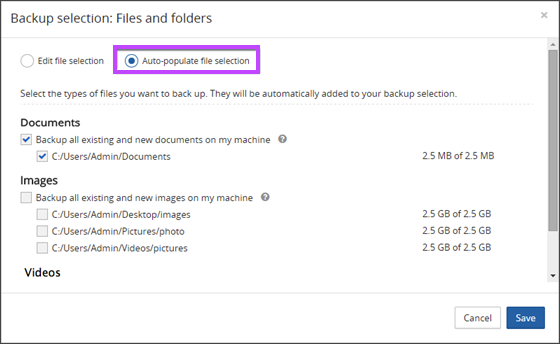
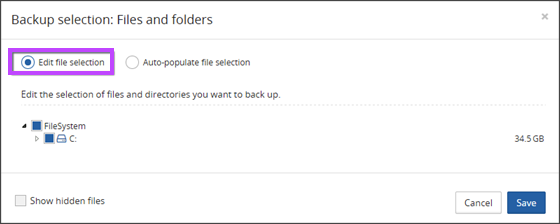
Files from the selected categories are automatically added to your backup list (as well as the containing folders). Choose Edit file selection to view these files and folders and add more (if needed).
If you are using exclusion filters (Preferences > Backup filters), files matching your filtering conditions will not be backed up (even if they are included into your backup selection).
How the feature works
- The Backup Manager scans the local hard drives in search for valuable files. Network shares are not scanned
- The Backup Manager approaches valuable data by the folder. If it detects a folder with matching content, all files in that folder are selected
- The "Documents" category is populated based on file extensions only (no regard to file size). The "Images" and "Video" categories observe the minimum size limit of 20 MB per folder. If the total size of matching files in a folder and all if its subfolders is less than 20 MB, the folder does not appear under "Automatic file selection". You will be able to add it to your backup selection manually if you wish (the Edit file selection option)
- Some directories are automatically excluded from the automatic selection: "Windows", "Program Files", "Program Files (x86)" on 64-bit computers, and "ProgramData"
- Whenever you make changes to the automatic file selection categories, your backup list gets automatically updated. It does not work the other way round though. So editing your backup selection has no influence on the automatic selection categories. For example, if you select the "Images" category and then uncheck your D:\ volume, none of the images located on that volume will be backed up
- If a new file is added to a folder marked for backup, it is automatically included into your backup selection. Just the same is with sub-folders
- The Backup Manager scans your file system once a week (unless specified otherwise). This is done at a time when there are no active backup or recovery processes. To view the scanning results and integrate them into your backup selection, open the Backup tab, click Edit next to the "Files and folders" data source, and then choose Auto-populate backup selection. Click Save when you finish editing
Advanced settings (optional)
You can adjust how the feature works on your computer using through the advanced settings (view instructions).