
Perform actions on Windows 365 Cloud PCs
Cloud Commander will be decommissioned and stop functioning on May 13, 2026. You can use the product until that date.
Review and update workflows to remove any dependencies before the product is decommissioned.
Support, bug fixes, and security patches will be available until April 13, 2026.
You perform the following Windows 365 Cloud PCs actions from the Windows 365 Cloud PCs page. Select an action below to see the instructions.
You perform actions on multiple devices at the same time using the actions at the top of the list.
Use the Action menu on the right of each device to perform the action on only that device. To refresh the data for a device on the page, select Refresh device.
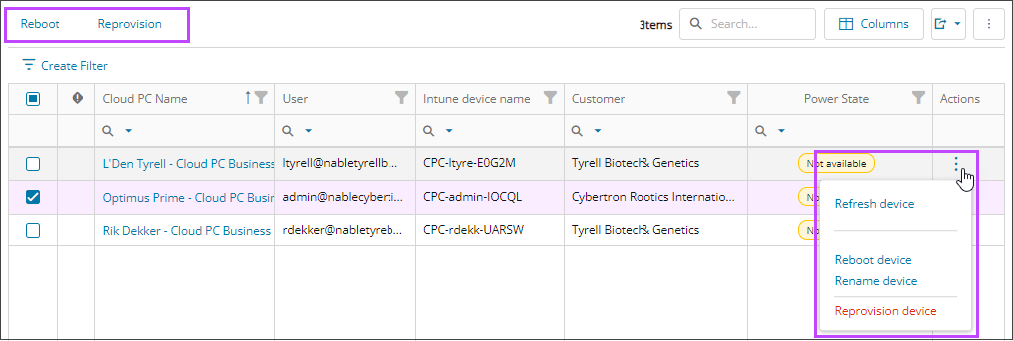
To view the status of device actions, select a device name to view its details and go to the Command logs tab. See View Windows 365 Cloud PCs and details.
Prerequisites
- You must be assigned the Microsoft Windows 365 Writer role scoped to the tenant to perform actions on Windows 365 Cloud PCs.
Reboot devices
- In the , select
 Assets > .
- Search for and select the checkboxes for the devices you want to reboot or select all devices.
- Select Reboot at the top of the list.
- Review the capability summary to see if you can perform the action on the selected devices and select Next.
- Review your selections. If you need to make changes, select Back. Otherwise, select Confirm
Reprovision devices
When you reprovision a Cloud PC, the Cloud PC is deleted and a new Cloud PC is created. All user data, applications, customizations, and the like are deleted. The new Cloud PC is reprovisioned according to the settings configured in the provisioning policy that is targeting the user's Microsoft Entra group. If the image referenced by the policy has changed, or if any other changes to the policy have been made, the reprovisioned Cloud PC uses the new settings. You can think of reprovisioning as a similar process to resetting a physical device. See the related Microsoft documentation.
- In the , select Assets > .
- Search for and select the checkboxes for the devices you want to reprovision.
- Select Reprovision at the top of the list.
This command deletes the device including all user data, applications, and customizations.
- Review the capability summary to see if you can perform the action on the selected devices and select Next.
- Review your selections. If you need to make changes, select Back. Otherwise, select Confirm.
The Cloud PCs are deleted, and brand new Cloud PCs are created.
Rename a device
- In the , select Assets > .
- Search for the device you want to rename and use the Action menu to select Rename device.
- Review the capability summary to see if you can perform the action on the selected devices and select Next.
- Enter the new name for the device and select Next.
- Review your selections. If you need to make changes, select Back. Otherwise, select Confirm.
The rename request is sent to the Cloud PC and is added to the alerts and notifications icon in the Product Bar.
Related articles
Updated: Jan 09, 2026