Installation Prerequisites
This guide does not provide any detailed instructions for installing and configuring Microsoft products. References to those procedures have been provided where ever possible.
N-able recommends that you minimize all windows on your desktop while you install Report Manager. Application windows that are open during installation may hide a dialog that requires your input, making it appear that your installation has stalled.
Microsoft SQL Server Settings
Microsoft SQL Server settings must be configured properly before installing Report Manager or you will have significant issues with installation and scheduled reporting.
Report Manager supports Microsoft SQL Server versions 2012 through 2022.
See the Microsoft instructions to upgrade, install, or configure SQL Server. For SQL Server 2016 and later (2016, 2017, 2019, 2022), refer to the SQL Server Installation Guide (Windows). Detailed Microsoft prerequisites are available in the Planning and hardware/software requirements documentation. For SQL Server 2012 and 2014 visit Microsoft's previous versions installation documentation.
The settings below are critical and must be applied in either a new or existing installation, for Microsoft SQL server to work with Report Manager.
- Install the SQL Server as a default instance.
- Select the NT Authority\System account for SQL Server services.
- Select Mixed Mode for Database Engine Configuration.
- Ensure the following Feature Selections are applied:
- Database Engine Services
- Reporting Services
- Integration Services
- Management Tools – Complete
Report Manager Environment
Before installing Report Manager, ensure the following items have been reviewed and updated:
- Report Manager must not be installed on a domain controller. During Report Manager installation, a user account is created that must be added to a local user’s account group. A domain controller does not have a Local Users and Groups option available and will halt the installation of Report Manager.
- Report Manager must not be installed on a computer with other applications or share a host with N-able N-central. Report Manager runs without limits to resources to process data and will significantly affect other applications installed on a server. The following are some examples of what should not be installed on the same server as Report Manager:
- CRM
- Sharepoint
- Exchange Server
- PSA and ticketing solutions: HDM, ConnectWise Manage, Autotask
- WSUS
- Ensure that there is space in Windows Event log. Report Manager will not start if the Windows Application log is full.
- Check the Windows Application log properties:
- For the When maximum event log size is reached setting, select Overwrite events as needed (oldest event first).
- Check the Windows Application log properties:
- Ensure HTTP is available as a connection to the SQL Server Reporting Services. Report Manager uses HTTP to access SQL Server Reporting Services. See this Knowledge Base Article for more information.
- Set the time zone on the Report Manager server. Report Manager will convert ticketing times to local time zones. If the server is not configured to the local time zones, the data collected will be logged incorrectly.
The Report Manager server must be in the same time zone as the N-able N-central server.
- Set up the Domain Name System (DNS) Server to resolve addresses automatically. N-able recommends setting up your DNS server to resolve addresses automatically. If this is not done, the installation will not stop, but it will stop you from successfully adding a data source to the system.
- Fully Qualified Domain Name (FQDN). If you are using a FQDN that does not match the local computer name, Microsoft IIS 5.1 or later has a security feature that helps prevent reflection attacks on your computer. If you will be using the FQDN to access the Report Manager server, see the appropriate Microsoft documentation for more information.
- Ports. Report Manager does not support custom ports. Use only the following ports:
- HTTP communication—Port 80
- HTTPs communication— Port 443
- Firewalls—80, 443, 1433
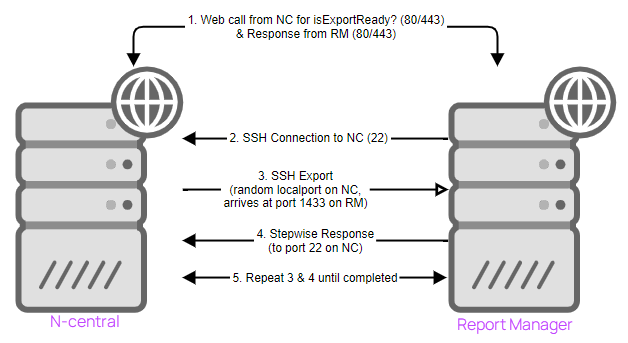
Secure export over SSH
In order to increase security and comply with the California Data Protection Act, N-centrall 12.2 and higher can Export Data using SSH to Report Manager SP6 and later editions.
If either N-central or Report Manager is not on a required version, or if port 22 is blocked, the export will continue unencrypted on port 1433.
-
Enable port 22 inbound to N-central from Report Manager
-
Enable ports 10500-10999 inbound to Report Manager from N-central
The diagram illustrates the connections between N-central (NC) and Report Manager (RM).