Connect to Snowflake using Microsoft SQL Server
Seamlessly integrating diverse data management systems is essential for optimizing efficiency and enhancing decision-making. Snowflake’s cloud data warehousing solutions, combined with the robustness of Microsoft SQL Server, create a comprehensive environment for data storage, processing, and analytics. By connecting Snowflake with Microsoft SQL Server, you can leverage the strengths of both platforms, enhancing your data strategies with scalability and advanced features while maintaining familiarity.
This guide provides a step-by-step approach to integrating these two powerful data systems. The integration not only enables a hybrid data storage solution but also enhances your analytics with Snowflake’s unique capabilities, all within the reliable framework of Microsoft SQL Server.
In the following sections, we will explore the technical setup of a linked server, the configuration of Open Database Connectivity (ODBC) drivers, and the fine-tuning of system performance to ensure a versatile and future-ready data management strategy.
We will also guide you through integrating BrightGauge, a business intelligence platform, with Microsoft SQL Server, enabling effective creation of gauges and reports.
In this page:
Prerequisites
-
Microsoft SQL 2019 or higher
-
Server 2016 or Higher
Permissions
-
Microsoft SQL Server:
-
Sysadmin or setupadmin server roles are needed to create and configure linked servers.
-
-
Snowflake:
-
Installation privileges for the ODBC driver, which usually require local administrator access on the server or workstation.
-
Appropriate roles in Snowflake with permissions to create, manage, and query databases and schemas.
-
Connecting to Microsoft SQL Server Using SSMS
-
Sign in to your Microsoft SQL Server instance.
-
Launch Microsoft SQL Server Management Studio (SSMS):
-
In the search box, enter "SQL Server Management Studio" or "ssms.exe".
-
Choose Microsoft SQL Server Management Studio from the search results.
-
If the Connect to Server window does not open automatically, go to Object Explorer > Connect > Database Engine.
-
-
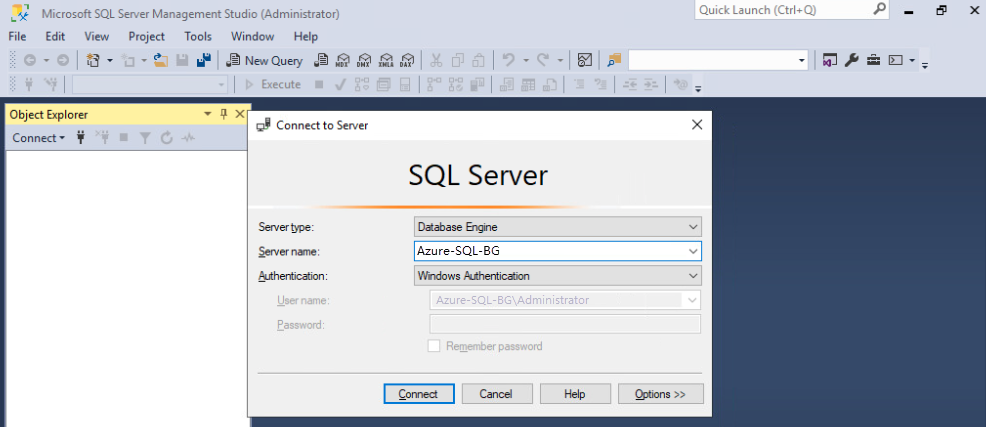
In the Connect to Server dialog box:
-
Select the Server type as Database Engine.
-
Enter the Server name. Use localhost if connecting locally or specify the server and instance name for remote connections.
-
For Authentication, use Windows Authentication or SQL Server Authentication as required. If available, you can also use Microsoft Entra authentication.
-
-
Click Connect to establish the connection.
-
Verify the connection in Object Explorer, where the server’s name, SQL Server version, and username are displayed.
Creating an ODBC data source in Microsoft SQL
Install the Snowflake ODBC driver on your system to continue. You can obtain the driver from the official Snowflake website or via the Snowflake web interface.
-
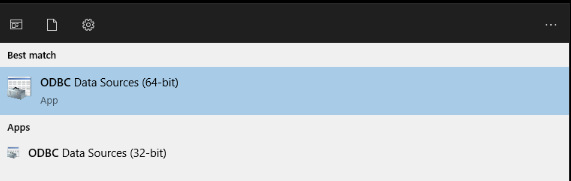
Launch the ODBC Data Sources utility on your Microsoft Windows Server by searching for “ODBC Data Sources” in the Windows search bar.
-
Access your SQL Server:
-
Sign in to your Microsoft SQL Server.
-
Open Microsoft SQL Server Management Studio (SSMS). If the “Connect to Server” dialog box does not appear automatically, find it by navigating to Object Explorer > Connect > Database Engine in SSMS.
-
Connect to your server instance using your Windows authentication credentials.
-
-
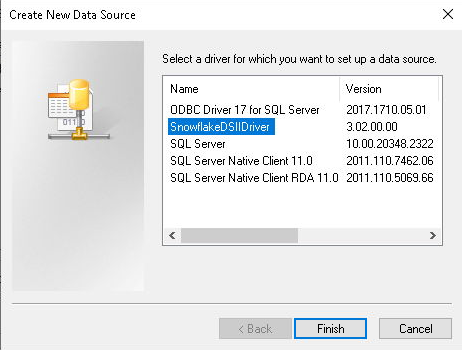
Set up a new ODBC Data Source:
-
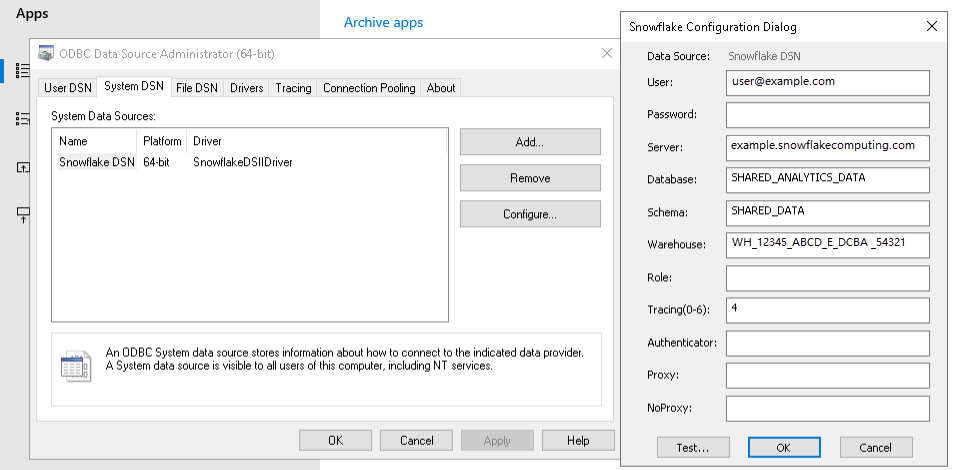
In the ODBC Data Source Administrator, go to the System DSN (Data Source Name) tab and click ‘Add’ to create a new data source.
-
Select the Snowflake ODBC driver from the list of installed drivers. If the driver is not present, install it beforehand.
-
-
Configure your data source:
-
Provide a name for your data source, such as “Snowflake DSN”.
-
Enter your Snowflake credentials, including your username and password.
-
Fill in the connection details from Snowflake:
-
Server: The URL of your Snowflake instance.
-
Database: The specific database you want to access.
-
Schema: The schema within the database you are targeting.
-
Warehouse: The computing warehouse in Snowflake that will execute your queries.
-
-
- Test the connection: After configuring the settings, click ‘Test’ to ensure the connection to Snowflake is successful. A confirmation message should appear if the connection was correctly established.
Ensure your MS SQL server’s security settings allow connections to Snowflake. If you encounter connectivity issues, it may be necessary to update the security allowlist for your SQL Server.
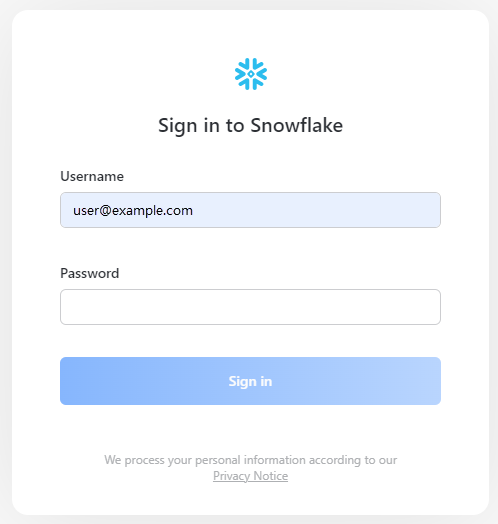
Sign in to Snowflake: Use your credentials to access your account. After setting up the ODBC connection with the correct Snowflake ODBC driver configuration, perform a connection test. A successful test will confirm that you have established an active ODBC connection to Snowflake.

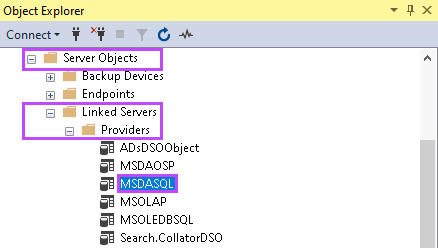
Change the permissions on Microsoft Data Access Components OLE DB Provider for SQL Server (MSDASQL)
Changing your permissions allows Microsoft SQL Server to import tables from Snowflake SQL.
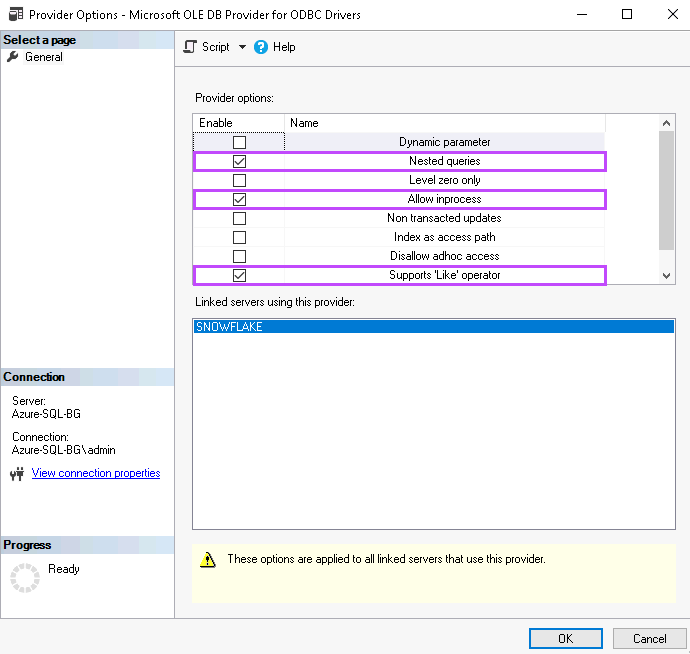
Right-click on MSDASQL and select Properties. Ensure the following options are enabled:
-
Nested Queries: This allows for the execution of SQL queries within other SQL queries.
-
Allow in process: This setting permits the OLE DB provider to run within the same process as the SQL Server.
-
Supports ‘Like’ Operator: This enables the use of the ‘LIKE’ SQL operator for pattern matching in queries.
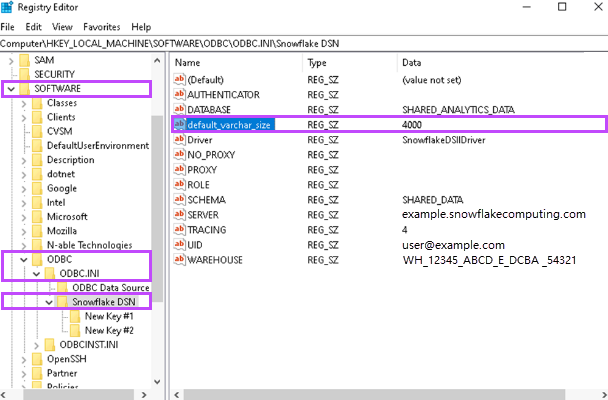
Create a New Registry Key
-
Open the Registry Editor on your Microsoft SQL Server and navigate to:
-
Right-click in the white space and choose New > String Value.
-
Name this new key default_varchar_size and assign it a value of 4000. This defines the default size for variable character (VARCHAR) columns.
Computer\HKEY_LOCAL_MACHINE\SOFTWARE\ODBC\ODBC.INI\YourDSNName
Where YourDSNName i is the Data Source Name (DSN) you specified during the ODBC setup.
The Windows Registry is a system database that stores settings for the operating system and applications. Incorrect changes can cause serious system issues. Always back up the registry before editing to ensure system recovery if needed.
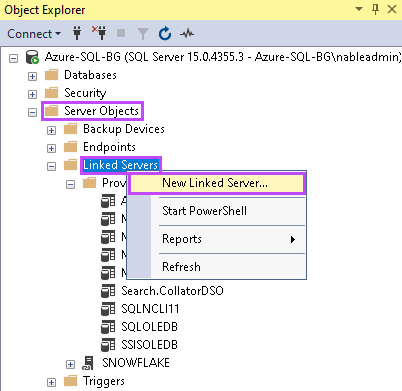
Setting Up a Linked Server in Microsoft SQL
-
Initiate the Linked Server Configuration:
-
In SQL Server Management Studio (SSMS), navigate to Server Objects > Linked Servers.
-
Right-click and select New Linked Server to begin the setup.
-
-
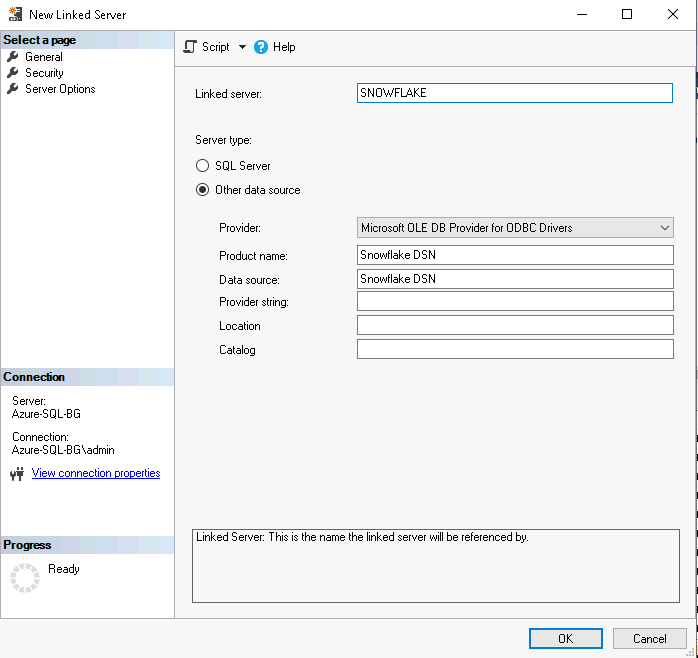
Provide the Linked Server Details:
-
Assign a descriptive name to the Linked Server. For example, “Snowflake” is used here for illustration.
-
In the provider dropdown menu, choose Microsoft OLE DB Provider for ODBC Drivers (MSDASQL).
-
-
Specify the Data Source: Enter the exact DSN you established during the ODBC configuration. Remember, it is case-sensitive. In this example, “Snowflake DSN” is used.
-
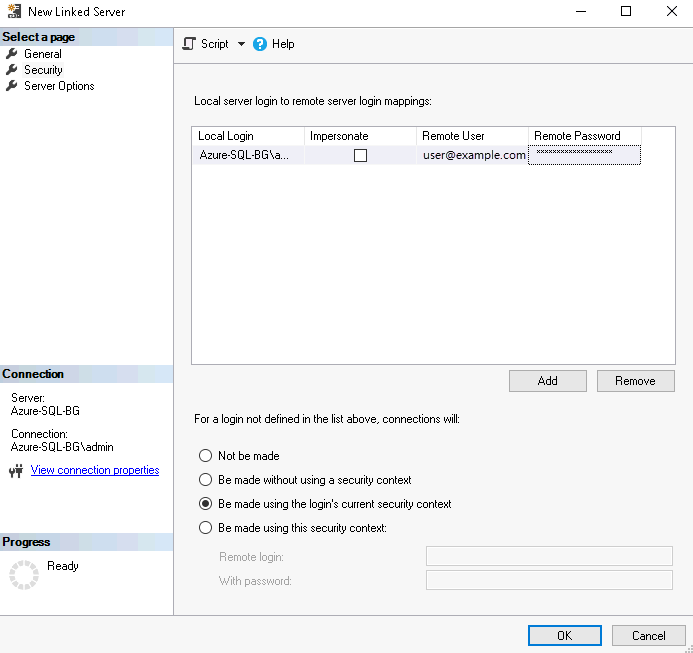
Configure Security Settings:
-
Click on the Security page to map your local Microsoft SQL Server logins to the Snowflake credentials.
-
Select Add. Under Local Login, input the login you utilize for SSMS, such as “Azure-SQL-BG\nableadmin”.
-
Avoid selecting Impersonate.
-
Input your Snowflake credentials under the appropriate fields.
-
Choose the option Be made using the login’s security context for the connection to be authenticated.
-
-
Complete the Setup:
-
Click OK to finalize the creation of the Linked Server.
-
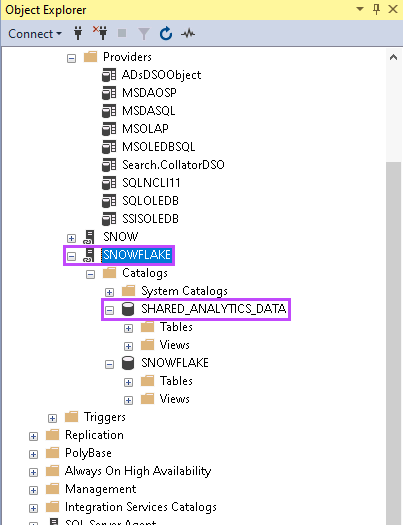
If the setup is correct, “Snowflake” will now appear in the list of Linked Servers.
-
Expand the Linked Server node to view and access the Snowflake table structures. Typically, you will find your data under a schema such as “SHARED_ANALYTICS_DATA”.
-
-
Ensure Database Availability: Confirm there is at least one database present on the server. It can be empty, but its existence is required for applications, like BrightGauge, to access the linked data.
Creating an SQL Query in Microsoft SQL Server
-
Create an SQL Query:
-
In SQL Server Management Studio (SSMS), locate the database added from Snowflake, referred to in this example as “SNOWFLAKE”.
-
Expand the Views section to find the specific view you wish to query. For instance, look for SHARED_DATA.DIM_CUSTOMER_LATEST.
-
Right-click on the desired view and select Script View as > SELECT To > New Query Editor Window. This action will generate a SQL query template in a new editor window.
-
-
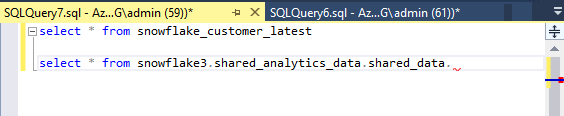
Construct and Test Your Query: In the new query editor window, you can modify the generated query or write a new one to retrieve data. Here are two example queries to get started:
-
Replace SNOWFLAKE.SHARED_ANALYTICS_DATA.SHARED_DATA with the full path to the view or table you are querying, ensuring all identifiers are correct.
-
Execute and Review the Query Results:
-
To run the query, click the Execute button, which may appear as a green arrow in the toolbar. This will process your SQL command.
-
Upon successful execution, the live data from the view or table will be displayed in the results pane below the query editor.
-
-
Integrate Applications: With the linked server successfully returning data, you are now ready to integrate this SQL Server instance with Connect to Microsoft SQL Server using BrightGauge or any other application that requires access to your Snowflake data.
SELECT * FROM SHARED_DATA.DIM_CUSTOMER_LATEST
SELECT * FROM SNOWFLAKE.SHARED_ANALYTICS_DATA.SHARED_DATA