
Configure N-able N-central and HaloPSA Integration
Use this guide to set up N-central to work with HaloPSA. It covers prerequisites, required permissions, integration steps, and troubleshooting tips.
Before you begin, please review the Prerequisites and HaloPSA Integration Process Overview.
N-central System Hierarchy for PSA Integration
How the hierarchy affects configuration
The hierarchy determines where and who can manage integration settings. If an SO-level configuration exists, system-level options are hidden to prevent conflicts. This ensures that settings are controlled at the appropriate level for your organisation.
Service Organization (SO) Level
You can define different configurations for each SO. Any SO administrator can modify integration settings.
System Level
Only the Product Administrator can modify the configuration. If a PSA configuration exists at the SO level, the option does not appear at the System level.
HaloPSA Configuration Steps
Complete the initial integration steps in HaloPSA before setting up N-central. These steps include configuring application settings, generating credentials, and preparing your environment for integration.
-
Configure Agent Permissions (including create the Agent account).
-
-
Configure Application Authentication and Agent Login.
-
Set Application Permissions.
-
Do not set HaloPSA asset or ticket fields to mandatory when using the N-central integration.
Mandatory settings can introduce unsupported fields, which may cause synchronization issues during exports from N-central or ticket creation in HaloPSA.
Configure Agent Permissions
The integration agent- the HaloPSA user account used for the N-central application - does not need Administrator privileges. The 1st Line Support role provides sufficient access.
To create the agent account:
-
Sign in to HaloPSA using an account with Administrator permissions.
-
Go to Configuration > Teams & Agents > Agents.
-
Select New to add a new agent.
-
Complete the required information.
-
Choose Save to create the agent.
To configure the agent permissions, for new and existing agents:
-
In the Agents dialog, select the account to use for the integration.
-
Open the Permissions tab.
-
Set the following minimum required permissions.
-
Select Save to apply the changes.
Feature Access
-
Tickets Access Level: Read and Modify
-
Assets Access Level: Read and Modify
-
Can add new Tickets
-
Can edit closed Tickets
-
Can view unassigned Tickets
-
Can view tickets assigned to other Agents
-
Can change a Ticket’s Ticket Type
-
Can Re-assign Tickets
-
Can Edit Advanced Ticket Details
-
Can Edit All Actions
Ticket Permissions
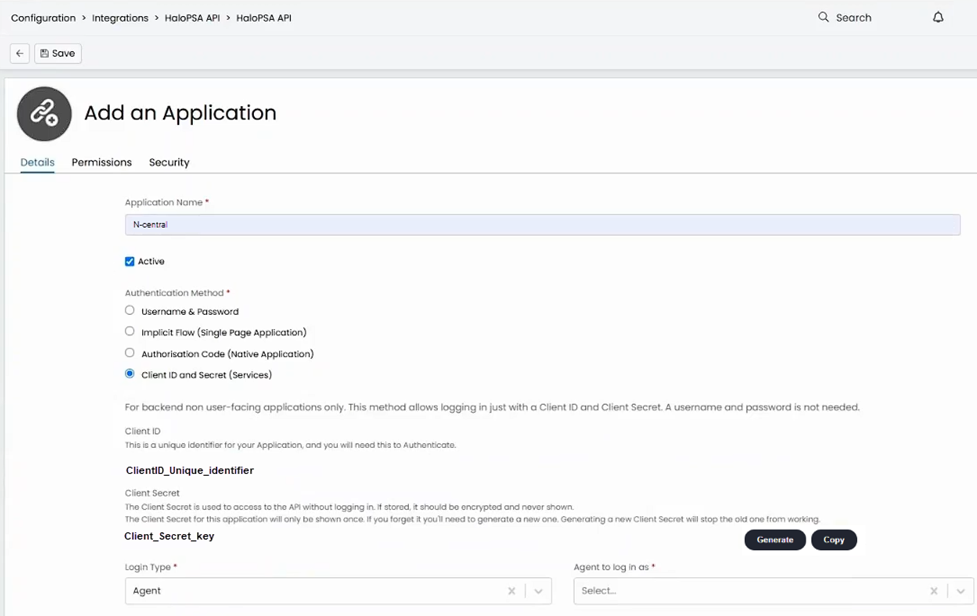
Create an Application
-
Go to Configuration > Integrations > HaloPSA API > Applications > View Applications.
-
Click New and provide an Application Name that clearly identifies your N-central instance.
-
Ensure the account is Active.
-
For Authentication Method: Select Client ID and Secret.
-
Click Generate to create a Client Secret, if one does not already exist.
-
Copy the Client ID and Client Secret for use in N-central.
-
Set Login Type to Agent.
-
Select the Agent to log in as from the drop-down. This agent account acts as the integration identity and should already exist in HaloPSA(for example, a 1st Line Support role).
The next step is to configure the applications permissions.
-
Go to the Permissions tab for the application.
-
Enable:
-
allstandard = Yes
-
allteams = Yes
-
-
Click Save to apply the settings.
Only enable other permissions (e.g., admin, adminwebhooks) if required for the role.
N-central Configuration Steps
After you set up HaloPSA, configure the integration in N-central. This stage includes mapping customers and devices, setting up export profiles, and configuring ticketing and notifications.
-
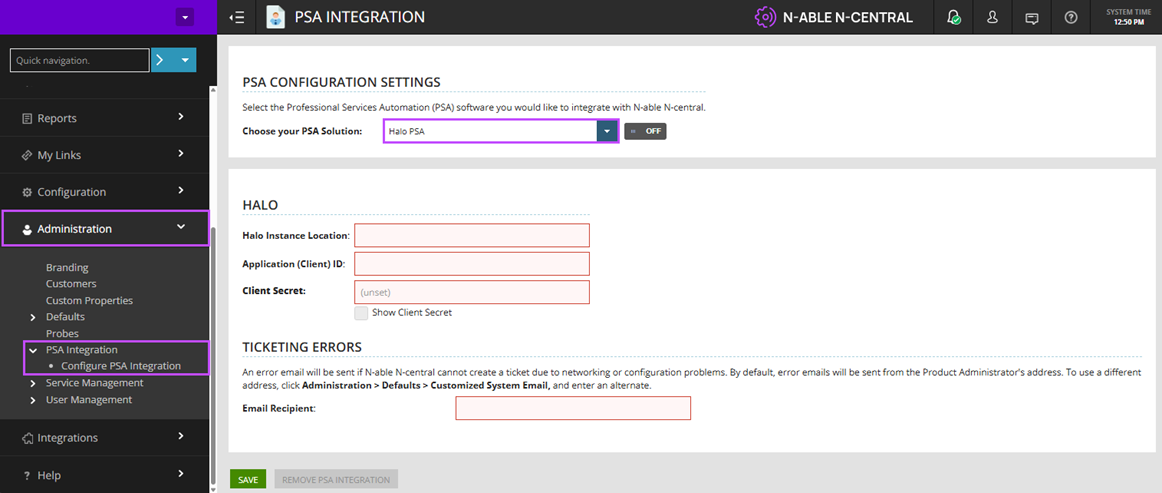
Navigate to Administration > PSA Integration > Configure PSA Integration.
-
From Choose Your PSA Solution, select HaloPSA.
-
Populate the following fields:
-
Instance Location: The URL of your HaloPSA instance. (e.g. https://<your-halo-instance>.halopsa.com).
-
Application (Client) ID: Paste the unique Client ID for the application created in HaloPSA.
-
Client Secret: Paste the secure Client Secret key generated in HaloPSA.
-
Ticketing Errors: Enter the Email Recipient to receive error emails if N-central cannot create a ticket due to networking or configuration problem.
-
-
Select Save.
After a successful connection, the HaloPSA option in the Choose your PSA solution list is toggled to On. Below the toggle, you’ll see the version of HaloPSA that N-central is connected to.
PSA Integration Menu Items
After you integrate with HaloPSA additional options appear under PSA Integration in the N-central navigation pane:
-
Customer Mapping
-
Device Class Mapping
-
Export Devices
-
Ticketing
If the integration is configured at the System level, fewer options are available at the Service Organization (SO) level. At the Customer level, only the Ticketing feature is available.
Integration Troubleshooting
If the integration fails or you see errors, check the following:
Invalid Credentials
-
Verify the Client ID and Client Secret match the values generated in HaloPSA.
-
Regenerate the Client Secret if necessary.
Agent Permissions
-
Ensure the agent has the minimum required permissions.
Application Permissions
-
Confirm allstandard and allteams are enabled in the application settings.
Connection Test Fails
-
Check network connectivity between N-central and HaloPSA.
-
Make sure the HaloPSA instance URL is correct and accessible.
Ticketing Errors
-
Review the Ticketing Errors section in N-central and confirm an email recipient is configured for error notifications.
Cross-Origin Resource Sharing (CORS) Issues
-
If API calls fail due to CORS restrictions, add the N-central host name to the CORS Whitelist in HaloPSA under Security.