
Integrate MSP Manager with QuickBooks Online and export your invoices
Follow the steps below to set up the integration between your Quickbooks Online and MSP Manager accounts.
Disable the pop-up blocker in your browser before getting started.
With the latest update to MSP Manager 's QuickBooks Online integration, you will need to log in to your QuickBooks Online account prior to exporting invoices to get a token. That token is stored in the MSP Manager database and is valid for the next 100 days. After that time, MSP Manager will require you to log in to QuickBooks again.
Configure QuickBooks Online integration with MSP Manager
- In MSP Manager , navigate to Settings > Company Settings > Integrations and select Configure QuickBooks Online.
- Confirm you have disabled your browser's pop-up blocker, and click Import in the top right corner of the page.
- In the QuickBooks pop-up window, click Connect to authorize MSP Manager and QuickBooks to share information.
- In the Default Mapping tab, select a default item for each category.
- Navigate to the Services tab and use the filters on the left to view specific MSP Manager Item Types (Service Plans, Service Items, Rate Templates or Rates). You can also filter the list of services by MSP Manager Customer or Template, QuickBooks Category or Mapping Status.
- Select an item from the Accounting Service column to map to each MSPM Item in the list. This overrides any default mapping previously configured and allows a specific rate or rate template, for instance, to be mapped directly to an item in QuickBooks.
- Navigate to the Customers tab and, where applicable, select an Accounting Customer by clicking on missing and selecting how to invoice that specific customer:
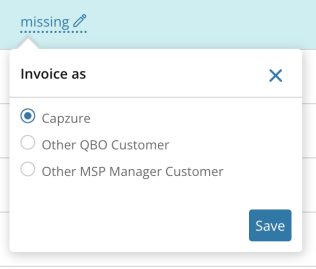
- Select the Customer Name to invoice that customer by the same name that exists in MSP Manager.
- Select Other QBO Customer and choose a QuickBooks customer from the drop down list that appears.
- Select Other MSP Manager Customer and choose a MSP Manager customer from the list.
- Click the Filter icon
 and select from different filter options to view specific Service items or Program Levels, Customers, QuickBooks Categories. Its helpful to use the Mapping Status filter to view inactive QuickBooks items, or items that are missing a mapped accounting item or that have been successfully mapped.
 - When all items in MSP Manager are successfully mapped to the appropriate accounting items in QuickBooks, navigate to the Default Mapping tab and click Save.
Open an additional tab in your browser and log into your QuickBooks Online account. This will allow MSP Manager to easily communicate with QuickBooks.
A status message a the bottom of the page indicates the connection was successful and also displays the number of customers and services that were successfully imported.
If you add products and services to QuickBooks Online, repeat this process to import and map them to the appropriate MSP Manager items.
Export invoices to QuickBooks Online
- Navigate to Billing and click + Add Billing Batch to run a billing batch and generate invoices.
- After generating your invoices, select QuickBooks Online from the Export Format list, and select Export Invoices.
Your invoices are available instantly in QuickBooks Online after the export is completed.
MSP Manager does not send customers' billing address and email when exporting invoices to QuickBooks Online. This information should be configured from within the customer's profile in QuickBooks.
Edit your invoice template in QuickBooks Online to configure the fields you want displayed on your finalized invoices.