Spam Experts outgoing filter uses, by default, use the primary interface (IP address) to deliver outgoing emails to the destination MX records. It may however be preferred to separate the outgoing delivery IP from the incoming delivery IP.
To reduce per-IP delivery volume, it is possible (though not recommended) to setup a "pool of delivery IPs" which will be randomly selected for delivering the outgoing emails. This is not recommended, as recipients may start blocking email based on such activity (in specific cases it can be used to reduce the delivery rate per IP).
It is also possible to specify different delivery IP addresses for different outgoing users.
When using the API there is no advanced syntax checking, please ensure to use the correct settings to prevent breaking the mailflows. The call apply to both IPv4 and IPv6 addresses.
Adding IP addresses to the network configuration
To add additional IPs , you can directly add to /etc/network/interfaces as long as the primary IP does not change.
Please do NOT list the new IP addresses as part of the server hostnames, those should always resolve only to the primary IP address.
Full documentation on how to add IP addresses in Debian can be found here:
https://wiki.debian.org/NetworkConfiguration#Multiple_IP_addresses_on_one_Interface
Usually, when adding a new IP to an existing setup, the following can be added directly to the /etc/network/interfaces section. (replace XXX with the correct values):
auto eth0:1
iface eth0:1 inet static
address XXX.XX.XXX.XXX
netmask 255.255.XXX.XXX
Then apply the new configuration using this command: service networking restart
Alternatively, you can reboot the server. Please note new IPs that are added may take up to 1 hour to show up in the interface. If you need this visible faster, please contact our support team by raising a support ticket through N-ableMe.
If you are not sure on how to do this change on your side, Please contact Spam Experts support and clearly describe which IP address(es) should be added to which system(s). Please always ensure to send us the full network details ( IP, netmask, gateway ) so our engineers can assist you with adding the IPs to the filtering nodes.
IP Management via the Interface
If you want different users to have their outgoing messages delivered via different IPs, for example to tie the reputation of an IP to a specific set of of users, you should configure the user to use specific IPs here. You may configure an identity to use a specific set of IPs, or all identities for an outgoing user or domain, or all users and domains that belong to a specific admin. You can also set the interfaces that should be used by default, if you haven't chosen a specific set of IPs for a user. If you remove all choices, then one will be automatically selected. You can also disable all delivery over IPv4 (only allowing IPv6) - note that this can result in mail being unable to be delivered. You'll need to ensure that your users know that they need to have the IPs that you have selected for them in their SPF records.
Viewing the current defaults
- Log in as super-admin user
- Navigate to Outgoing > Manage outgoing delivery IPs
- Click show results
Configure outgoing IP
- Login as super-admin user
- Navigate to Outgoing > Manage outgoing delivery IPs
- Click Configure outgoing IP
- Select your level (Default, Admin, Domain, Domain + Username, Domain + Username +Identity)
- Select Hostname
- Select IP address to be used
- Click Save
Before configuring any secondary IP, please make sure that the PTR is correct. Do not use underscores (_) in your PTR hostnames as this is not permitted per RFC. If you use a custom HELO this needs to be configured via the API
If IPv6 is enabled on you Local Cloud servers, then you need to also set these from the IPv6 tab. If you do not set these, then any of the IPs will be used. If you do not wish to use IPv6, you should contact support to have these disabled.
Edit an existing outgoing IP
- Log in as super-admin user
- Navigate to Outgoing > Manage outgoing delivery IPs
- Click show results
- Find the entry you wish to edit and click the downward arrow to the left of the admin
- Select edit from this menu
- Adjust the settings as necessary
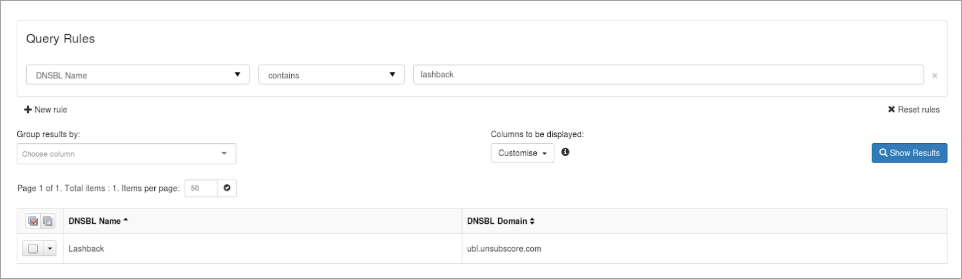
Using the Query Rules
The Query rules allows you to filter on specific criteria when showing results. Columns are also customizable.
IP Management via the API
Managing outgoing delivery IP addresses
To retrieve a list of IP addresses that are currently active, you can use the software API:
https://SERVERNAME/cgi-bin/api?call=api_get_outgoing_interfaces&domain=DOMAIN&username=USERNAME
You can specify the outgoing "domain" and "username" for which to retrieve the details. Please ensure these exists as an outgoing user in the system. To retrieve the default values for all users please specify as DOMAIN "default" and leave USERNAME blank. The default IP address is 0.0.0.0 for IPv4 and ::0 for IPv6, these refer to the primary interface of the server.
In case you wish to overrule the default delivery address of a filtering node, you can use the software API directly:
https://SERVERNAME/cgi-bin/api?call=api_set_outgoing_interfaces&domain=DOMAIN&filtering_host=FILTERING_HOST&interfaces=INTERFACES&username=USERNAME
To change the default IP for a node, specify as DOMAIN "default" and leave USERNAME empty. The FILTERING_HOST refers to the server hostname you wish to set the IP for, and the INTERFACES variable should contain 1 or more IP addresses separated by a semi-colon (%3B when posting directly via the URL). If an IP is blocked, you can change the IP address used to a new IP which is not until the issue has been resolved. Please do ensure to first remove spam from the email queues if present, to avoid the new IPs from immediately getting blocked.
Configuring IP addresses via the API
Please note that the IP address should have a valid PTR and forward hostname, which are NOT a sub-domain of the server hostnames. When adding an IP address, it's important to ensure the PTR of the IP address resolves to that IP address and is also used in the HELO. By default, the system will use the PTR hostname as HELO. To overrule the automatic system and set a custom HELO for the IP address you can use:
https://SERVERNAME/cgi-bin/api?call=api_set_outgoing_ehlo&ip=IP&ehlo=EHLO
Example
For example, I have a 2 node cluster:
node1.demo-domain.invalidnode2.demo-domain.invalid
I'd like to configure node2.demo-domain.invalid to deliver all outgoing emails randomly via both 1.1.1.1 and 2.2.2.2.
-
Please contact Spam Experts support to add 1.1.1.1 and 2.2.2.2 as additional IPs to
node2.demo-domain.invalid(or add it directly to/etc/network/interfaces) - Create A-records in your DNS for both IPs (e.g.
out1.demo-domain.invalidfor 1.1.1.1 andout2.demo-domain.invalidfor 2.2.2.2) - Set the PTR records of both IPs to the A-records
- Set the HELO of both IPs:
https://node1.demo-domain.invalid/cgi-bin/api?call=api_set_outgoing_ehlo&ip=1.1.1.1&ehlo=out1.demo-domain.invalid
https://node1.demo-domain.invalid/cgi-bin/api?call=api_set_outgoing_ehlo&ip=2.2.2.2&ehlo=out2.demo-domain.invalid
- Set the default of
node2.demo-domainto use both IPs randomly for delivery:https://node1.demo-domain.invalid/cgi-bin/api?call=api_set_outgoing_interfaces&domain=default&filtering_host=node2.demo-domain.invalid&interfaces=1.1.1.1%3B2.2.2.2&username=
- To revert back to the default primary interface, you can execute:
https://node1.demo-domain.invalid/cgi-bin/api?call=api_set_outgoing_interfaces&domain=default&filtering_host=node2.demo-domain.invalid&interfaces=&username=
Step 4 is not needed if the correct PTR is set, as, by default, the HELO is set to the PTR. You only need to use this if it is not possible to set a correct PTR
Do not use underscores (_) in your hostnames if you are using the PTR as the HELO, as this is not permitted per RFC.
Warming up new IPs
Many destination server will by default ratelimit traffic from IPs they have not seen traffic from before. To prevent newly added IPs to get immediately ratelimited, it is recommended to periodically activate them using the IP so they "warm up" and destination servers get familiar with their traffic. This will prevent a queue build-up. It's generally recommended to take at least 7 days to warm up new IPs, starting with delivering just an hour per day and increasing that to 24 hours over time.
Outgoing delivery IP reputation check
In the Manage outgoing delivery IPs section, you will see the Reputation check and the Configure Reputation Check tabs.
Configure Reputation Check
This section already comes populated with a list of DNSBLs that will be checked. To view these, you need to go to the Configure reputation check tab and click Show.

From this section you can also remove any of the existing DNSBLs one by one or several at once.
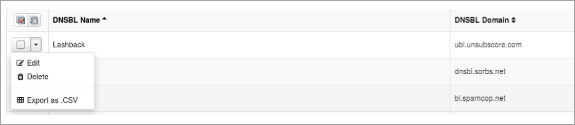
To take action on one of the DNSBLs, you need to use the drop down arrow to the left of it and choose from:
- Edit
- Remove
- Export to CSV
To take action on multiple DNSBLs from the list, you will need to select several or all DNSBLs and use the drop down list at the bottom of the page and select:
- Remove
- Export to CSV
Depending on what you need to do:

Once the action is selected, you need to click Apply.
Adding DNSBLs
You can add DNSBLs one by one or several at once.
To add a single DNSBL:
- Click the Add New DNSBL button.
- In the pop-up screen add:
- Valid name
- DNSBL link
- Click Save
To add multiple DNSBLs, you can use the: Import From CSV option. To import this, you need to use the Select file button, and then Import.
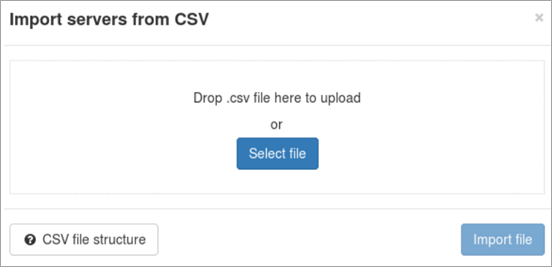
The CSV file structure needs to be: rbl_hostname,rbl_name. Example CSV file content
- rbl_domain,rbl
- bl.spamcop.net,SpamCop
- dnsbl.sorbs.net,SORBS
If you wish to export the current list of DNSBLs, you can do that by using the Export to CSV option.
In order to search for a certain DNSBL added to the list, you will need to:
- Click on Add new rule
- Select from DNSBL name / DNSBL domain / Both
- Enter the query details
- Click Show Results
Once this list is populated you will be able to use the Reputation Check.
Reputation Check
The Reputation Check tab allows you to select one or more of your outgoing delivery IPs, and then check those IPs against a set of DNSBL. You may check one IP against one DNSBL (click the ‘load’ icon in the cell), check one IP against all DNSBL (select the row and use the “check” action), check all IPs against one DNSBL (click the ‘load’ icon in the column heading), or check all IPs against all DNSBL (select all rows and use the “check” action).