
The WHM part of the add-on includes all configuration options and features for the Super-admin user. To access this menu:
- Search for Plug-ins in the WHM interface
- Click Professional Spam Filter
- Click the icon to open the add-on's main menu

Configuration Tab
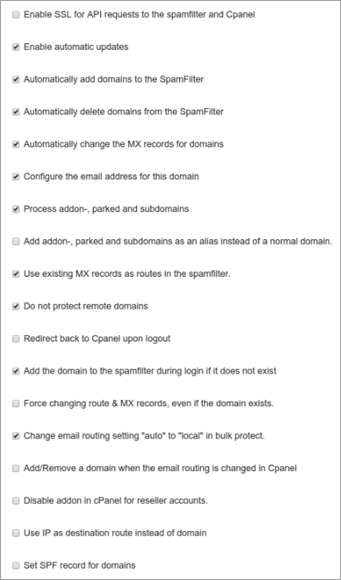
The Configuration panel allows you to configure all the necessary settings for the add-on. Generally, the default settings are sufficient but can be customised to suit your needs.
On mouse over, a tooltip with the option description is displayed.
To use the add-on on the Hosted Cloud there are some additional steps required. See Integrations and Add-ons.
For a detailed overview of the Configuration options, see the Configuration Details section.

Configuration Details
| Setting | Definition | Example |
|---|---|---|
| SpamPanel URL / AntiSpam API URL |
The primary hostname of your cluster or CNAME of that address. If you want to use https://, you must configure SSL support for cpsrvd. This URL will be validated. If it is not a Control Panel URL, a notification will display in the cPanel interface to advise. |
Local Cloud: https://spamfilter.example.com Hosted Cloud: https://login.antispamcloud.com |
| API hostname | The hostname is being used to interface with the API. This is the hostname of your primary server. |
Local Cloud: spamfilter.example.com Hosted Cloud: login.antispamcloud.com |
| API username | The API username should be an admin or sub-admin account. We recommend that you use a separate sub-admin user for each cPanel server. For security reasons, we advise against using Super Admin credentials. Also, ensure that you do not use a “Software API” user. | DemoUsername1 |
| API password | The API password is the one that belongs to the API user. The combination of hostname, username, password and SSL enabled/disabled is validated. If the login fails, you will be notified so you can make the appropriate adjustments. | DemoUserPassword123! |
| Primary MX | The Primary MX record (MX10) | See Hosted Cloud MX Records |
| Secondary MX | The optional Secondary MX record (MX20) | See Hosted Cloud MX Records |
| Tertiary MX | The optional Tertiary MX record (MX30) | See Hosted Cloud MX Records |
| TTL to use for MX records | You can select which TTL the add-on should use when creating MX records for the domain it is protecting. | See Hosted Cloud MX Records |
| Enable SSL for API requests |
Use SSL for API requests. That this will require cpsrvd to be compiled with OpenSSL. This checkbox will be unchecked/greyed out when your PHP version/server does not support OpenSSL.
|
Yes |
| Enable automatic updates |
Updates are performed once a week to make sure the add-on is running the most recent version. If you tick this box, the add-on will periodically check if updates are available. If there is an update, it will be installed automatically. You can also update manually through the add-on's “Update” feature. |
Yes/No (Yes recommended) |
| Automatically add domains to the SpamFilter | Create new domains in the Spam Experts Control Panel when it is being added to cPanel. | Yes/No (Yes recommended) |
| Automatically delete domains from the SpamFilter | Remove domains from the Spam Filter when they are being removed from cPanel. | Yes/No (Yes recommended) |
| Automatically change the MX records for domains |
Change the MX records in cPanel > DNS Zone Manager for your domains. This option uses the Primary/Secondary/Tertiary MX records set here to provision the DNS for a new domain, or when you are executing Bulk Protect. |
Yes/No (Yes recommended) |
| Configure the email address for this domain |
Automatically sets the primary contact address for the domain in the Spam Filter. This function will work only if your account has an email address attached in cPanel. |
Yes/No (Yes recommended) |
| Process add-on- and parked domains | Add add-on (alias) and parked (suspended) domains to the Spam Filter. | Yes/No (Yes recommended) |
| Add add-on- and parked domains as an alias instead of a normal domain |
If unticked (and the previous one ticked), domains will be added as normal standalone domains. If you tick this box (and the previous one is ticked), add-on- and parked domains will be added as special domain aliases for the root domain. |
Yes/No (Yes recommended) |
| Use existing MX records as routes in the SpamFilter |
If selected, instead of the server hostname, the original MX records for that domain will be used as destination hosts. You can use this for specific server setups, such as Google Workspace. |
Yes/No |
| Do not protect remote domains |
If selected, this will skip protecting domains that are set to “remote”. By enabling this option and the “use existing MX records as routes in the SpamFilter” option, you can protect the domain transparently. The existing MX records are used which point to the remote server which the Spam Filter delivers mail to. |
Yes/No |
| Redirect back to controlpanel upon logout | Redirect users back to cPanel when they click the logout button in the Spam Experts interface. | Yes/No |
| Add the domain to the SpamFilter during login if it does not exist | Add the domain to the Spam Filter if the domain does not already exist at first login. | Yes/No (Yes recommended) |
| Force changing route & MX records, even if the domain exists |
If selected, this changes the route to this server and MX records in DNS Zone Manager, if the domain already exists. This feature is useful when you are frequently migrating domains between multiple cPanel hosts. |
Yes/No (Yes recommended) |
| Change email routing setting "auto" to "local" in bulk protect |
The cPanel “email routing” setting will be set to “local” (this server handles email) if the domain is set to “auto”. By ticking this box, domains set to “auto” will be changed into “local”. |
Yes/No (Yes recommended) |
| Add/Remove a domain when the email routing is changed in cPanel | When the email routing is being changed in the “Edit MX records” setting, the add-on can be set to automatically remove the domain if it is set to anything but local or add the domain if it is switched to local. | Yes/No |
| IP as Destination route instead of domain | With this turned on all newly added domains to the Spam Filter will have destinations represented with IP addresses. With the option turned off the destinations will be hostnames. | Yes/No |
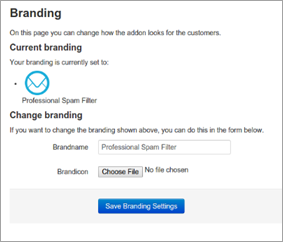
Branding Tab
Using the branding option, you can change the appearance of the cPanel icon to match your own branding. This functionality is only available if you have purchased the Private Label (White label) or Premium Private Label (Premium white label).
Domain List Tab
The domain list shows you all the local domains and allows you to check if it is protected and exists in the Spam Filter. You can also choose to log in to it.
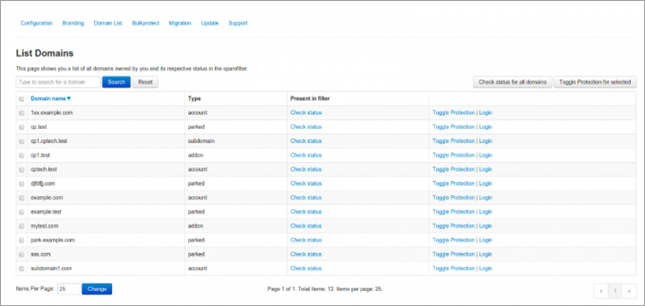
Clicking Check Status or Check all domains displays if the domain is added to the filter.
Using Toggle Protection, you can either add or remove the domain from the Spam Experts Control Panel.
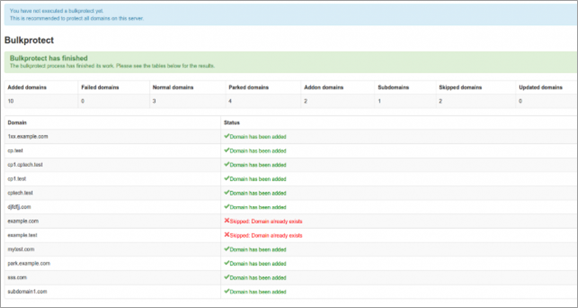
Bulkprotect Tab
The Bulkprotect option allows you to protect all domains on the local system.
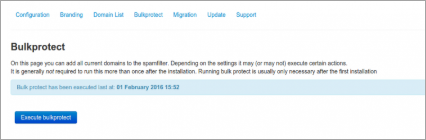
Clicking Enable bulkprotect enables the bulk protect system. This may take some time as it has to iterate through all domains (account, add-on, parked) and execute all the various tasks involved in protecting the domain (for example: adding it, changing MX records, setting email address for reports).
On servers with a lot of domains (1000+) using the User Interface for running bulk protection can be too resource-intensive. To handle large domain lists better, the add-on provides a command-line utility for running the bulk-protection procedure. It can only be executed in root sessions by running the following commands:
cd /usr/local/prospamfilter
php bin/bulkprotect.php
Migration Tab
The migration page allows you change the username and re-assign all domains to that user. For example, if the destination user is an admin:
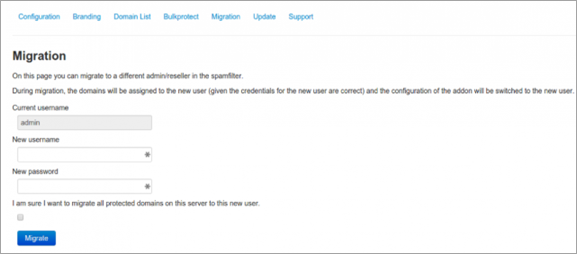
The migration process requires that you enter the new user's username and password, to verify you have access to that account. During the migration, the domains will be assigned to this new user.
Once the process is complete, the username and password is updated for the add-on configuration.
We strongly recommend each cPanel server to use it's own Control Panel API credentials. Whenever you move an account from one cPanel server to another, you should first transfer the ownership of the domain from the old web interface user to the new one. That way, the old cPanel server does not have access to the domain anymore (and won't delete it), whilst the new server does have access (allowing the client to log in).
Update Tab
In the Update page you can enable auto-update or manually update the version to the latest one. You can also choose what type of updates you'd like to receive: manually updating or reinstalling the current version.

We highly recommend you use the tested and preferred, stable builds at all times.
The testing and trunk builds are updated more often but may contain bugs.
Support Tab
The support page contains basic information about which versions are being used and generates a special code.

The special code contains a collection of data which can help troubleshoot any problems. Please provide this information when contacting Support with related queries.
Disclaimer: This documentation may contain references to third party software or websites. N-able has no control over third party software or content and is not responsible for the availability, security, or operation, of any third-party software. If you decide to utilize a release involving third-party software, you do so entirely at your own risk and subject to the applicable third party’s terms and conditions of the use of such software. No information obtained by you from N-able or this documentation shall create any warranty for such software.