
Plesk Addon for Linux
Installing the addon
Note, this addon is only for Plesk 12.5 and older. For newer versions please use the "Plesk extension" instead.
The installation of the addon is very straightforward and can be done by anyone with root access to the system.
System requirements
To use the addon, you have to ensure your system is setup/configured accordingly.
- Full root/shell access to be able to install the addon
- Plesk version 12 or up on Linux (for the Windows version please see here)
- Plesk running on the default port (8443)
- The Spam Experts Local Cloud or Hosted Cloud product, and either administrator or super administrator API credentials
- The Linux "at" package installed on the Plesk server
- If "Restrict Administrative Access" is enabled in Plesk, the loopback IP "127.0.0.1" and "::1" must be accepted
- PHP support for:
- cURL
- OpenSSL/LibreSSL (recommended)
- PHP 5.4> available on the commandline
Be Advised: PHP should have "display_errors" disabled as the addon uses HTTP redirects and any extra output sent before the "Location" header can cause issues. As we communicate directly with the Plesk API having display_errors enabled may return raw responses from the Plesk API.
Please note, Due to recent changes within Plesk, version 17 and onwards requires the new "Plesk extension" instead. This can be found directly on the Plesk online store. Our development version can be found here
Setup instructions
First make sure that the system requirements are met.
If the requirements are met, open a terminal on the Plesk server and issue the following command:
wget -N http://download.spambrand.com/integration/installers/plesk-linux/installer.sh && bash installer.sh
This command will download the installer script and set up the latest (stable) version of the addon.
During the installation it will look for your PHP binary. If the script cannot find the PHP binary, you will have to provide the path to it.
Once the installation has completed, you can configure it through the Plesk admin area.
Addon: Customer view
The customer part of the addon provides the end user a (brandable) icon in their control panel, allowing them to see added domains and login to them.

By clicking on the icon, the users will be redirected to another page that displays all their domains and login links.
Clicking “login” will automatically log the user in the Spam Experts web interface, allowing them to manage their antispam settings for the added domains.
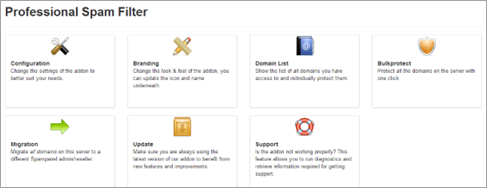
Addon: Admin view
The admin part of the addon includes all administrator configuration and features.
Clicking the icon will lead you to the addon’s main menu.
Configuration
The configuration page contains the full addon options and allows you to set up the addon to act as desired. In most cases, the default settings are sufficient but can be altered to suit your needs.
If you hover over an option, it will show you a tooltip describing the option and what it entails.
Please note: If you want to use this addon on our Hosted Cloud there are some additional steps required, see Using our Addons.
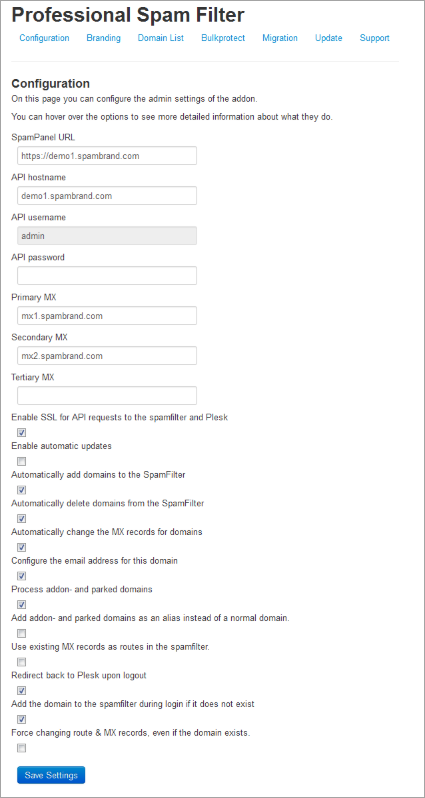
Configuration items described in detail
SpamPanel URL
What URL is being used to manage the Spamfilter? This can be the primary hostname of your cluster, or a CNAME you're using. To use HTTPS, you will need to configure SSL support for cpsrvd.
This URL will be validated. If this is not a Spam Experts Control Panel URL, you will be informed.
API hostname
The hostname being used to interface with the API. This is the hostname of your primary server.
API username
The API username should be either an administrator or super admin account. We recommend you to use a separate admin user for each Plesk server.
API password
API password that belongs to the API user. The combination of hostname, username, password and SSL enabled/disabled is being validated. If the login fails, you will be informed so you can make the appropriate adjustments.
Primary MX
The Primary MX record (MX10).
Secondary MX
The Secondary MX record (MX20). Optional
Tertiary MX
The Tertiary MX record (MX30). Optional
Enable SSL for API requests
Use SSL for API requests. This checkbox will be unchecked/greyed out when your PHP doesn't support OpenSSL.
Enable automatic updates
Updates are being performed once a day to make sure the addon is running the most recent version. If you tick this box, the addon will periodically check for updates that will be automatically installed.
You can also update manually though the addon's “Update” icon.
Automatically add domains to the SpamFilter
If you want to automatically filter domains when adding new ones in Plesk, tick this box.
Automatically delete domains from the SpamFilter
Tick this box to automatically remove filtered domains when removing them from Plesk.
Automatically change the MX records for domains
Tick this box to automatically change the MX records for domains. This option uses the Primary/Secondary/Tertiary MX records to provision the DNS for a new domain or when you're executing Bulk Protect.
Configure the email address for this domain
Automatically set the contact address for the domain in the Spam Experts web interface. Using this, customers can use the "Retrieve login link" feature if they forget their password and will start receiving Protection Reports for their domain. For protection reports, the default settings are being used.
This function will work only if your account has an email-address attached in Plesk.
Process addon- and parked domains
Tick this box to allow the addon to handle addon and parked domains.
Add addon- and parked domains as an alias instead of a normal domain.
If this box is unticked (and the previous one ticked) alias domains will be added as normal standalone domains. If you tick this box (and the previous one is ticked), alias domains will be added as aliases for the root domain they belong to.
Use existing MX records as routes in the SpamFilter.
If you tick this box, instead of the server hostname the original MX records for that domain will be used as destination hosts. You can use this for specific server setups (such as Google Apps)
Redirect back to controlpanel upon logout
Tick this box in case you want to have the user redirected back to Plesk when they click the logout button in the Spam Experts interface.
Add the domain to the spamfilter during login if it does not exist
This function will add the domain to the filter, in case the domain does not exist during login. This is useful to auto-protect domains during login, in case they are not protected yet.
Force changing route & MX records, even if the domain exists.
This will change the route to this server and MX records in case the domain already exists. This functionality can be used in case you are frequently migrating domains between multiple Plesk boxes.
TTL to use for MX records
You can select which TTL the addon should use when creating MX records for the domain it is protecting. Having this set low beforehand will minimize propagation delays. For more information see Local Cloud MX Records.
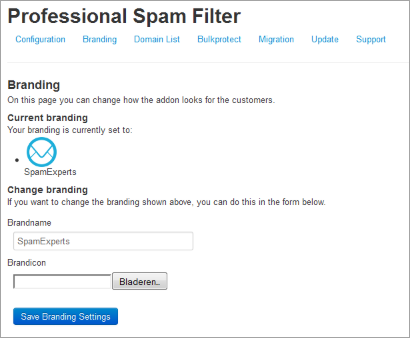
Branding
Using the branding option, you can change the appearance of the Plesk icon to match your own branding. This functionality is only available if you have purchased the Private Label (Whitelabel) or Premium Private Label (Premium whitelabel).
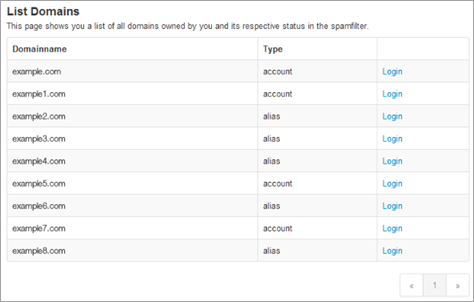
Domain List
The domain list shows you all the local domains and offers you an option to check if it is protected (if they are filtered by Spam Experts) and to login to it.
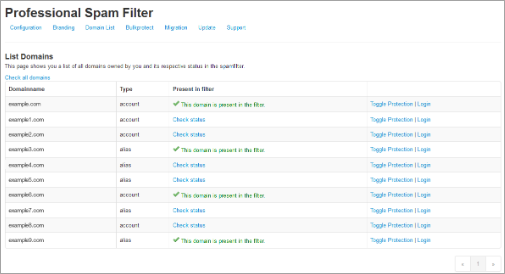
Clicking “Check Status” or “Check all domains” will verify if the domain is added to the filter. Using the “Toggle Protection” you can either add or remove the domain from the spam filter.
Bulkprotect
The Bulk Protect option allows you to protect all domains on the local system.
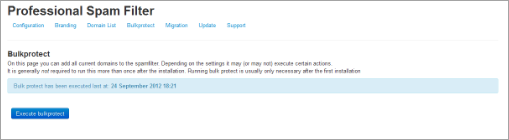
Clicking bulk protect will execute the bulk protect system. This may take some time as it has to iterate through all domains (account, addon, parked) and execute all the various tasks involved in protecting the domain ,for example: adding it, changing MX records, setting email address for reports.
On servers with big amount of domains (1000+) using the User Interface for running bulk protection can be too resource-intensive. To better handle big domains lists, the addon provides a command-line utility for running the bulk-protection procedure. It can be executed in root sessions only by running the following commands:
cd /usr/local/prospamfilter
php bin/bulkprotect.php
Migration
The migration page allows you change the username user and re-assign all domains to that user, in case the destination user is an administrator:
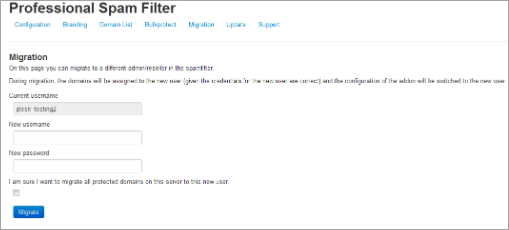
The migration process requires you to enter the new username and password, to verify you have access to that account. During the migration, the domains will be assigned to this new user.
Once the process is completed, it will update the username and password for the addon configuration.
Update
The addon can auto-update itself to the latest version. On the update page you can change what type of updates you'd like to receive, manually update it or reinstalling the current version.
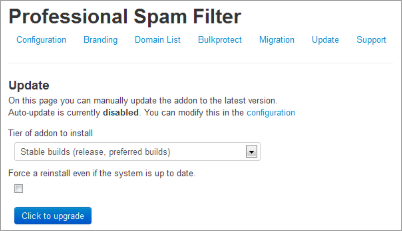
We highly recommend you use the stable builds at all times, as these are the tested and preferred builds.
The testing and trunk builds are updated more often but may contain bugs or untested changes.
Support
The support page shows you basic information about which versions are being used and generates a special code.
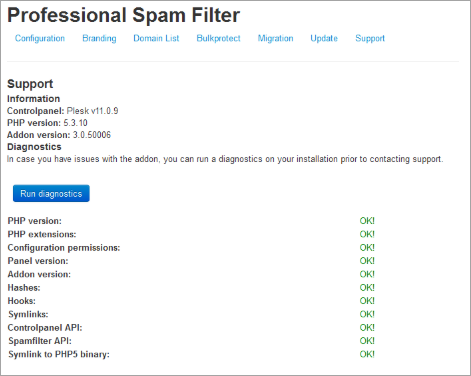
The special code contains a collection of data used by our support engineers to better help you. When asking support, please provide this information.
Troubleshooting
There are two parts of enabling debug mode, one is enabling debug mode for the addon and the other is to have syslog save debug-level logs. Both steps are required to successfully enable debug level logging.
You can enable the addon's debug mode by issuing:
touch /etc/prospamfilter/debug
This feature should only be enabled when there is a problem and you want to debug it.
To disable it again, just issue:
rm /etc/prospamfilter/debug
We recommend to only enable debugging when there are problems (white-pages, unexplainable errors). This mode logs quite some information to the log file and starts displaying more errors in the Control Panel.
In order to have it log its debug level data, you must change your syslog settings. Most installations have a default setup which ignores the "DEBUG" entries. In order to make them show up, you can add the following line to /etc/rsyslog.conf and restart syslog afterwards:
*.debug /var/log/debug
In case you want to keep this enabled for a longer period, you might want to add it to the log rotation configuration.
PHP Binary
During setup we try to find a suitable PHP binary using `which php` and `which php5`. If none can be found, you will be asked for the binary. If this binary matches the minimum version it will be used for the addon to execute CLI tasks (e.g. the updater cronjob). A symlink will be created to allow us to easily find the binary.
If your PHP location ever changes, you'll have to update this location using these commands via SSH:
rm /usr/local/bin/prospamfilter_php
ln -s /usr/bin/new/location/php /usr/local/bin/prospamfilter_php
Please note that if the provided PHP binary does not meet the minimum version correct operation cannot be guaranteed. PHP4 is not supported.
Upgrade Instructions
The system automatically updates itself (when enabled), but in case you want to do this manually over SSH you can use:
/usr/local/prospamfilter/bin/checkUpdate.php --force
Updates will be installed immediately in case there is one.
Uninstall Instructions
In case you want to remove the addon, you have to run the uninstaller using the following command:
cd /usr/local/prospamfilter/bin/ && /usr/local/bin/prospamfilter_php -d open_basedir=/ -d safe_mode=0 -d disable_functions='' ./uninstall.php
This will remove the addon and its configuration from Plesk. No domains will be removed when you do. If you want to remove the domains as well, this can be done through Spam Experts Control Panel or the API's.