
ConnectWise Manage Integration Configuration
When the ConnectWise Manage Integration has been configured you will be able to sync:
- Clients
- Users
- Assets (each must have a hostname, serial number or MAC address recorded in ConnectWise Manage).
- Contacts
- Locations
Requirements
- A ConnectWise Manage API member account with the default plus the following permissions:
- System - Table Setup - Inquire permission required
- System - Security - Inquire permission required
- System - Member Maintenance - Inquire permission required (for syncing Users)
Companies - Company Maintenance - Inquire Permission required (for syncing Clients)
Companies - Configurations - Add, Edit, Inquire Permissions required (for syncing Configurations as Assets)
Companies - Contacts - Add, Edit, Inquire Permissions required (for syncing Contacts)
- The API Key for ConnectWise Manage.
The ConnectWise Manage instructions will help you create an API User and the API Key for use in setting up the ConnectWise integration: https://www.connectwise.com/services/support. Please note we are not responsible for the content of 3rd Party websites.
Before beginning, If you are using an on-premise version of ConnectWise Manage, you may need to ensure SSL is correctly configured prior to attempting the integration.
- Versions 2018.1 or higher: No SSL configuration required.
- All SSL configurations are built into this version to accommodate the security of the integration.
- Versions earlier than 2018: Please review the following KB article from ConnectWise to ensure your SSL configuration is ready for use before proceeding with integration. All traffic to Passportal is over SSL and the integration will fail if it is not configured correctly: http://university.connectwise.com/install/cqt/ssl.html
To integrate with ConnectWise Manage:
- Select Settings > Configure Integration.
- Choose ConnectWise Manage.
- Enter the ConnectWise ManageCompany ID, Server Domain, Public Key and Private Key in the appropriate fields.
- Toggle to enable the sync selections if required.
- Auto-create toggles become available when the corresponding Sync toggle is enabled. When toggled ON new entries created in ConnectWise Manage after the initial sync will be created in Passportal.
- Auto-Create new Clients
- Auto-Create new Users
- Auto-Create new Configurations
- Click Authenticate.
- You are next prompted to select which types of information records you want to sync, use the toggles to select those you require.
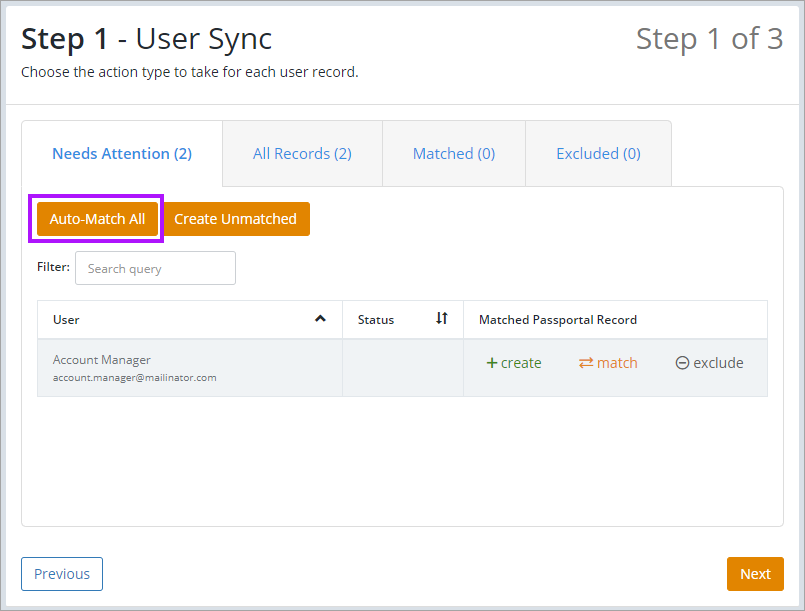
- If Sync Users has been enabled in the previous step, the User Sync screen is now displayed. Passportal will attempt to match all existing users set up in Passportal with their corresponding ConnectWise Manage users, to ensure duplicates are not created. Users must have identical names for this to work. Select Auto-Match All to start this process.
- If you would prefer to manually match the users, you can also do this by clicking on Match in the Matched Passportal Record column and clicking on the corresponding user in the drop-down.
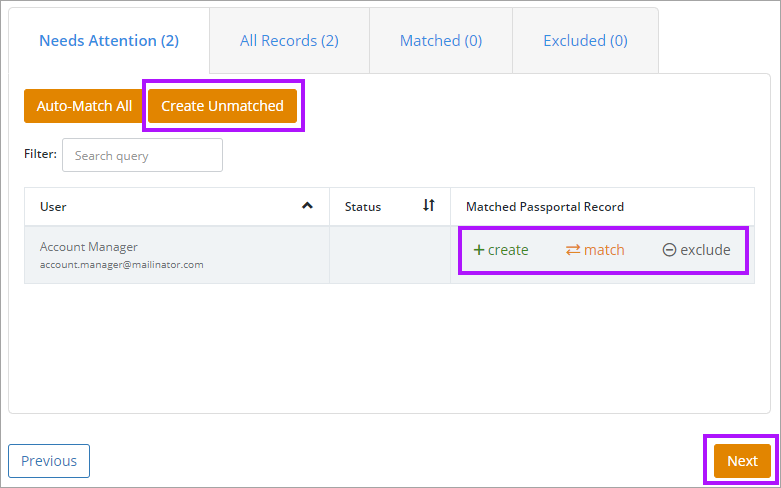
- For the remainder of the users select either the Create or Exclude buttons in the Matched Passportal Record column. If you have a large list you can just exclude the users you don't want and select the Create Unmatched button to create the remaining users.
- If you excluded a user that you would like to later add, simply select the Excluded Records tab and select Create or Match.
- You will be able to revisit this page after the initial setup and change any of the settings or create any users you had previously left uncreated. Click Next to continue.
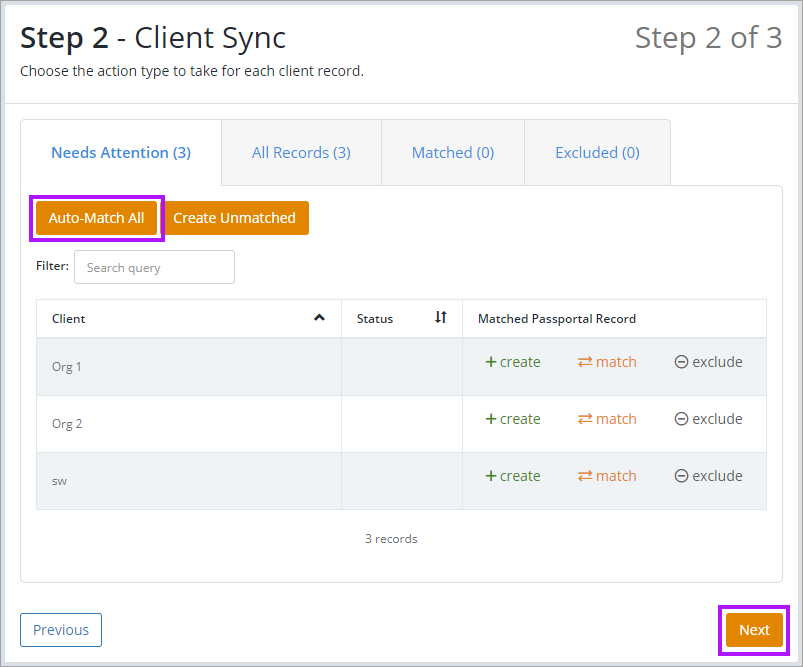
- If Sync Clients had been enabled in the previous steps, the Client Sync screen is now displayed. Passportal will attempt to match all existing clients set up in Passportal with their corresponding Kaseya BMS clients, to ensure duplicates are not created. Clients must have identical names for this to work. Select Auto-Match All to start this process.
- If you would prefer to manually match the clients, you can also do this by clicking on Match in the Matched Passportal Record column and clicking on the corresponding client in the drop-down.
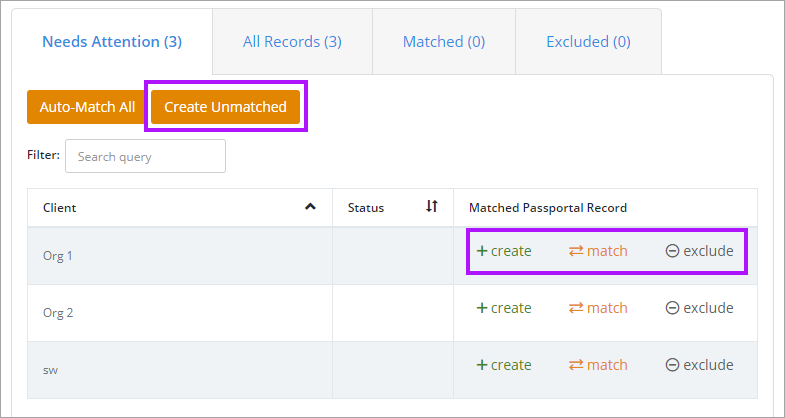
- For the remainder of the clients select either the Create or Exclude buttons in the Matched Passportal Record column. If you have a large list you can just exclude the clients you don't want and select the Create Unmatched button to create the remaining clients.
- If you excluded a client that you would like to later add, simply select the Excluded Records tab and select Create or Match.
- You will be able to revisit this page after the initial setup and change any of the settings or create any clients you had previously left uncreated. Click Next to continue.
- The Sync Preview Sync screen is displayed, which is an overview of records to be created, matched, or excluded.
- Review to ensure the expected actions will be taken. Click Finish to complete the integration process.


After you have completed the process, it may take some time for the initial synchronization of assets to complete. Depending on the number of items to sync, this can take several hours. All imported items will appear in their respective clients.
You can view the Sync Status in the lower half of the screen. Hover over any un-matched Asset to see why sync has failed. Usually the asset is missing a required attribute.
For an asset to import new or match to an existing Passportal asset, the asset on the PSA/RMM integrated solution must contain the following mandatory fields: hostname, serial number or MAC address. Please check your asset on ConnectWise Manage, add the missing information and wait for your next scheduled sync or force sync.
Should you rename a Client in ConnectWise, Passportal does not automatically update to reflect the change as we use the IDs recorded inConnectWise, associated with the ID recorded in Passportal, and not the display names. As such, the corresponding Customer in Passportal will need to be manually amended to match. If you leave the Display names different, this will not cause any adverse effect due to the use of the back-end IDs. In this integration, neither product can be considered the 'primary' or 'secondary' product in the integration.