
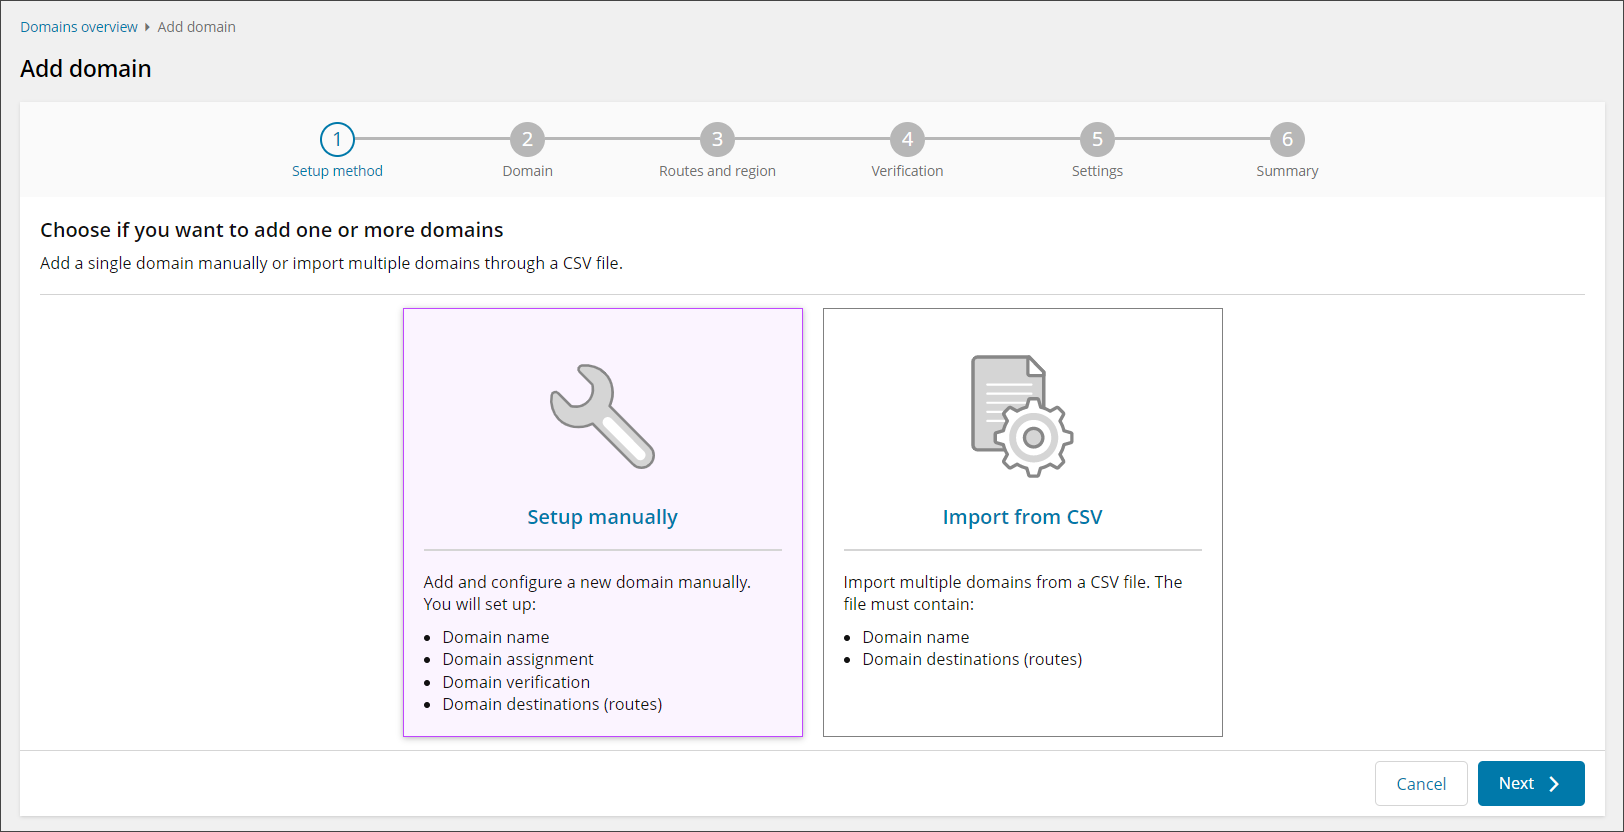
To accept and filter mail for a domain it must first be added to Mail Assure. The options available when adding a domain depend on the version of the dashboard in use. The new interface dashboard includes the option to verify a domain as part of the setup process as well as import multiple domains through a CSV file.
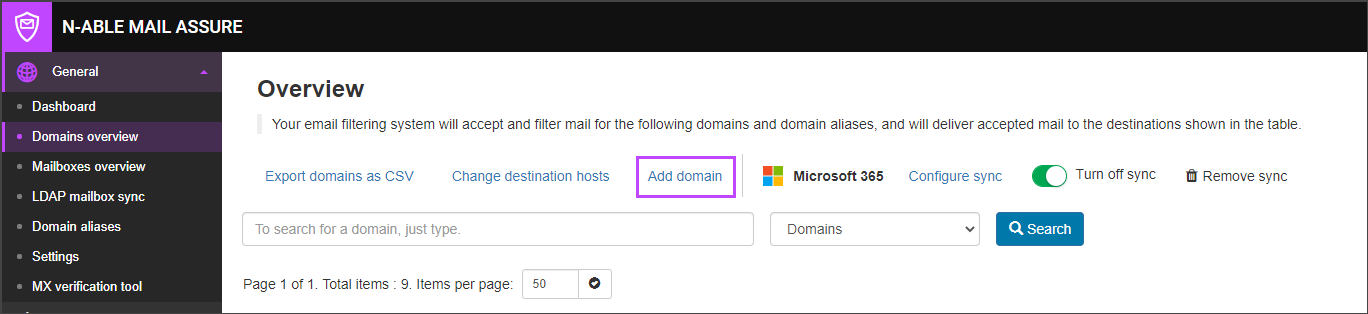
- Login to Mail Assure as an Admin Level user
- Navigate to General > Domains Overview
- Click Add Domain
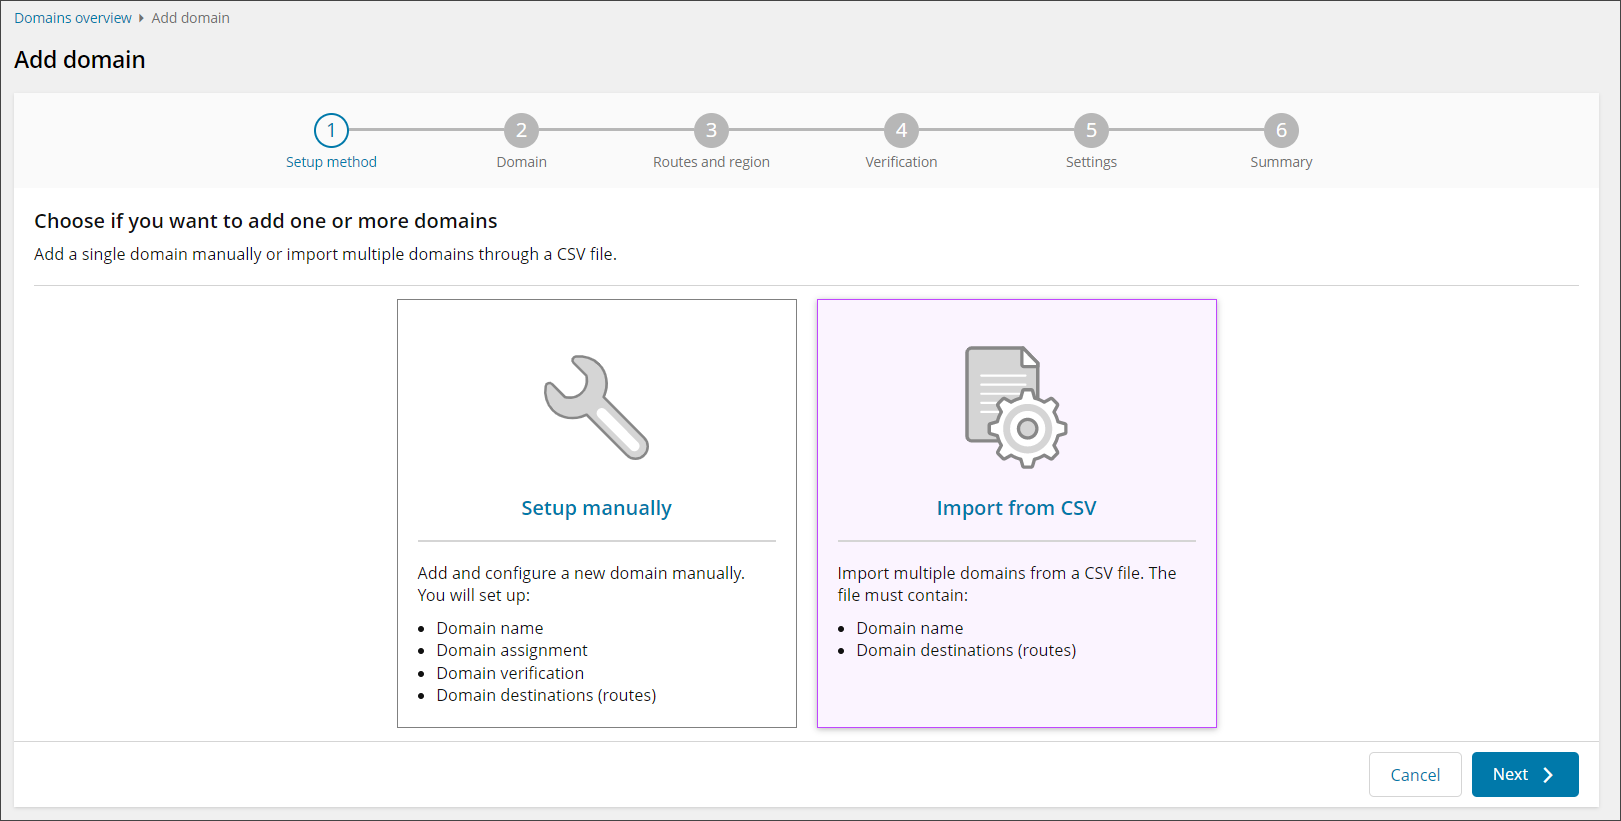
- Select Setup Manually
- Enter the domain name and assign the domain to an Admin and click Next

Assigning a domain dictates the ownership of a domain. The only users who can access this domain will be the top level Tenant user and the Sub-Admin to which it has been assigned.
- To keep message logs and quarantine storage within a specific geographic region, choose the territory from the Region dropdown:
- Global (recommended)
- United States
- European Union
- United Kingdom
- Asia-Pacific
- South Africa
This does not affect the mail-flow into and out of the domain. Specific Geographic MX records and relay servers must be used to alter mail-flow locations.
We recommend using the default Global region to make optimal use of our globally distributed cloud and infrastructure redundancy. When selected, our Global data centers are used for email filtering, logging and quarantine.
We then validate the entered destination and port information. For example, ensure it resolves to a valid IP address and attempt to query the domain's MX records. Where we detect an issue this is displayed in the dialog for review.
- In the Destination route hostnames fields, add the mail server address (IP or FQDN) along with the Port incoming mail is to be routed through after filtering
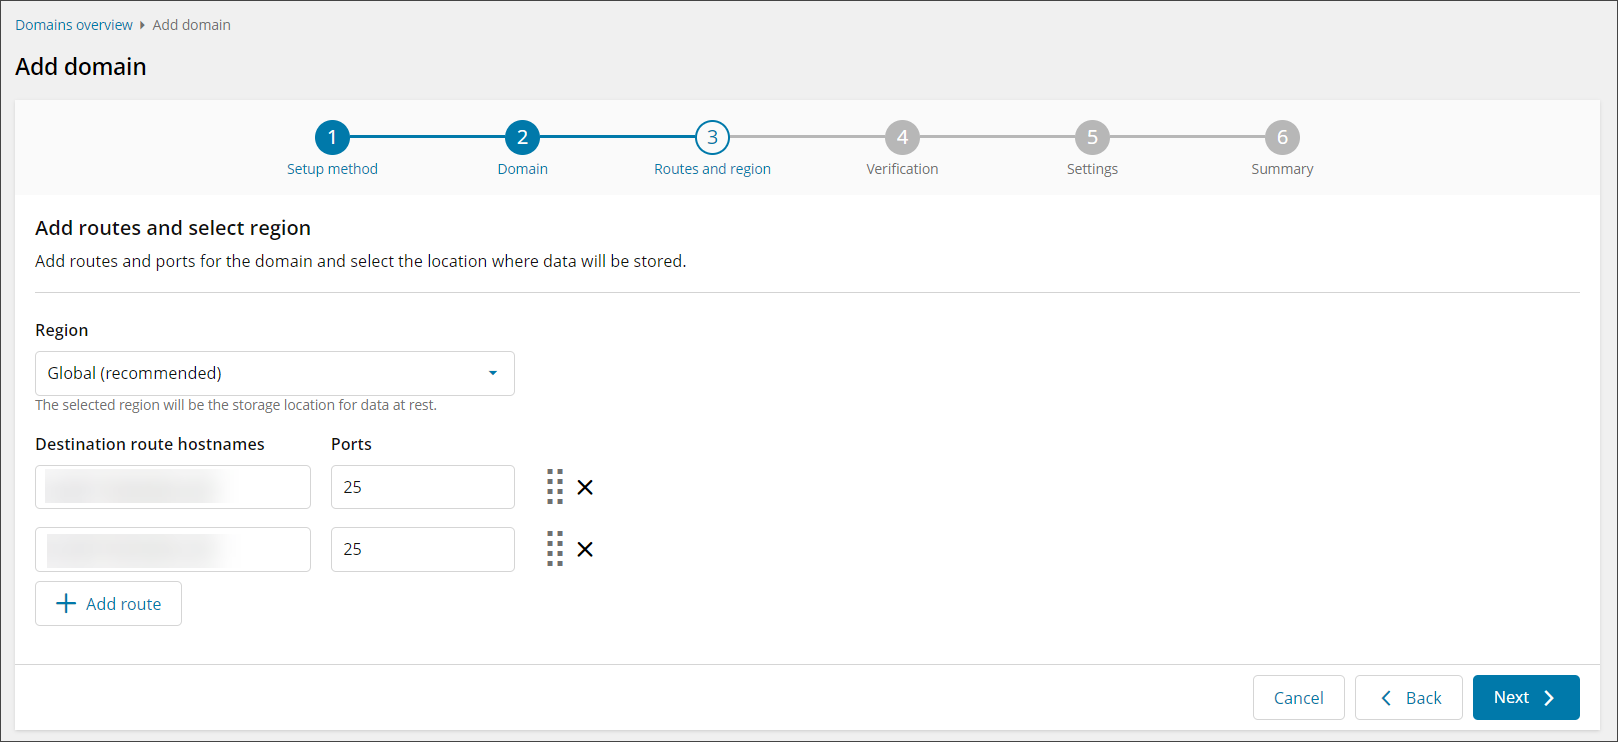
Click + Add route to include additional routes and ports for the domain. Use the drag and drop feature to reorder the destinations and ports. Adding multiple routes here is preferable for load balancing purposes or if an alternative route is needed in case of failover.
For more information on how to find your Destination server address, see Find Destination Server Hostname
If you do not have a specific destination server route to add from the start, Mail Assure will automatically fill in a suggested destination route for you (this route is detected from the domain's existing MX records), with a default destination port 25.
Once you have set your destination route(s) here, they will be displayed in the Incoming > Destinations page -
- Click Next
- You will now be presented with the Domain Verification instructions. Follow the steps provided here to verify ownership of the domain you are adding
This step is mandatory, either now or after the domain has been added.

Cross-domain aliases will be disabled for this domain until you verify ownership
- After Verification, you will see the Settings tab.
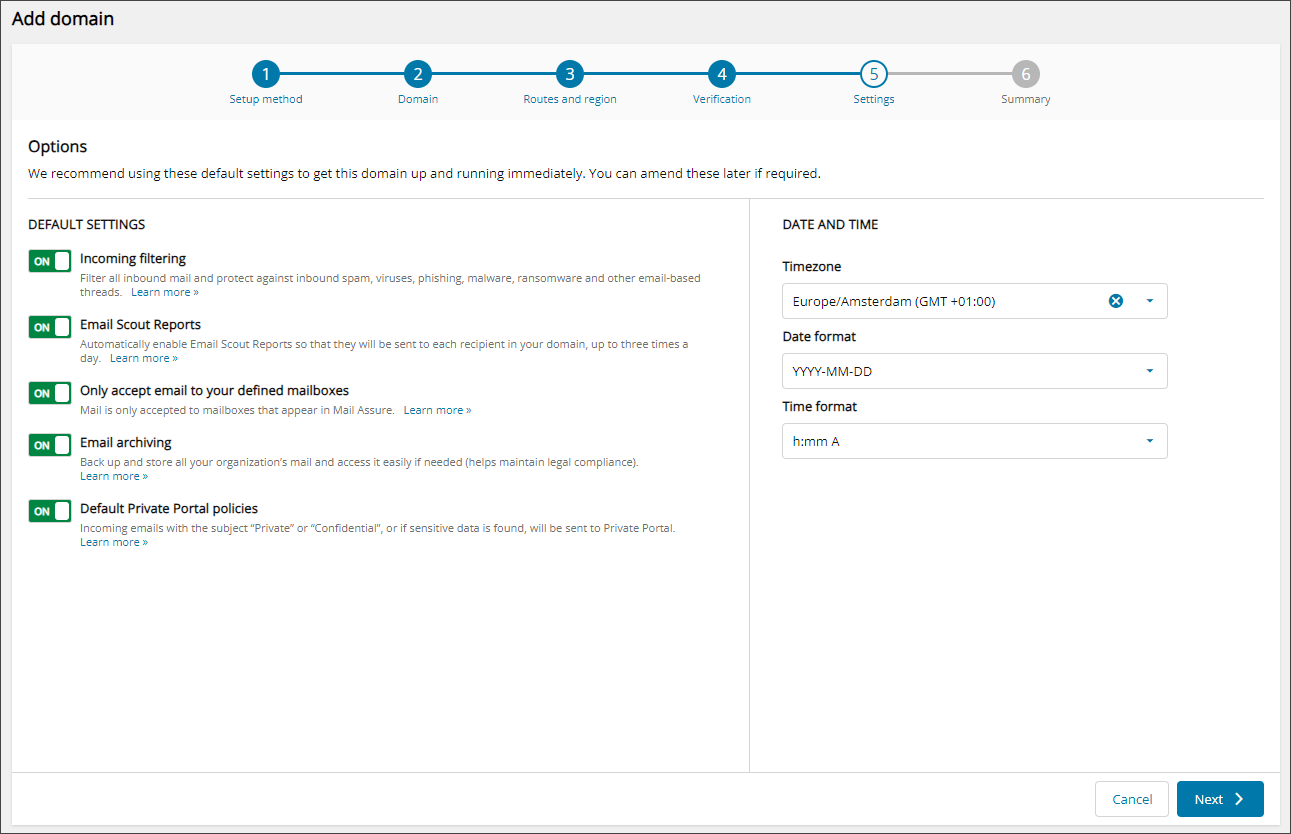
On this page, configure the Default settings for the domain:
- Incoming Filtering - If enabled, all inbound email will be filtered
- Email Scout Reports - This will automatically enable Email Scout Reports so that they are sent to each recipient in your domain, up to 3 times a day
- Only accept email to your defined mailboxes - If enabled, inbound mail will only be accepted to mailboxes that appear in Mail Assure
- Email archiving - If enabled, a backup of all your organizations mail will be taken
- Default Private Portal Policies - If enabled, four policies will be created automatically every time the sync runs, to send emails that match the criteria to the Private Portal:
- Messages where the subject contains 'Private'
- Messages where the subject contains 'Confidential'
- Messages where the subject contains banking information
- Messages where the subject contains the padlock emoji (unicode character "U+1f512", or shortcodes ":lock:", "(locked)" or ":locked:")
Please check with your provider for how to add this
- Timezone - Set the timezone the domain is based in
Automatically detected from the browser, but can be changed here
- Date format - Select a date format
- Time Format - Select a time format
- Click Finish and configure mailboxes
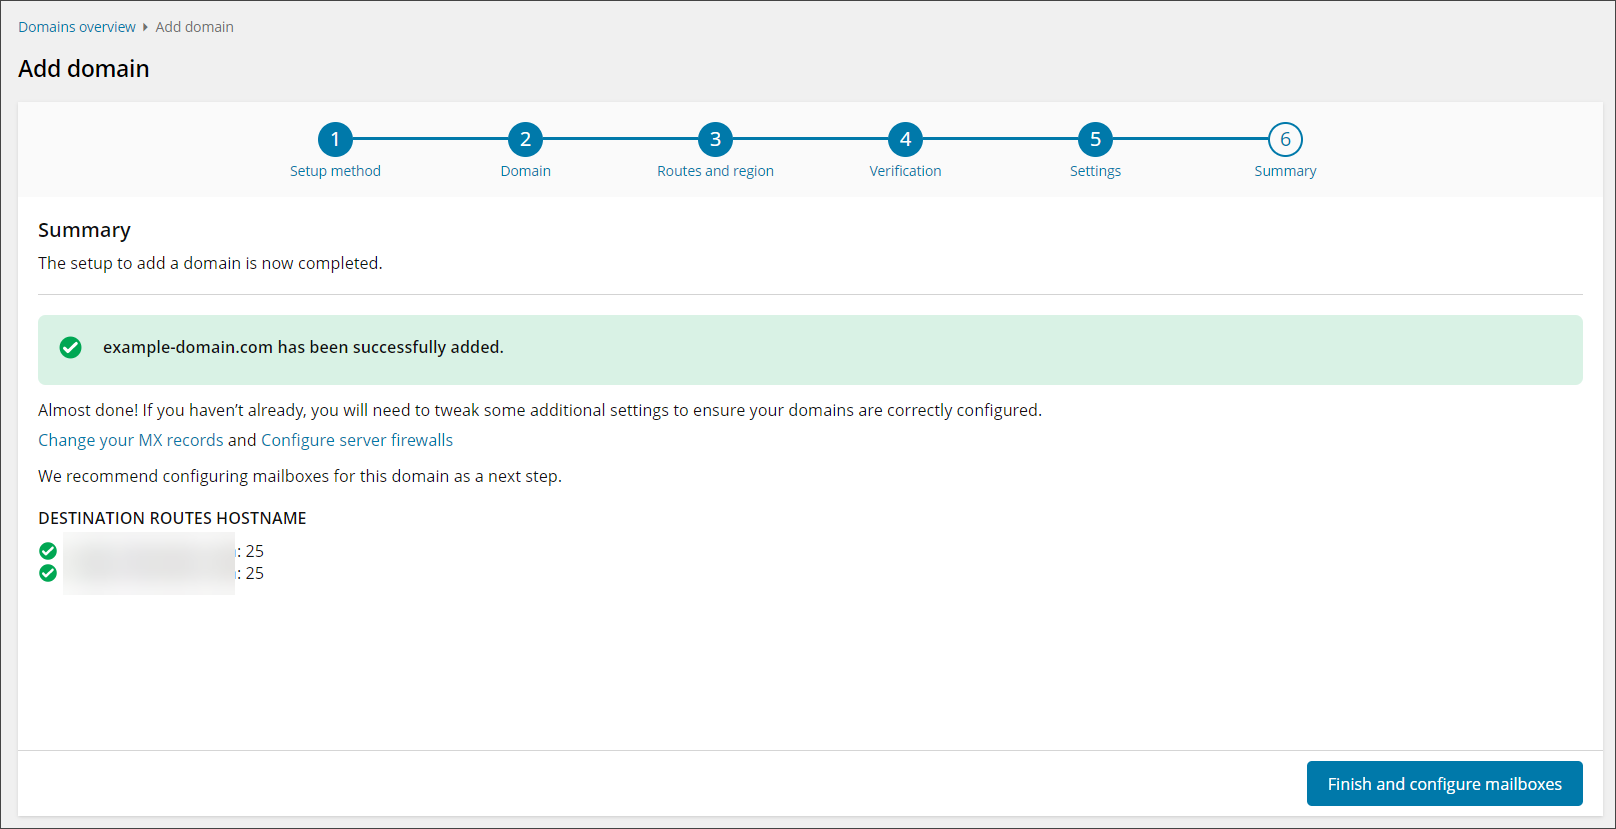
The summary page will also advise to update your MX records and configure Firewalls once the domain has been added. These steps must be completed
If the domain entered returns a destination of onmicrosoft.com or outlook, a prompt will be given which will either take you to Configure Microsoft 365 Sync for the domain, or to continue adding the domain manually.
Import from CSV
Requirements
- Each line in the CSV file must contain at least a domain and destination column entry
- Domain aliases may be added through a third column (optional)
- Only one CSV file can be uploaded at a time
- The CSV must be less than or equal to 9MB in size
CSV File Format
| Domain | Routes | Aliases |
|---|---|---|
| domain1.example | mail.domain1.example | |
| domain2.example | mail.domain2.example:2525 | |
| domain3.example | 192.168.0.1 | |
| domain4.example | mail.domain4.example,fallback.server4.example | alias4.example |
| domain5.example | mail.domain5.example:2525,fallback.server5.example | alias5.example,alias6.example |
File Upload
After populating the CSV file it is ready for import into Mail Assure.
- Login to Mail Assure as an Admin Level user
- Navigate to General > Domains Overview
- Click Add domain
- Select Import from CSV and click Next
- Drag and drop the CSV file into the upload section of the dialog or use browse to navigate to its location on the local computer
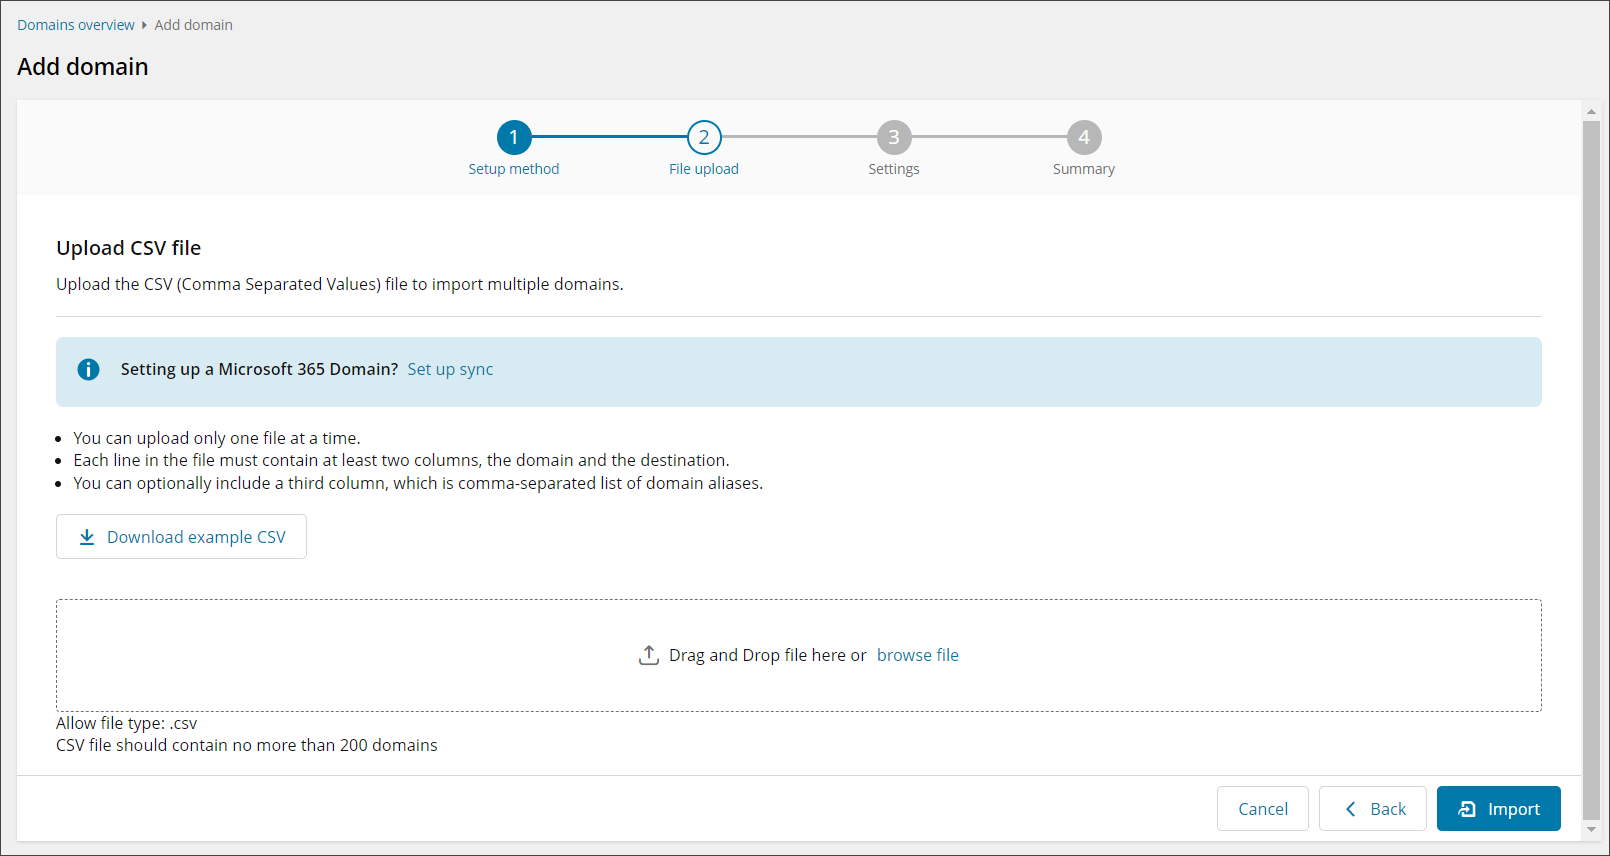
You may download an example CSV file by clicking this button to confirm the file format used in your own CSV is correct
- Select Import to import the file
Any issue identified with the file are reported in the "Upload CSV file" section. For example it was not a CSV file
If the domain entered returns a destination of onmicrosoft.com or outlook, a prompt will be given which will either take you to Configure Microsoft 365 Sync for the domain, or to continue adding the domain manually.
- You will see the Settings tab
Here you can configure the Default settings for the imported domains:
- Incoming Filtering - If enabled, all inbound email will be filtered
- Email Scout Reports - If enabled, Email Scout Reports will be automatically enabled so that they are sent to each recipient in your domain, up to 3 times a day
- Only accept email to your defined mailboxes - If enabled, inbound mail will only be accepted to mailboxes that appear in Mail Assure
- Email archiving - If enabled, a backup of all your organizations mail will be taken
- Default Private Portal Policies - If enabled, four policies will be created automatically every time the sync runs, to send emails that match the criteria to the Private Portal:
- Messages where the subject contains 'Private'
- Messages where the subject contains 'Confidential'
- Messages where the subject contains banking information
- Messages where the subject contains the padlock emoji (unicode character "U+1f512", or shortcodes ":lock:", "(locked)" or ":locked:")
Please check with your provider for how to add this
- Timezone - Set the timezone the domain is based in
Automatically detected from the browser, but can be changed here
- Date format - Select a date format
- Time Format - Select a time format
- Click Finish and configure mailboxes
The summary page will also advise to update your MX records and configure Firewalls once the domain has been added. These steps must be completed
View Domains and their verification status
Go to General > Domain overview in the new interface dashboard to review each of your domains. The verification status of the domain is displayed as an icon against its name. Hover over the icon for the associated text:
- Tick green circle: Domain verified
- Exclamation mark red diamond: Domain not verified
- Clock yellow circle: Domain verification pending
- Dash gray circle: Domain verification skipped
Verify Domain
If a domain has been added without completing verification of ownership of the Domain during the verification step of Adding the Domain, this must be done after.
To verify the domain:
- Login to Mail Assure as an Admin Level user
- Click on General > Domains Overview
- Find the newly added domain
- Click the dropdown to the left of the Domain Name to open the action menu
- Click Verify domain
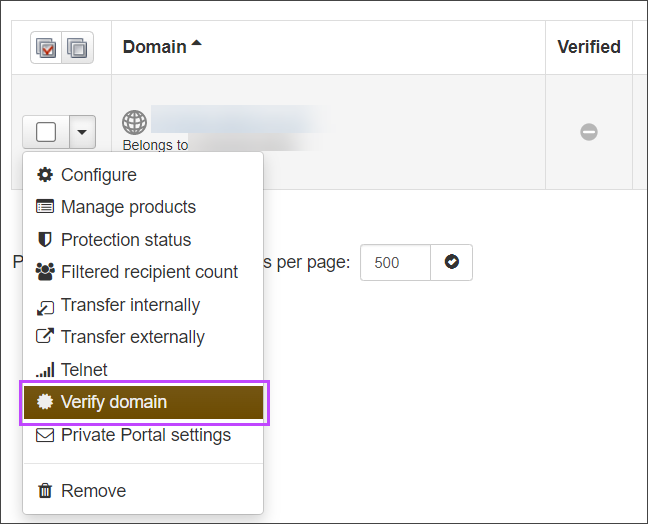
- You will be taken to the Verify Domain wizard, where you will be given steps on completing the verification
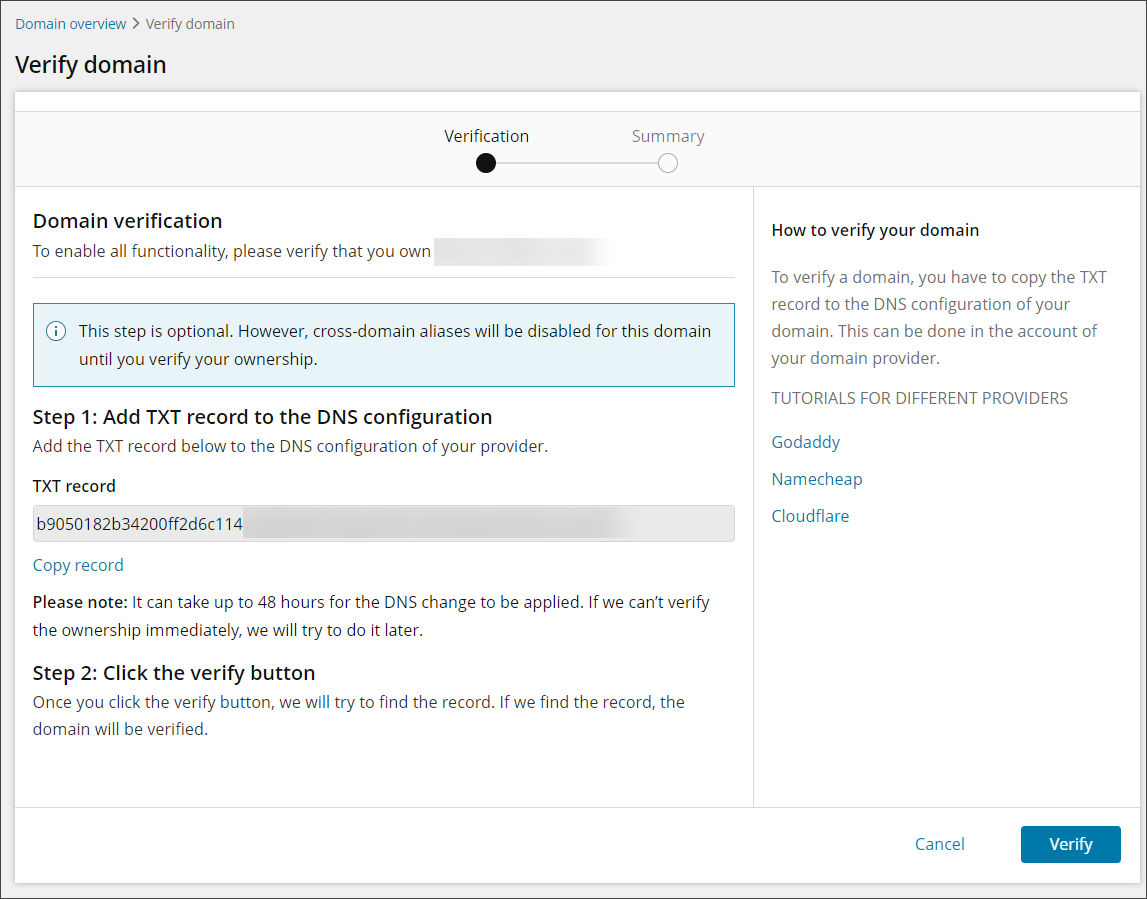
- Click Verify
Check your New Domain can Communicate with the Mail Server
To ensure Mail Assure can communicate with the mail server, carry out a Protection status check:
- Login to Mail Assure as an Admin Level user
- Navigate toGeneral > Domains Overview to display all your domains
- Click on the dropdown alongside the domain you want to check
- Select Protection status to check the routes you have set:

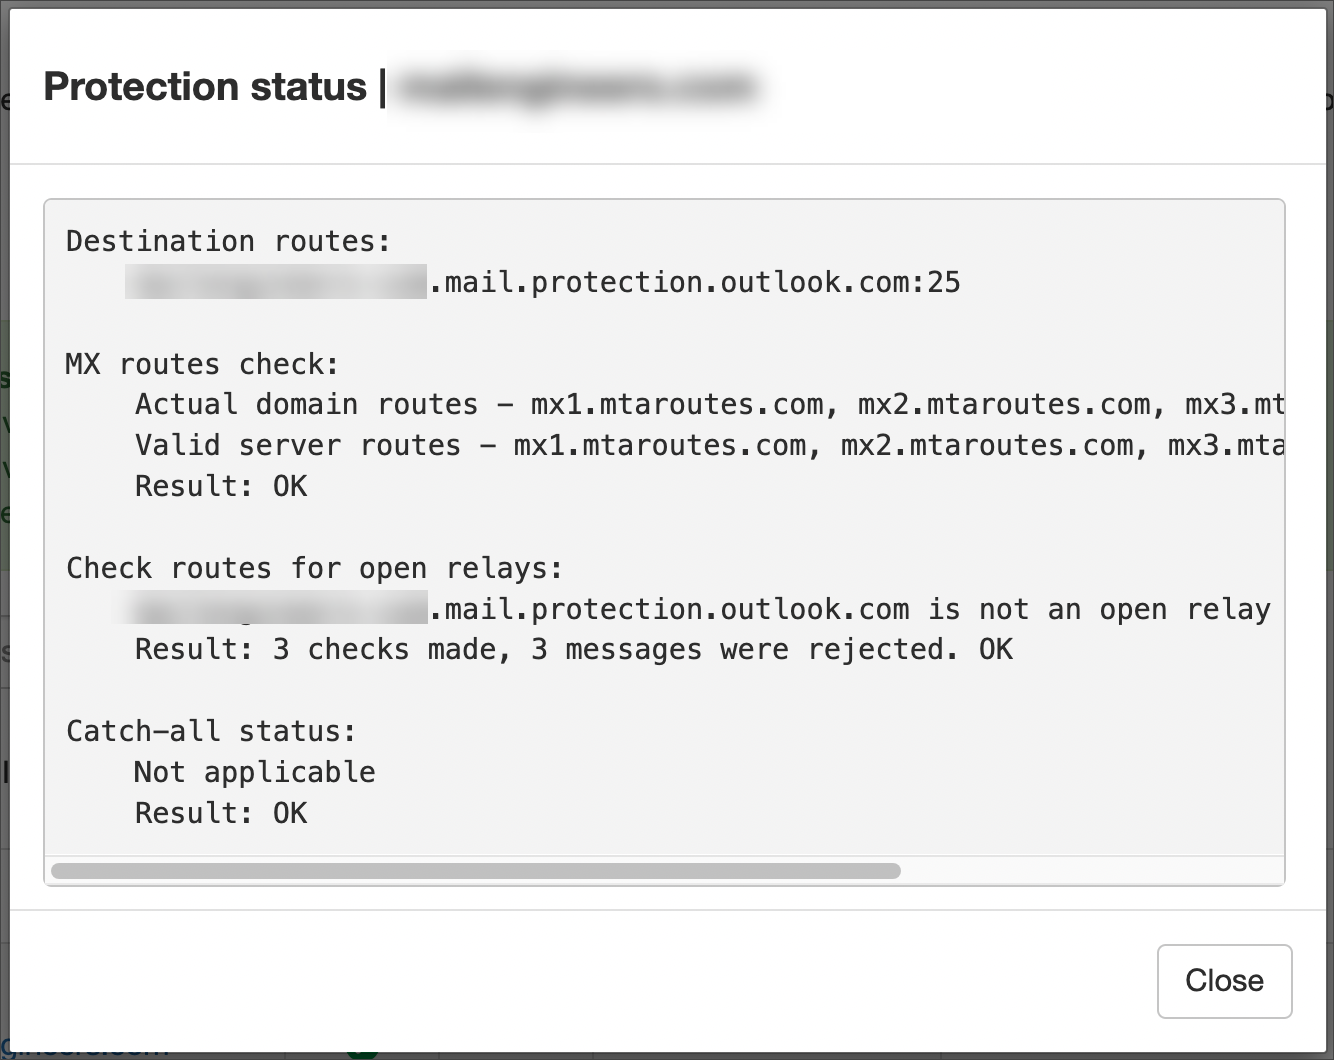
The Protection status dialog should display connection details. If connection failed, a series of 'Connection timed out' responses are displayed.
Now that your new domain is set up you need to modify your MX Records in your domain provider's DNS Settings, in order to point to the correct Mail Assure routes - see MX Records.