
Before beginning, edit your SPF record to include the Mail Assure servers.
You must complete all steps below for correct operation of the outbound filtering.
In order to configure outgoing filtering for Exchange Online/Microsoft 365 follow these steps:
- Step 1: Create Outgoing User/Authentication Method in Mail Assure
- Step 2: Create the connector in Exchange Online
- Step 3: Create the Transport Rule in Exchange Online
Step 1: Create Outgoing User/Authentication Method in Mail Assure
- Log in to the Mail Assure control panel as an admin
- Select General > Domains Overview then click on the relevant domain to open the Domain Level Control Panel
- Select Outgoing > Manage Users
- Select the Authenticating Domain tab and ensure that the domain you are using with Exchange Online is shown
- Enter a secure password and click Add and configure
- Configure the Authentication method as required, ensuring that Re-authentication permitted is enabled
 Settings to Configure
The Outgoing User Settings page is displayed:
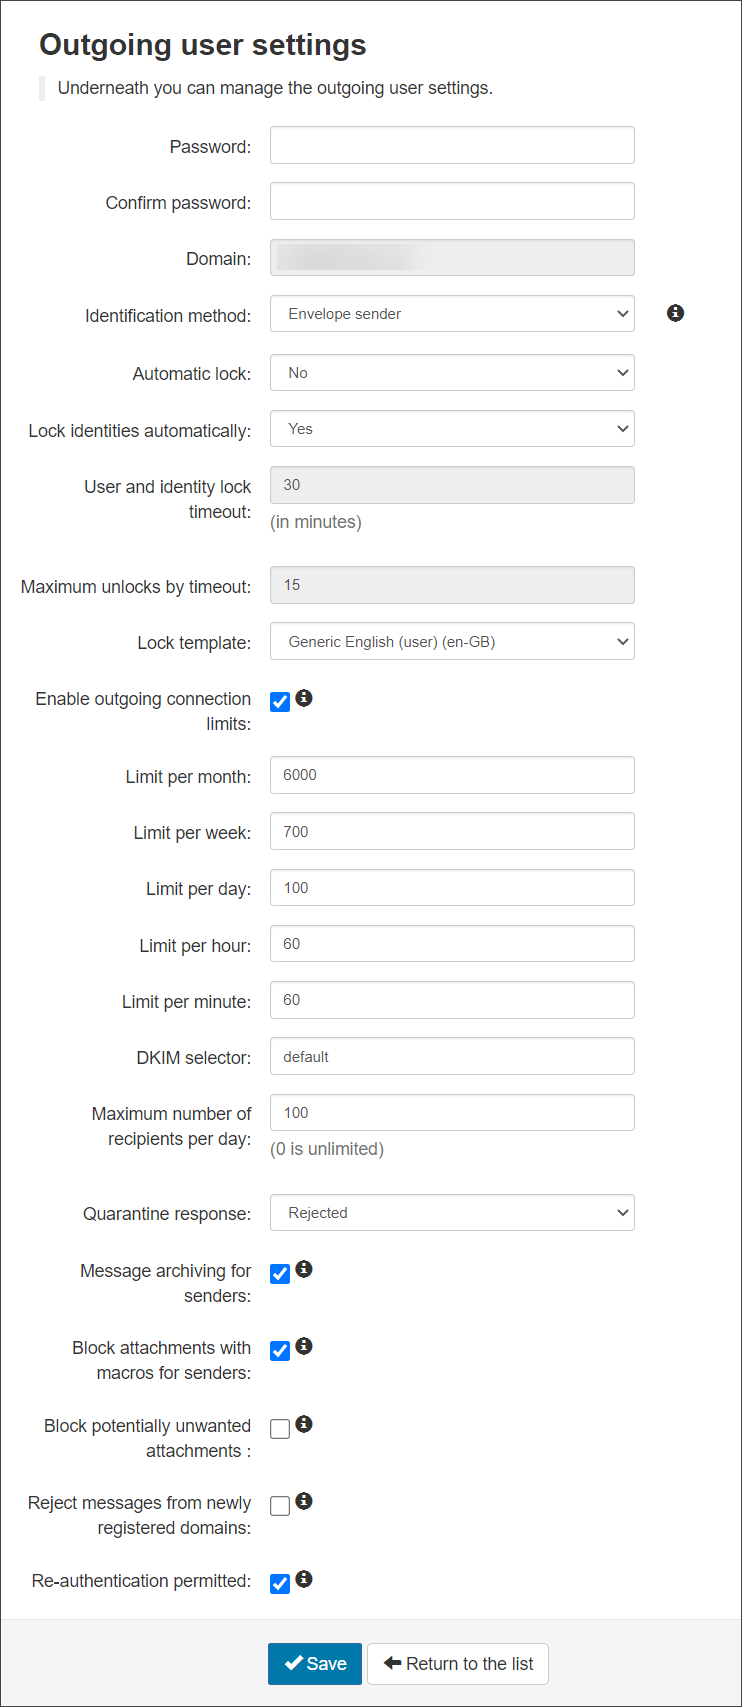
- Password - Create or change the password for the authenticating domain
This password is unique to the Authenticating Domain user and is not tied to any other user credentials. This password can be anything you please.
- Confirm Password - Confirm the password
- Domain - This is the domain the IP address or IP range is associated to
- Identification Method - Choose from: “envelope sender”, “authentication user” or “Header” as the identification method (See the Manage Identities page for more details)
Envelope Sender Use this if your system enforces the “envelope sender” (or MAIL FROM value). This is typically used by Mail Assure users. Authentication User The outgoing user’s authentication details. This is the best choice when you are providing unique usernames and passwords for each outgoing user, rather than using a smarthost system. Header If you choose this option, you are able to add any number of identification headers that we should search for in the message. For example, you might have a system that adds an “X-Client-ID” header, which uniquely identifies each of your end users. For each header, you may choose to either use the entire header value as the identity, or you can provide a regular expression that extracts out a part of the value to use. You may also choose to have our software remove the header after we have found the identity, if you don’t want this to be available to the recipient of the message.
We strongly recommend that an identity Header is set for all outgoing traffic. This makes monitoring and taking action against spammers much easier.
- Automatic lock - When enabled, and when the system detects that the user has sent approx 5 spam messages in 10 minutes, the user will be locked automatically. The user cannot send mail until they are unlocked (the administrator can do this from the alert sent or from the Outgoing Users/Authentication Methods page)
We recommend that you do not enable the Automatic lock if you are using IP authentication within a smarthost.
- Lock Identities Automatically - This spam prevention, when enabled and the system detects that the identity has sent approx 5 spam messages in 10 minutes, the identity will be locked automatically. The identity cannot send mail until they have been unlocked. The identity can be unlocked from the Manage Identities page
- User and Identity Lock timeout - The amount of time an outgoing user or identity will be unable to send messages. This only applies to if you are using the Automatic User Lock or the Automatic Identity Lock
- Maximum unlocks by timeout - The maximum number of times the user will be automatically unlocked after the time-out value has passed. After this has been depleted, the user will have to be manually unlocked
- Lock Template - Select the email template to be used to inform the user of the lock
- Enable outgoing connection limits - Enable or disable limits on outgoing connections whether spam or not, to prevent bulk mailing
Only enable limits when preventing unusual volume of SMTP connections for the following time frames:
- Limit per month - The amount of outgoing connections that can be opened per month
- Limit per week - The amount of outgoing connections that can be opened per week
- Limit per day - The amount of outgoing connections that can be opened per day
- Limit per hour - The amount of outgoing connections that can be opened per hour
- Limit per minute - The amount of outgoing connections that can be opened per minute
- DKIM Selector- Choose the selector you wish to use at domain level. Use the default or add one that has been generated using the DKIM Certificate Generation tool. Once you have created the certificate you need to add the TXT to your DNS
For Example, if you generate a key for selector
mailassure1, publish the DKIM Key under the DNS Recordmailassure1._domainkey.example.invalid. Then entermailassure1in this DKIM Selector field on Mail Assure. - Maximum number of recipients per day - The maximum number of SMTP recipients the authenticating method can send emails to in a 24 hour period
- Quarantine Response – When an outgoing message is detected as spam and it goes into the outgoing quarantine, the response you send back to the sending server can be Rejected or Accepted
- If 'Rejected' (550), legitimate senders will receive a bounce message when their mail gets blocked and quarantined even though the message is stored in the quarantine
- If 'Accepted' (250), the SMTP response would be ‘Accept’ and the message would still be blocked and shown in the quarantine but the sender will not receive a bounce message and will not know that the message is in the outgoing quarantine
The administrator will be notified that there are messages in the outgoing quarantine with an Abuse Report (ARF) if the Administrator’s contact email address has been added into the Outgoing > Settings page in the Domain Level Control Panel (see Configure the Abuse Report Address). Alternatively, use the Email Scout Reports to create a schedule report with details of outgoing quarantine content.
Tip - Administrators may use the Accepted option to prevent the sender receiving notifications when messages are quarantined. For example, they may want to review a rejected message before releasing it for the user.
- Message archiving for senders - Enabled/Disabled – If enabled, submission messages will be added to the archiving account of the envelope sender's domain. See Enable Archiving for Outgoing Mail.
- Block attachments with macros for senders - If enabled, any message with a document based attachment that contains any kind of macro will be rejected
- Block potentially unwanted attachments - If enabled, any messages with an attachment that is considered dangerous or otherwise unwanted will be rejected
This restriction applies to Outbound messages only, to apply this restriction for Inbound mail, see Manage Attachment Restrictions.
- Reject messages from newly registered domains - (if available) If set, then any message sent from a domain that is newly registered (less than a day) will be rejected
- Re-authenticate permitted - If enabled, authorized servers will be able to relay email on behalf of this user
- Password - Create or change the password for the authenticating domain
- Click Save
The secure password is only required to complete the configuration process. Once set, it is no longer needed.
For full details on Authentication methods, see Outgoing Users/Authentication Methods
Alternatively, use Microsoft 365 Sync. This adds the outgoing users to Mail Assure as part of the synchronization process.
Step 2: Create the connector in Exchange Online
Microsoft has specific instructions on setting up a third party cloud spam filtering system. For detailed instructions on configuring a Microsoft 365 environment, see the Microsoft documentation for this here. A summary of one possible configuration is below.
- Log in to the Microsoft 365 Admin Center
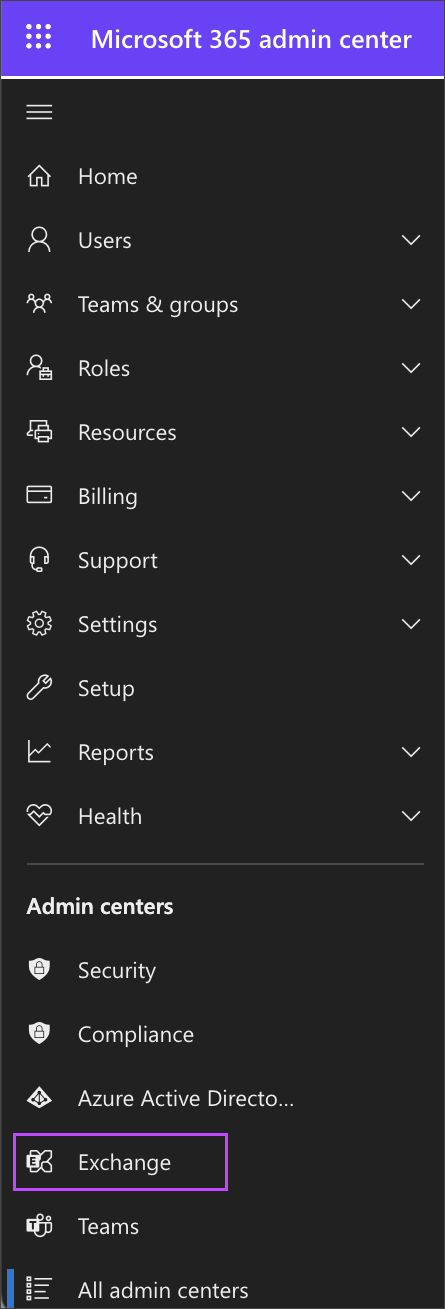
- In the navigation menu, select Show all to open the list of Admin Centers

- Select Exchange to open the Exchange Admin Center
- Open Mail flow > Connectors
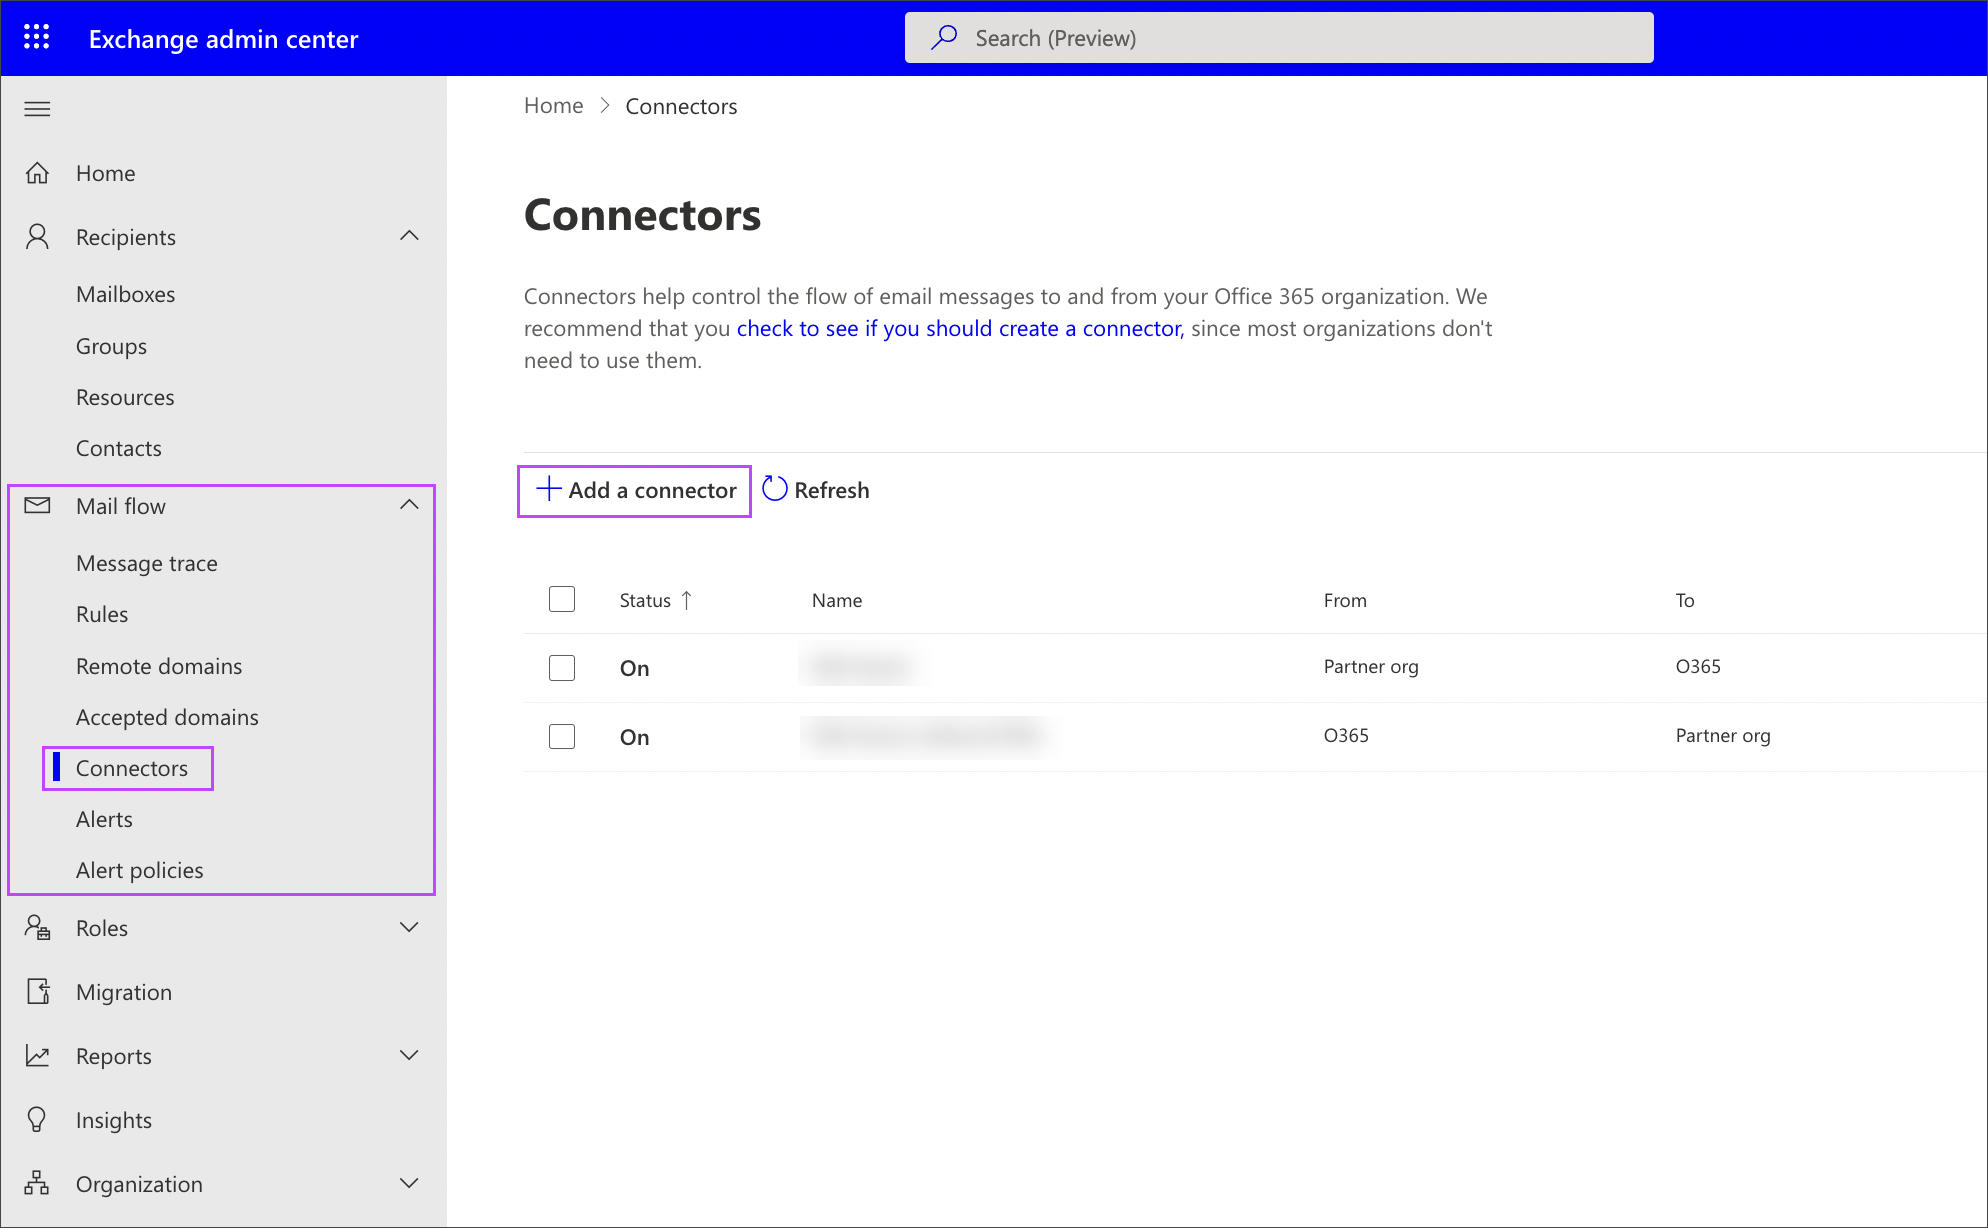
- Click + Add a connector
- Set the connection from: Office 365
- Set the connection to: partner organization
- Click Next
- Give the connector a name (for example: Mail Assure Outbound filter) and click Next
- On the Use of Connector window, select Only when I have a transport rule set up that redirects messages to this connector and click Next
- Select Route email through these smarthosts and enter:
smtpout.mtaroutes.com
- Click +, then click Next
- On the Security Restrictions tab, ensure Always use Transport Layer Security (TLS) to secure the connection (recommended) is ticked
- Use Issued by a trusted certificate authority (CA)
- Click Next
- Enter any valid email address in the Validation email field
- Click +, then Validate
If this validation fails after completing all of the instructions in Step 1 and Step 2 successfully, you may skip this to complete connector creation and then proceed to Step 3.
- Once the email is validated, click Next
- Review the details for the connector and click Create connector
Step 3: Create the Transport Rule in Exchange Online
The below instructions are just an example, please specify your settings for your unique transport rule needs.
- In the Microsoft 365 Admin Center, navigate to Mail flow > Rules
- Create a new rule by selecting + Add a rule and then Create a Rule
- Give the rule a name (for example: Route through Mail Assure, or Mail Assure Outbound)
- Fill the fields in as follows:
- Apply this rule if: The sender domain is
domain.invalidWhere
domain.invalidis replaced with the domain(s) requiredSpecify the domain(s) in the pop-up, ensuring you click the + icon to add each one
- Do the following: Redirect the message to the following connector
Select the connector made in step 2 from the dropdown provided in the Select Connector pop-up
- Apply this rule if: The sender domain is
- Click Next
- Set the rule settings:
- Rule Mode: Select enforce to ensure the rule is used
- Severity: Select the severity of the rule from:
- Low
- Medium
- High
- Not Audit
- Not Specified
- Match sender address in message: Select the Identification method used in Step #1.6 - Authentication
- Click Next
- Confirm the rule settings and click Finish
- Once the Rule has been saved, click Done to close the window.
Once this is done, any traffic matching your outgoing sender domain will be relayed via the transport rule and be processed by the filtering servers.
For additional details on configuring this in either the Classic EAC or the New EAC, see the Microsoft documentation to set up connectors for secure mail flow.