
Depending on its configuration, a mailbox may have a number of alternative alias email addresses associated with it. Regardless of the alias address a message is sent to, the email is delivered to the primary address of the user.
Domain alias addresses have a different email address local part but are still under the same domain. For example, jdoe@example.invalid as an alias for john.doe@example.invalid.
However, there may be scenarios where the user has different mailboxes set up on different domains, common after a company merger or acquisition.
These cross-domain alias addresses may have the same email address local part, but the domain is different. For example, john.doe@domain1-example.invalid and john.doe@domain2-example.invalid.
Requirements
- Both the primary and alias mailbox must be registered in Mail Assure
- The logged-in user must have visibility of the primary mailbox
- The Admin must own both domains
- All Primary and Secondary domains must be verified
How to setup a Cross-domain alias
Cross-domain aliases are configurable in two locations when logged into the new interface.
Setup a Cross-domain alias via the Mailbox Aliases section
As an example below, john.doe@example.invalid is the primary mailbox and john.doe@domain1-example.invalid is the cross-domain alias
- Log into Mail Assure as an admin
- Go to General > Mailboxes Overview > Mailboxes aliases
- Click Add alias to open the Add mailbox alias dialog
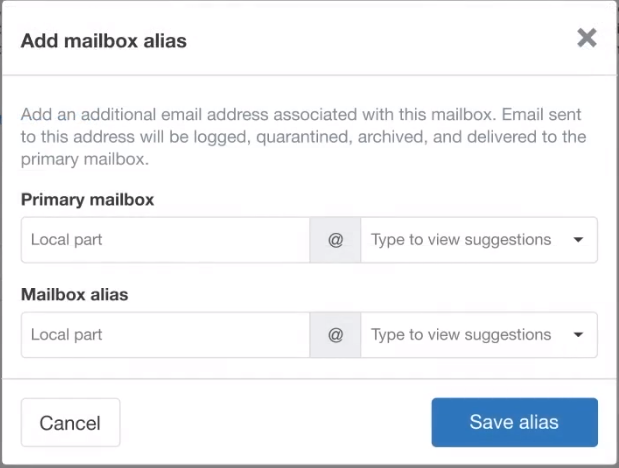
- Populate the Primary mailbox fields with the local part and domain of the primary address
For example, enter
john.doein the local part and select or typeexample.invalidin the domain - In the Mailbox alias fields, enter the local part and domain of the cross-domain alias address
For example, enter
john.doein the local part and select or typedomain1-example.invalidin the domain - Click Save alias to apply
Any issues with the "Mailbox alias" result in a notification message, are covered Notification Messages
Setup a Cross-domain alias via the Mailboxes tab
- Log into Mail Assure as an admin
- Go to General > Mailboxes Overview > Mailboxes to view the mailbox list
- Click on the dropdown beside the mailbox you wish to add the alias for and select Add mailbox alias
- This opens the Add mailbox alias dialog with the Primary mailbox information already pre-populated
- In the Mailbox alias field, enter the local part and domain of the cross-domain alias
- Click Save alias to apply
Any issues with the "Mailbox alias" result in a notification message, covered Notification Messages
Notification Messages
The following messages may be returned where an issue is experience with the entered "Mailbox Alias"
- Verify the domain: Where the "Mailbox Alias" domain is not verified, you will receive a link to take the required steps to verify the domain
- Add the domain: Only "Mailbox Alias domains already in Mail Assure can be used as an alias for mailboxes on other domains. If the "Mailbox Alias" domain is not in the Mail Assure system, you will receive a link to the Add the domain. This will take the user through the add domain process, including the steps to verify the domain
- Domains overview: If the domains are owned by different admins we return an ownership error message. This message states the owner of each domain in Mail Assure along with a link to change their ownership to the same admin in the "Domain overview" section
- Due to an error: This message is returned where we are unable to communicate with the domain to verify ownership. This can be as a result of a temporary issues and please attempt to add the mailbox at a later time
Verify the Domain
Domain verification is a mandatory step in the cross-domain setup process. It not only ensures the entered domain is valid, but also confirms that the person attempting to setup access to the entered secondary mailbox has ownership permissions for the domain. After verifying the domain, the alias can then be added.
As the steps to verify a domain are the same if adding a cross-domain alias via the Mailbox Aliases or against a specific mailbox, we will cover them both here.
Domain Verification
For visibility of the domain name to be verified, Mail Assure retrieves the domain name part of the entered secondary email address and displays it in "Domain verification" section.
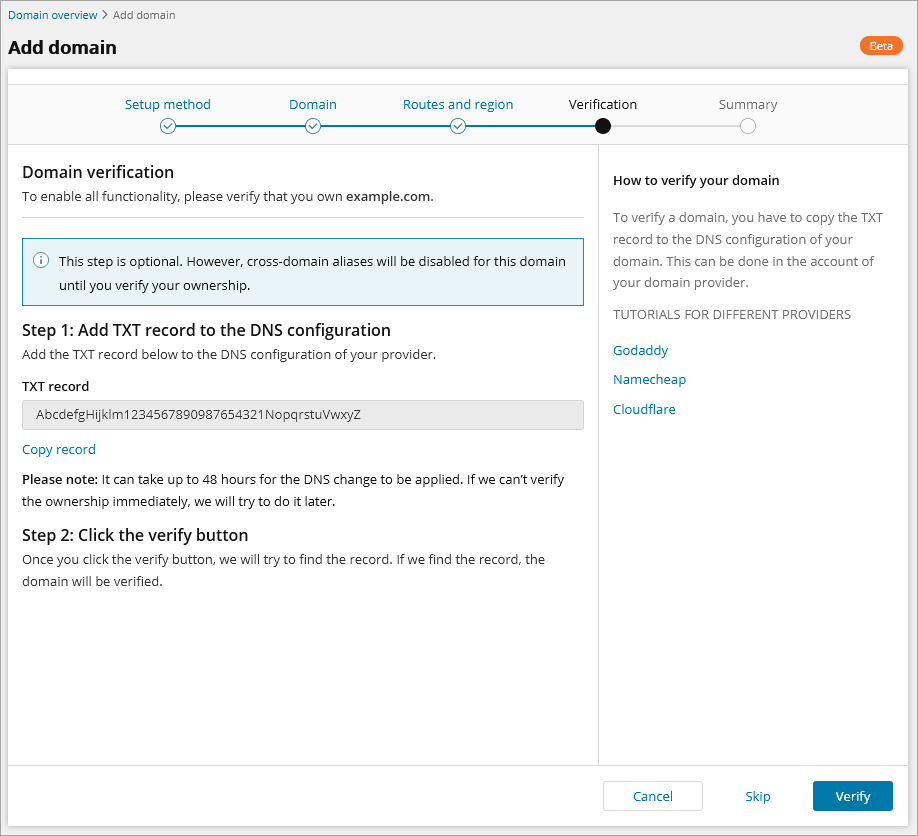
Step 1: Add TXT record to the DNS configuration
To verify a domain, copy the unique TXT verification record from the "TXT record" field and add this to the domain host's DNS configuration.
During the configuration process Mail Assure will attempt to identify the domain's registrar and display this in the dialog.
For ease of use the "How to verify your domain" side panel will include links to any tutorials or information provided by the registrar for setting up TXT records (where available). Where we cannot identify the registrar, we will return our top three results.
Step 2: Click the verify button
After adding the TXT record to the DNS configuration for the domain, click Verify.
It can take up to 48 hours for any DNS changes to apply.
Summary
The "Summary" section displays the verification results, including information on any issues.
Where the domain was successfully verified you can now create the alias that uses this domain.
If we were unable to confirm ownership, we will automatically attempt to re-verify the domain every hour for up to 96 hours and mark the domain as verification pending until ownership is confirmed. You can also check to ensure the TXT record was successfully added to the DNS configuration then attempt of verify the domain again.
Click Finish once complete to exit.
View Domains and their verification status
Go to General > Domain overview in the new dashboard interface to review each of your domains. The verification status of the domain is displayed as an icon against its name. Hover over the icon for the associated text:
- Tick green circle: Domain verified
- Exclamation mark red diamond: Domain not verified
- Clock yellow circle: Domain verification pending
- Dash gray circle: Domain verification skipped. To verify a skipped domain, select Verify domain from its dropdown to go to the Verify the domain section
If we could not verify the domain after repeated attempts a "Domain verification failed" banner is displayed in the "Domain overview" section. This lists the failed domain names and the option to try to verify again.