Before following the seed backup instructions below, please ensure you understand and have checked the following:
Step 1. Set seeding path
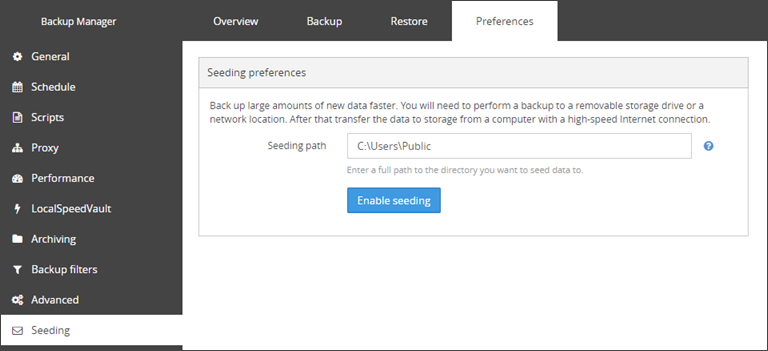
Connect a temporary storage medium to the computer that has data for backup. Then identify and copy the full path to the root of the storage medium or a directory on it. This will be used as the seeding path in the Preferences > Seeding section of Backup Manager.
- On Windows, copy the path from Windows Explorer. Examples:
F:\orF:\Seed - On macOS, use the Finder:
- Open the Finder (the removable drive will show under "Devices" in the Sidebar)
- Click the removable drive
- Right-click (or control-click) any directory on the removable drive. If no directories exist, you can create one first
- Choose Get info from the context menu
- Copy the path from the "Where" field. Example:
/Volumes/Seed
- On Linux, follow instructions for your distribution
Step 2. Enable seeding
- Launch the Backup Manager for the device
- Click Preferences > Seeding
- Paste the seeding path to the Seeding path field
- Click Enable seeding
- Open the Backup tab
- Click Run seeding
- When the initial seeding session is completed, click Run seeding again to back up more data (if necessary). You can run a second backup, modify selections, or even add additional data sources
- When all necessary data has been backed up, click Complete seeding on the notification ribbon
To monitor the status of the Seed backup, switch to the Overview tab and you will see the backup progress bar, which will detail the speed and size of the backup (among other things) as it does with any regular backup. Alternately, you can navigate using your file explorer to the seed location and monitor this for the seed data load, ensuring that this appears and has an appropriate modified date.
Once completed, you will find a new folder on the removable drive (located in the directory specified in Preferences > Seeding). This is the seeding folder. It has the same name as the backup device on which seeding has been done (for example "sony-vaio-hdqtrs").
When seeding is enabled on the device, the Backup manager cancels any backup operations currently in-progress and prevents additional backup or restore jobs from running (including scheduled backups) until the device is switched to post-seeding mode.
Step 3. Transfer seeding folder to storage
Finally, transfer the offline files created by seeding to the cloud.
A good thing is that while the data is on its way, the Backup Manager stays functional. You can continue backing up changed data to the cloud and to the LocalSpeedVault. Data recovery options while in the seeding and post-seeding modes are temporarily limited though.
- Connect the removable drive to a Windows computer with a high-speed Internet connection
- Download the Server Tool utility. You can get an installer from the Downloads module in the Management Console or from the Additional downloads page
The process name for the Server Tool utility is
servertool.exe - Unpack the archive you have downloaded
- Start Command Prompt from the Server Tool directory and run the following command:
ServerTool.exe seeds.upload -path <path_to_seed_load_folder> -threadscount <number_of_threads>
<path_to_seed_load_folder>is the explorer path to the seed load folder<number_of_threads>is the number of CPU threads used to process the seed. The higher the number, the more threads are used and so the faster the upload can complete
This variable is a number between 1 and 15, we recommend leaving this as the default of 3.
Here is an example:
C:\Users\Administrator\Downloads\mxb-st-windows-x64>ServerTool.exe seeds.upload -path F:\Seed\sony-vaio-hdqtrs -threadscount 3
If the path to the folder contains spaces, double quotation marks are necessary (for example "F:\Seed backup\sony-vaio-hdqtrs").
The command window will show the percentage of the seed upload complete, so this can be monitored until completion.
After the upload completes and the data is processed on the server, the Backup Manager will exit the seeding mode. The data transferred to the cloud using the seed loading feature will soon become available for recovery.


