Seed restore is a reverse seeding process to download data from the cloud in bulk for use in a local restore. This is useful if the Internet connection on the target computer isn’t fast enough or if uploading data from the Internet is undesirable (for example, due to security reasons).
Seed restore is a self-service operation. It can be performed without the involvement of service providers.
Definitions
- A host computer – the computer on which a seed restore is initiated
- A target computer – the computer to which the data will be restored
- A removable drive – a storage device for the transfer of recovery data to the target computer
Requirements
- The host computer must run on Windows and must have a high-speed Internet connection
- The target computer can run on Windows, macOS or Linux. It must have the Backup Manager installed with the same device name and installation key that was used for backup
- The removable drive must have a sufficient amount of free space for recovery data
During the seed restore all backup sessions available in the cloud are copied to the removable drive (therefore the free space requirement).
Instructions
Step 1: Get the Server Tool
- On the host computer, download the Server Tool utility.
- Unpack the archive you have downloaded

Step 2: Create a recovery folder
- Connect the removable drive to the host computer
- On the removable drive, create a folder where recovery data will be downloaded to, for example
D:\OfflineRestore
Step 3: Download backup data to the recovery folder
- Start the Command Prompt
- Go to the folder where the Server Tool is located, for example:
cd "C:\Users\Administrator\Downloads\mxb-st-windows-x64"
- Run the
seed.downloadcommand. Here is an example:ServerTool.exe seed.download -account sony-vaio-frontdesk -password 123456 -path D:\OfflineRestore
Values containing spaces must be submitted in straight double quotes.
Required parameters
| Parameter | Definition | Supported values |
-account
|
The name of the backup device recovery is performed for | Text |
-password
|
The installation key for access to the backup device | Text |
-path
|
The path to the recovery folder on the removable drive | Path |
Optional parameters
| Parameter | Definition | Supported values |
-retry-count
|
The number of attempts to connect to the remote server (if the initial attempt fails). | A whole number (set to 5 by default). Recommended range: 1 to 5 |
-thread-count
|
The number of simultaneous download threads | A whole number (set to 1 by default). 4 is recommended. |
For security reasons, the backup data downloaded to the removable drive is encrypted. To make it accessible, add it to the backup device that was used for its creation (see the next step for details).
Step 4: Recover the data to target computer
- When the download is completed, eject the removable drive and connect it to the target computer
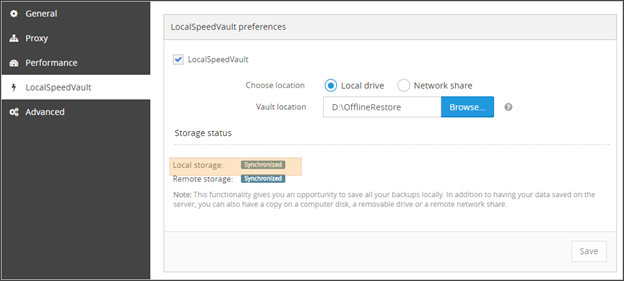
- In the Backup Manager, go to Preferences > LocalSpeedVault. Enable the feature and set Vault location to the recovery folder on the removable drive, for example
D:\OfflineRestore - When the local storage synchronization status changes to "Synchronized", open the Restore tab and perform recovery