
It is possible to expose a recovered server (recovered via Cove Data Protection (Cove) Disaster Recovery As A Service (DRaaS)) reachable from outside the recovery cloud while in failover - for an internet-facing service such as a website, customer portal, mail server, or API.
The Virtual Machine gets a public IP address and sits in an isolated network (known as DMZ network) with no traffic allowed by default, so only the ports you allow are reachable and the rest of the recovery environment stays private.
Prerequisites
The following prerequisites must be met before you can expose the VM to the internet:
- The failover VM must be in Successful Failover state to edit the Expose to Internet toggle or firewall rules.
- Controls are disabled in Preparing Failover and Failed Failover states.
- If controls appear greyed out, wait for the VM to reach Successful Failover before proceeding.
- Have a SuperUser or Manager account for Cove Data Protection (Cove)'s Management Console
Step 1: Expose VM to Internet
- Log in to the Management Console under a SuperUser or Manager account
- Navigate to Continuity > DRaaS > Overview
- Click the content in any column other than Device Name or Screenshot to open the DRaaS Properties panel
- Click Edit beside Network Configuration
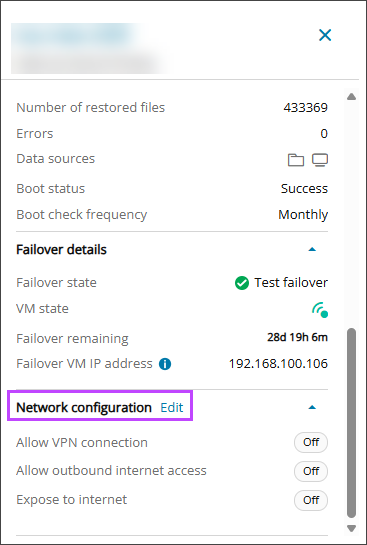
- Switch "Expose to Internet" to ON

The Firewall Rules section will display only once Expose to Internet has been turned ON.
Step 2: Set Internal and External Rules
Before configuring the Internal and/or External rules, you must decide the access pattern to use based on the desired connectivity:
- Private network connectivity? Use Internal rules.
- Internet/public connectivity? Use External rules.
- Both? Configure both Internal and External rules as needed.
To configure the rules:
- Continue in the Network Configuration window opened in step 1.5
- Click Add exception under External: Inbound, or Outbound, and Internal: Inbound, or Outbound
- Pick the relevant protocol from:
- Select All
- TCP
- UDP
- Provide the port/s and IP address using Single IP, Range or CIDR
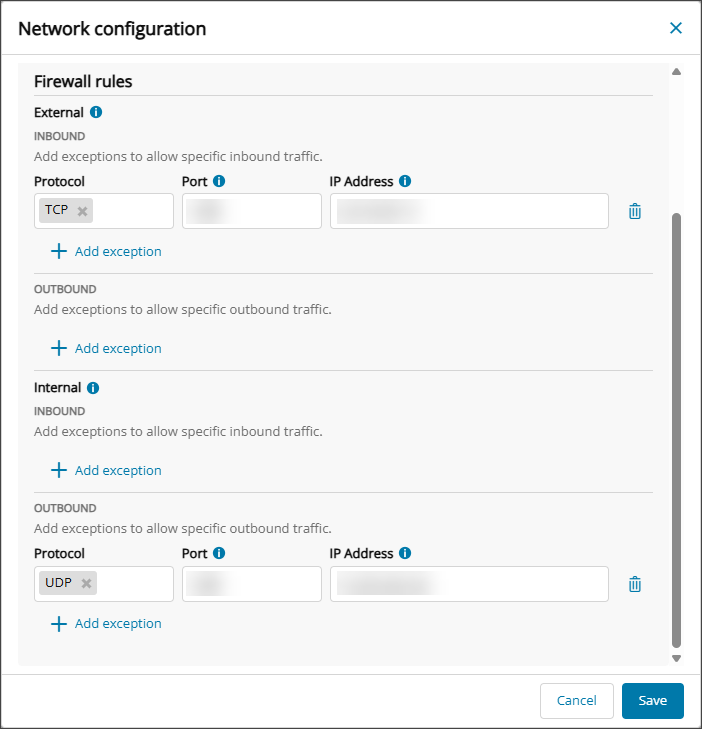
- Click Save
Step 3: (Optional) Set Routing for Internal connection
Configure on-prem routing to the DMZ network if on-prem hosts or Virtual Machines must reach the DMZ VM.
The VPN tunnel should be active.
Traffic destined for the DMZ subnet must be routed to the VPN appliance IP address as the next hop.
- In a Hyper-V environment, add the route on the host or VM that initiates the traffic.
- In an ESXi environment, add the route on the source VM or on the upstream on-prem router, depending on how routing is managed.
- If multiple on-prem VMs need access to the DMZ and they use a common gateway, it is preferable to add the route on that gateway instead of configuring each VM individually.
- If the on-prem environment and VPN appliance are connected through intermediate network devices, routing may also need to be configured on those intermediate devices.
- Add the route on the system that originates the traffic, or on its upstream gateway/router.
For a Hyper-V On-Prem environment, this is done on the Hyper-V host. For an ESXi On-Prem environment, this is done on the On-Prem VM. If there is a central on-prem router, add the route there instead of on each VM one-at-a-time.
- Run the following command in Command Prompt as Administrator
Windows:
route -p add <DMZ Subnet> mask 255.255.0.0 <VPN Appliance IP>
Linux:
ip route add <DMZ subnet>/16 via <VPN Appliance IP>
Where
DMZ subnetis replaced with the /16 subnet containing the private VM IP Address, and where VPN Appliance IP is replaced with the IP address of the VPN appliance machine.The Private VM IP Address is used to access via Internal rules and can be found by navigating to DRaaS > Overview, clicking the content in any column other than Device Name or Screenshot to open the DRaaS Properties panel and scrolling to the Failover Details section. The Private VM IP address is shown here.
The Public VM IP Address is used to access via External rules and can be found by navigating to DRaaS > Overview, clicking the content in any column other than Device Name or Screenshot to open the DRaaS Properties panel and scrolling to the Failover Details section. The Public VM IP address is shown here.
- Confirm that Forwarding is enabled for vEthernet interface on its upstream gateway/router. If disabled, enable it using the following commands:
Windows:
Set-NetIPInterface -ifIndex <inreface ifIndex> -Forwarding Enabled
Linux
sudo sysctl -w net.ipv4.ip_forward=1
Validate Connectivity
Once the configuration steps are complete, we recommend running the following checks to validate that connectivity has been successful:
- Test from source to destination with appropriate tools (ping where allowed, curl, telnet, RDP/SSH)
- Confirm traffic path (Internal vs External) matches the rule type used