Users of all roles can view Microsoft 365 domains present in the Management Console.
There are several ways to view only Microsoft 365 domains:
Microsoft 365 backups dashboard
Users can view Microsoft 365 backups dashboard by navigating to: Backup dashboard> Microsoft 365 backup
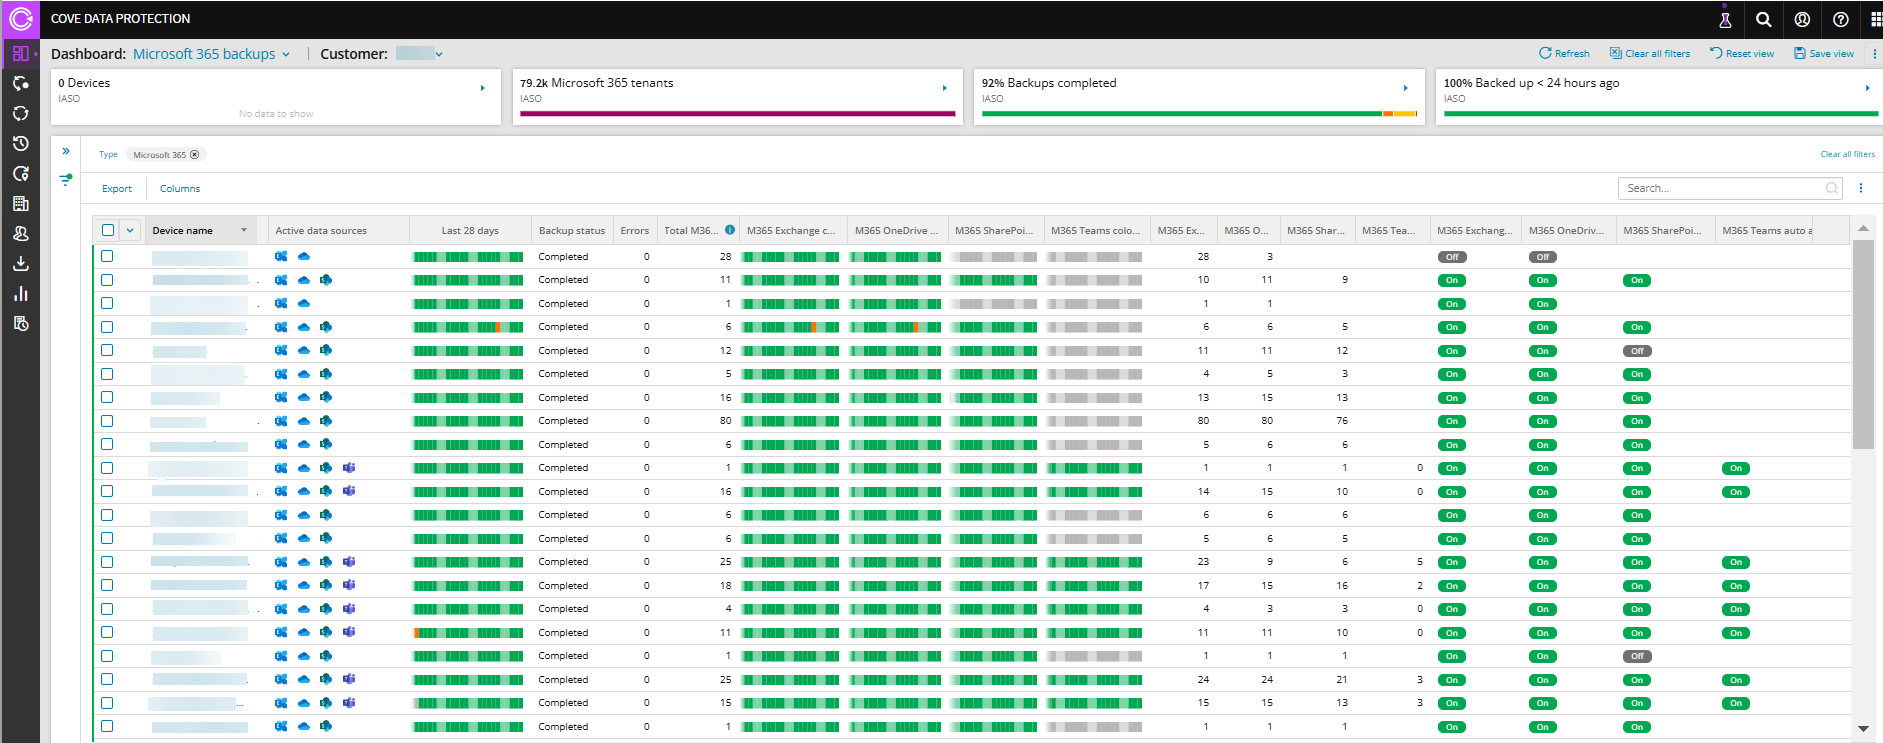
The following are the Microsoft 365 specific dashboard columns:
- Total Microsoft 365 billable users
- Color bars for every Microsoft 365 datasource
- Protected users for every Microsoft 365 datasource
- Auto add new users flag for every Microsoft 365 datasource
Please note that the auto add new users column is not included in the scheduled reports.
Widgets
To display only Microsoft 365 devices using the widgets:
- Expand the widgets at the top of the Dashboard
- Click Microsoft 365 tenants on the Microsoft 365 widget

- Click Microsoft 365 domain to view the Domain's property tabs and the list of devices under Microsoft 365 domains belonging to the customer selected
You can view only Microsoft 365 domains on any dashboard, if you click Microsoft 365 domain.
Searching
To search for Microsoft 365 domains:
- Use the Search bar to the top right of the devices list
- Enable Advanced searching by clicking the toggle

- Use the Type shortcode of
ATand the value of2to search for devices with the Account Type of Microsoft 365Full details on Advanced searching and the syntax and column codes to use can be found on Searching in Management Console
- Hit Enter
- Click on a domain name to view the Domain's property tabs
Filtering
To filter for Microsoft 365 domains:
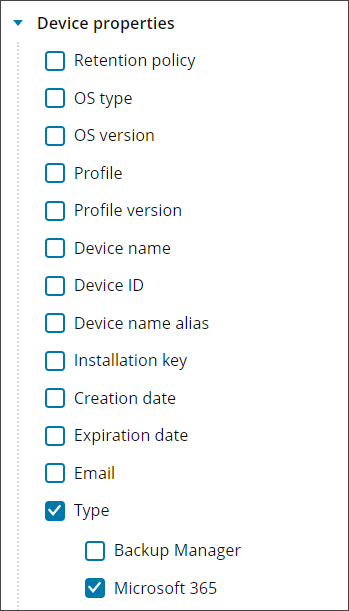
- Use the Filter panel to the left of the devices list, this can be expanded or collapsed by clicking the two arrows (>>/<<)
- Under the Device Properties section, select the type filter
- Tick Microsoft 365
- The devices list will automatically update to display the list of devices meeting this criteria
- Click on a domain name to view the Domain's property tabs
For full details on filtering, see the Filtering Devices in Management Console page for full details.
Export Protected Users
You can export a list of protected users from the Management Console to a spreadsheet in either .xlsx or .csv file formats.
Export files created by the Console contain all the data that is currently displayed in the protected users table. If the data spans across multiple pages, all the pages are exported.
- From the protected users tab apply any filters or searches to limit the list of users displayed
For example using the User Type filter to show only Shared mailboxes
- Click Export from the Toolbar
- Select the file format from:
- XLSX
- CSV
- Click Export
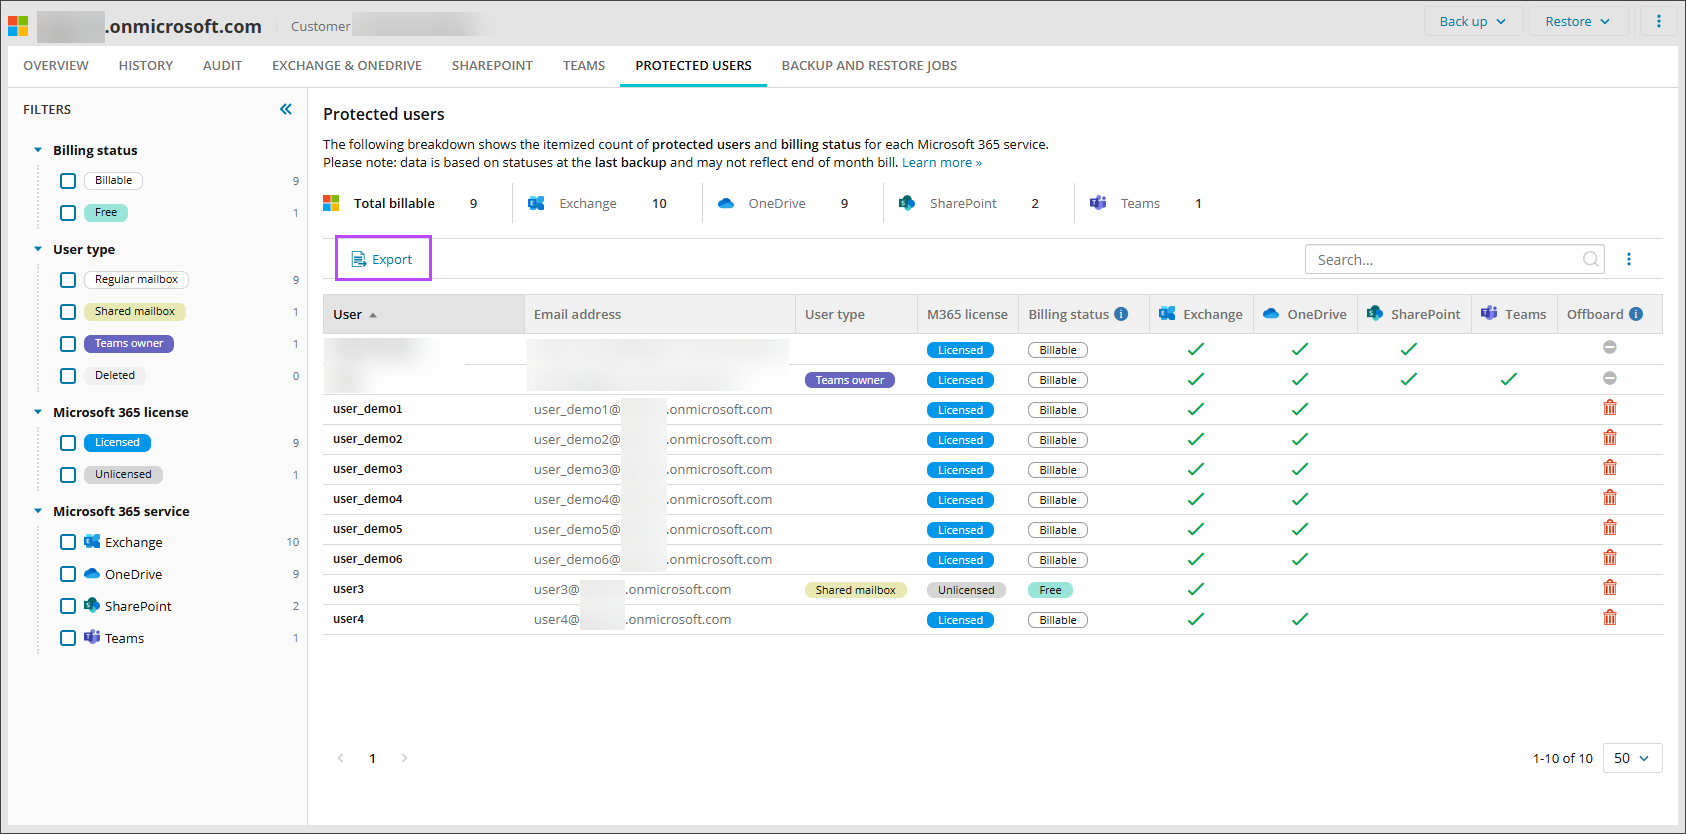
The report will then be generated and downloaded
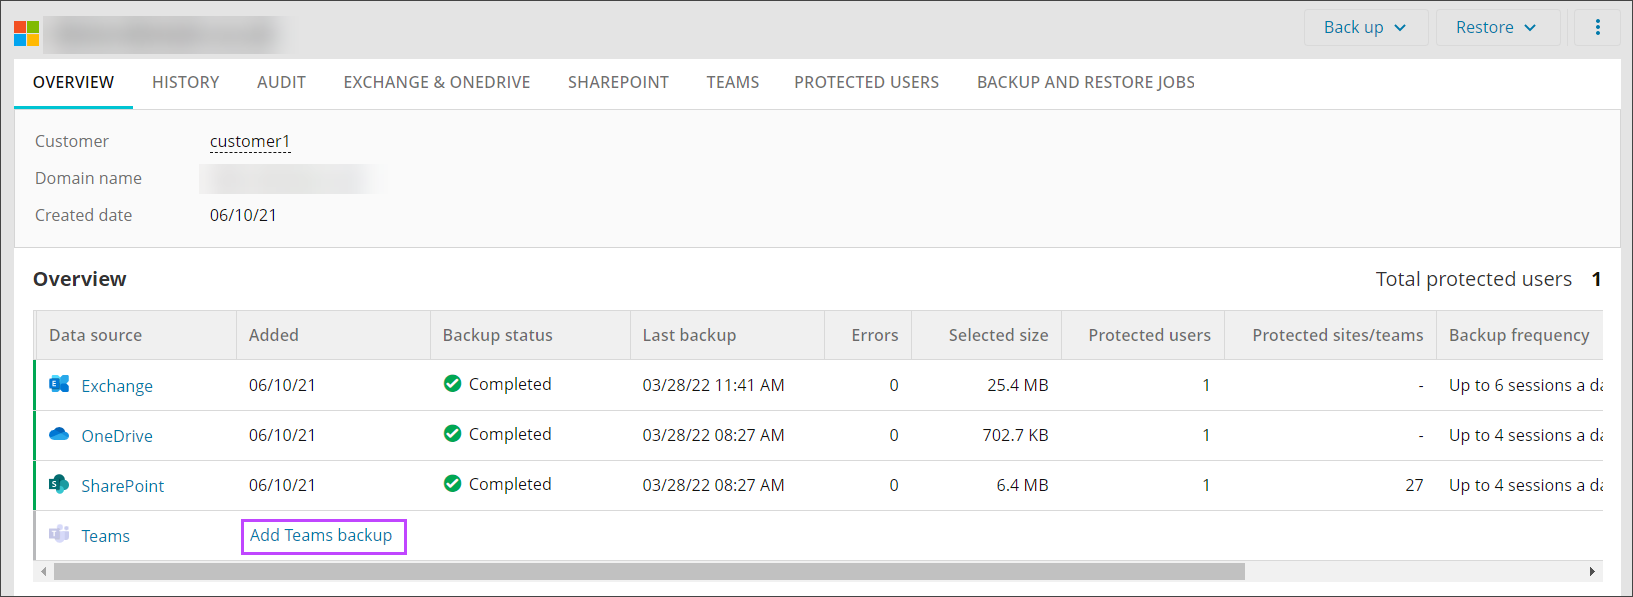
Manage backup selection
When looking at the domains properties, select either the Exchange & OneDrive, SharePoint or Teams tab to view all mailboxes, accounts or sites present in the domain.
Selecting a tab where no data source has been configured for backup will resent you with the option of adding a new data source
Exchange & OneDrive
You can also Add new users to backup automatically using the toggle switches at the top right corner of the tab;
| Toggle State | Result |
|---|---|
| On | newly added users/sites/teams will be added to the backup selection automatically |
| Off | newly added users/sites/teams will appear in the list but will not added to the backup selection |
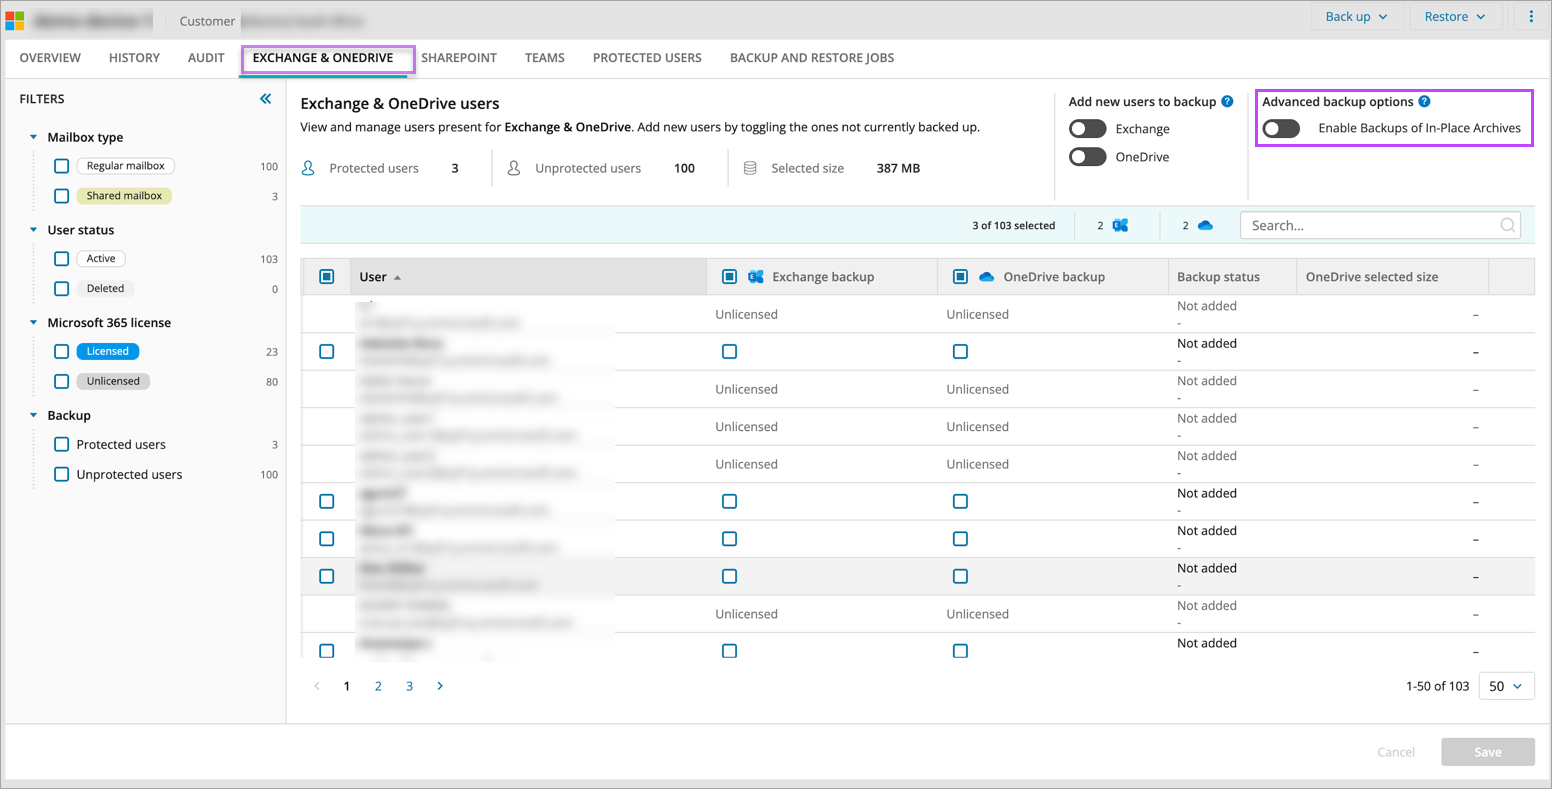
You can filter the displayed list by using the Filters on the left of the display, filtering on the Mailbox Type of Regular mailbox or Shared mailbox, User Status of Active or Deleted, Microsoft 365 license Licensed or Unlicensed and Backup Protected Users or Unprotected users.
Unlicensed users will show in the list as greyed out. This is to show which mailboxes or accounts cannot be selected for backup due to not being correctly licensed.
Enable backups of In-Place Archives
You can Enable backups of In-Place Archives for Exchange.
In-Place Archives (also known as Online Archives) are secondary mailboxes in Microsoft 365 Exchange Online that provide users with additional storage space for older emails.
Enable Backups for In-Place Archives if you wish to add In-Place Archives to backups

The Microsoft 365 permissions required window displays
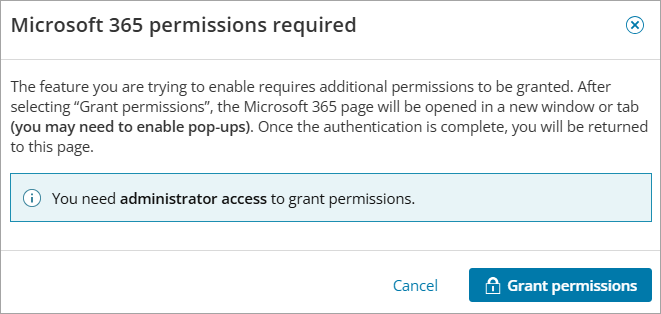
The permissions will be requested only once. You need not re-grant the permissions, if you have disabled the backups of In-Place Archives.
Once you accept the required permissions, the backups of In-Place Archives will be enabled for all users selected for Exchange backup.
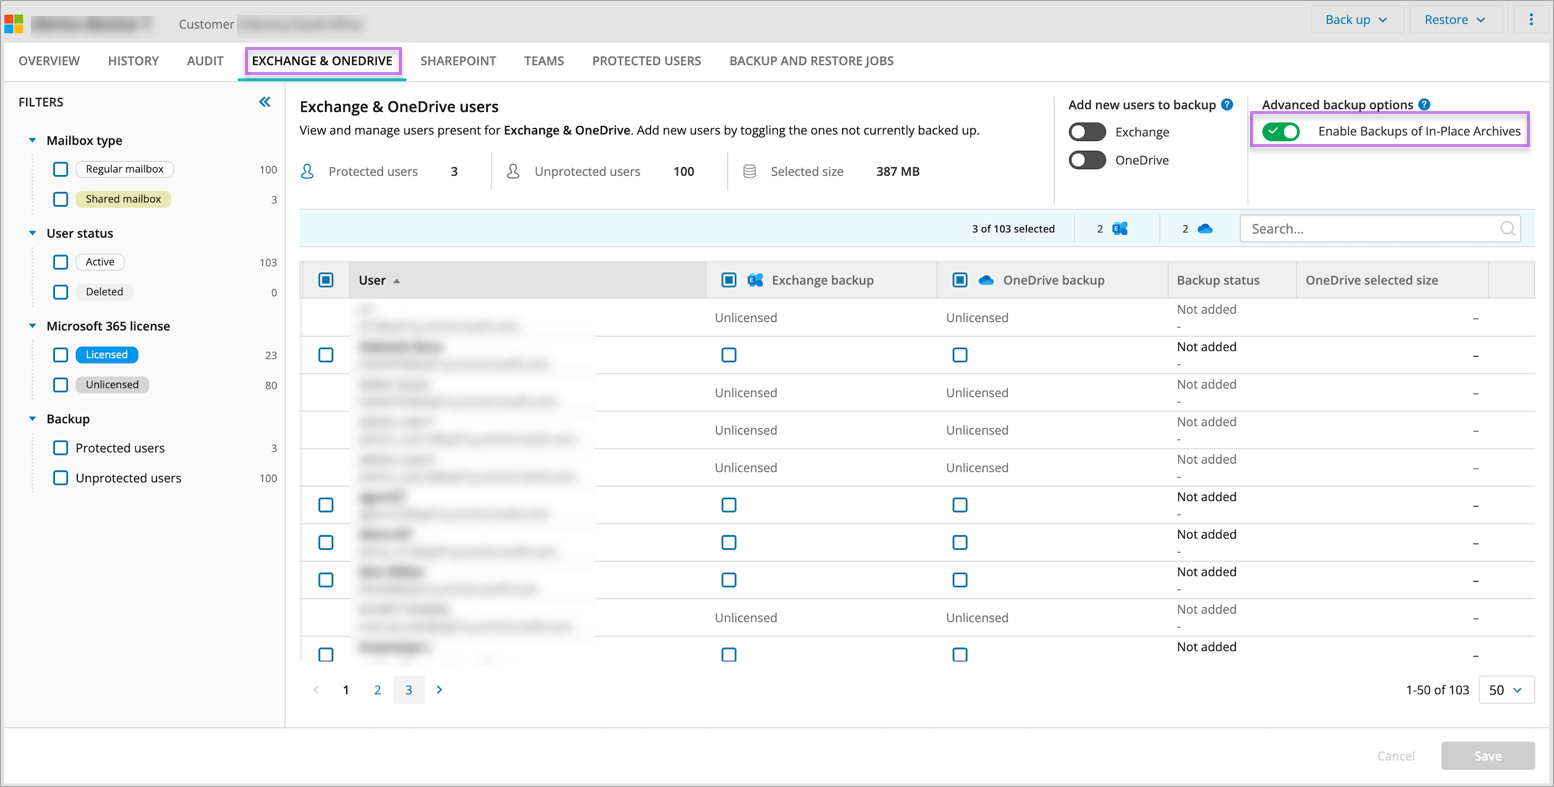
If In-Place Archive backups are disabled, the existing data is not be removed and remains available for restore from previous sessions.
To monitor whether the In-Place Archive backup option is enabled for your device, you can use dashboard column M365 In-Place Archive backup (AA3347). You can add this column to any custom dashboard view to quickly assess In-Place Archive backup status across all devices without opening each device individually.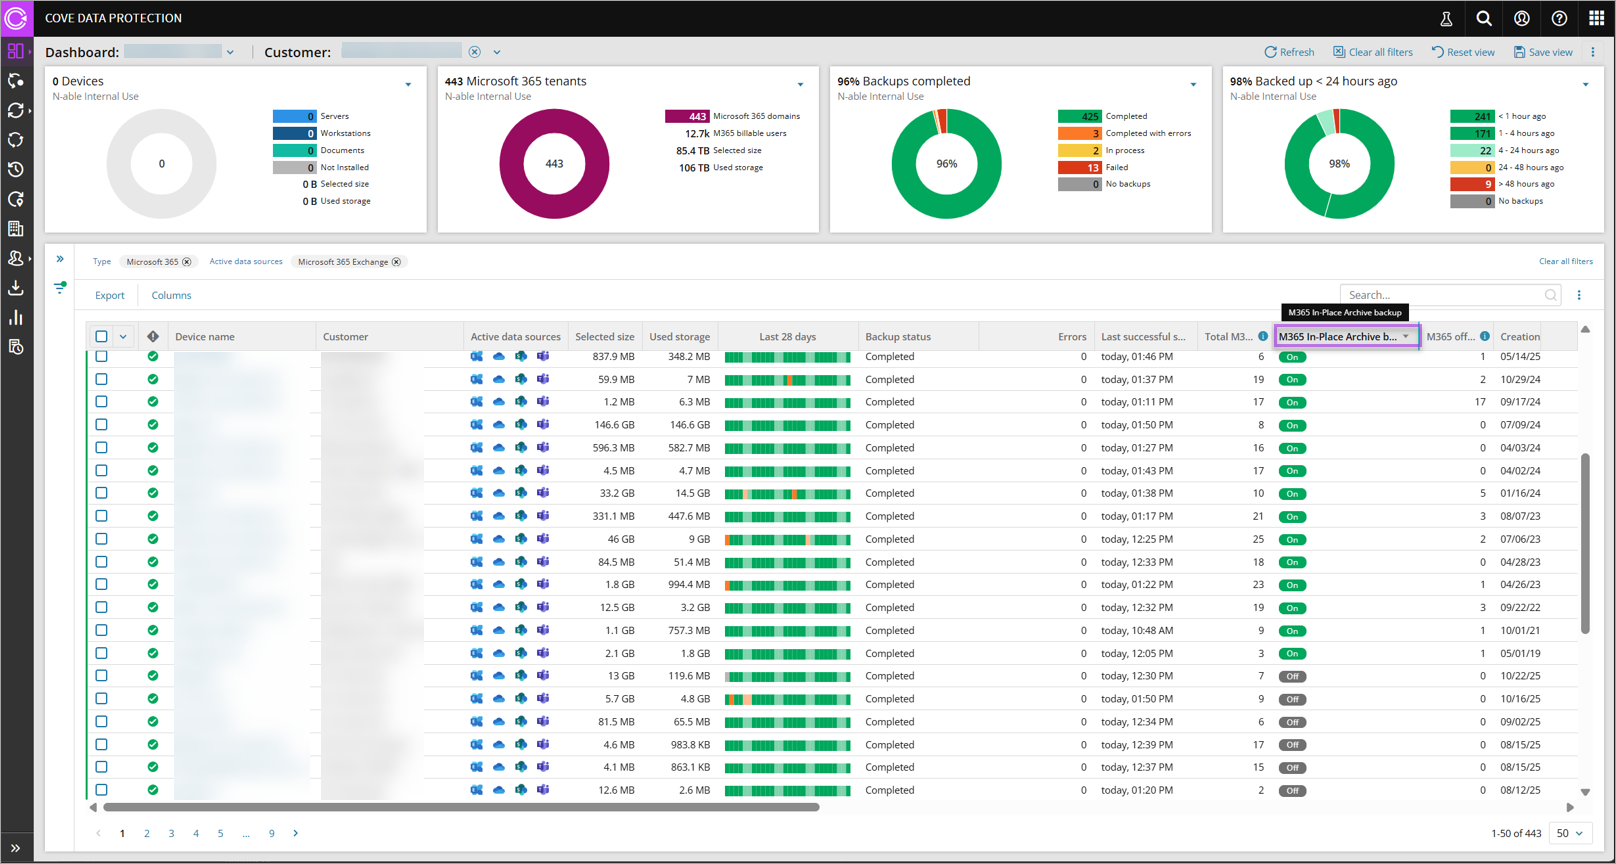
SharePoint
You can also Add new sites to backup automatically using the toggle switches at the top right corner of the tab;
| Toggle State | Result |
|---|---|
| On | newly added users/sites/teams will be added to the backup selection automatically |
| Off | newly added users/sites/teams will appear in the list but will not added to the backup selection |
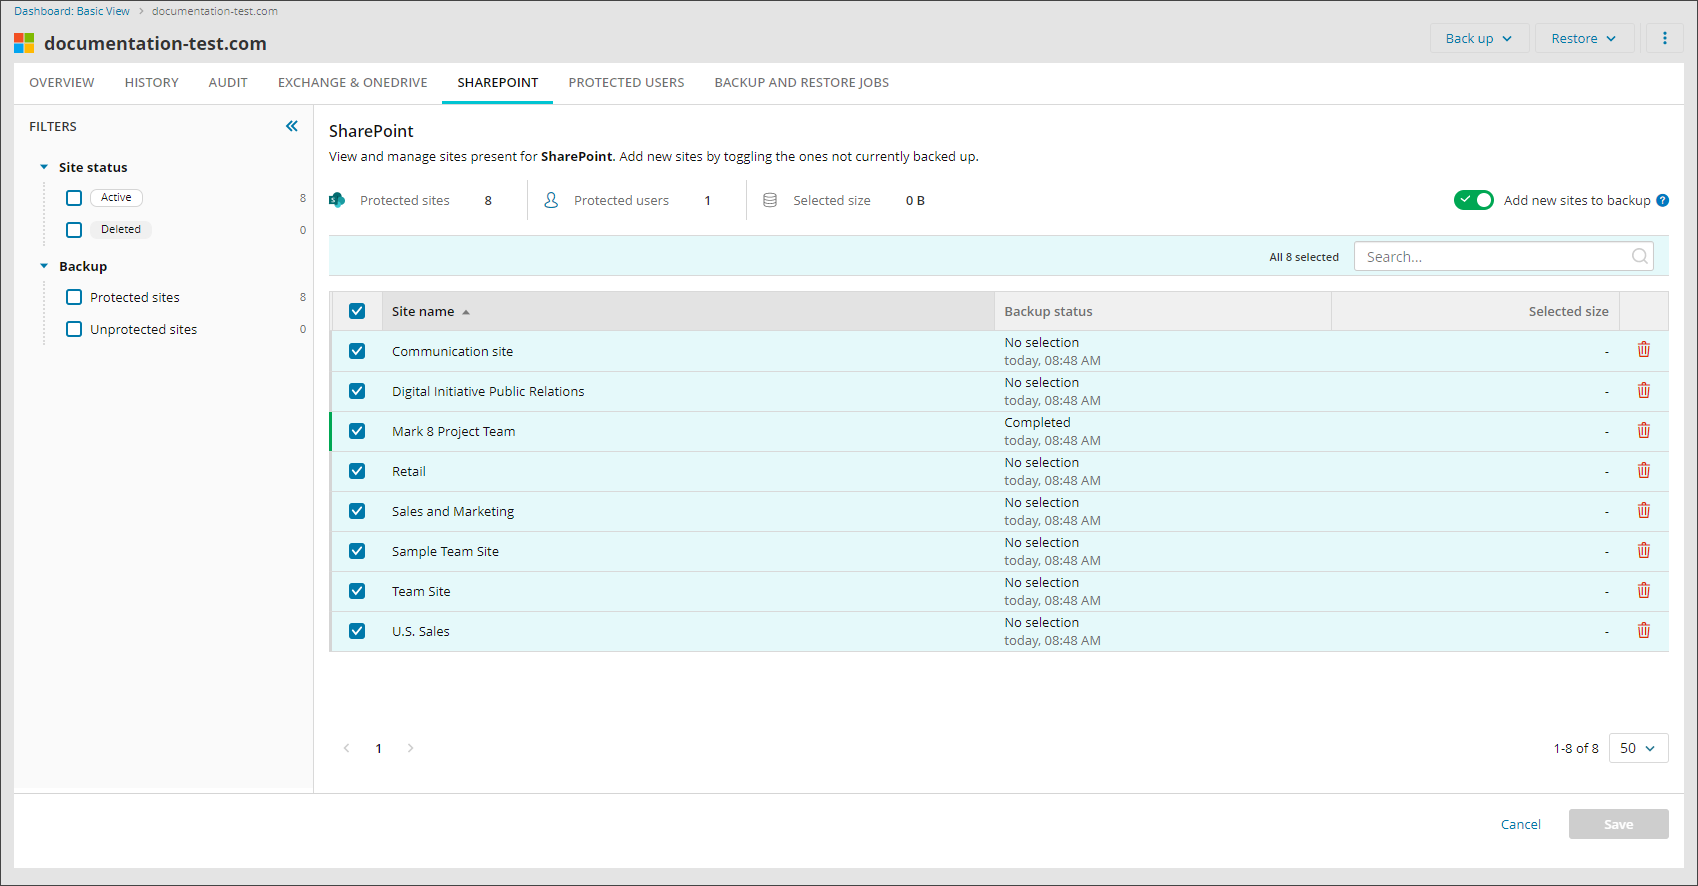
You can filter the displayed list by using the Filters on the left of the display, filtering on the Site Status of Active or Deleted and Backup Protected or Unprotected sites.
Teams
You can also Add new teams to backup automatically using the toggle switches at the top right corner of the tab;
| Toggle State | Result |
|---|---|
| On | newly added users/sites/teams will be added to the backup selection automatically |
| Off | newly added users/sites/teams will appear in the list but will not added to the backup selection |
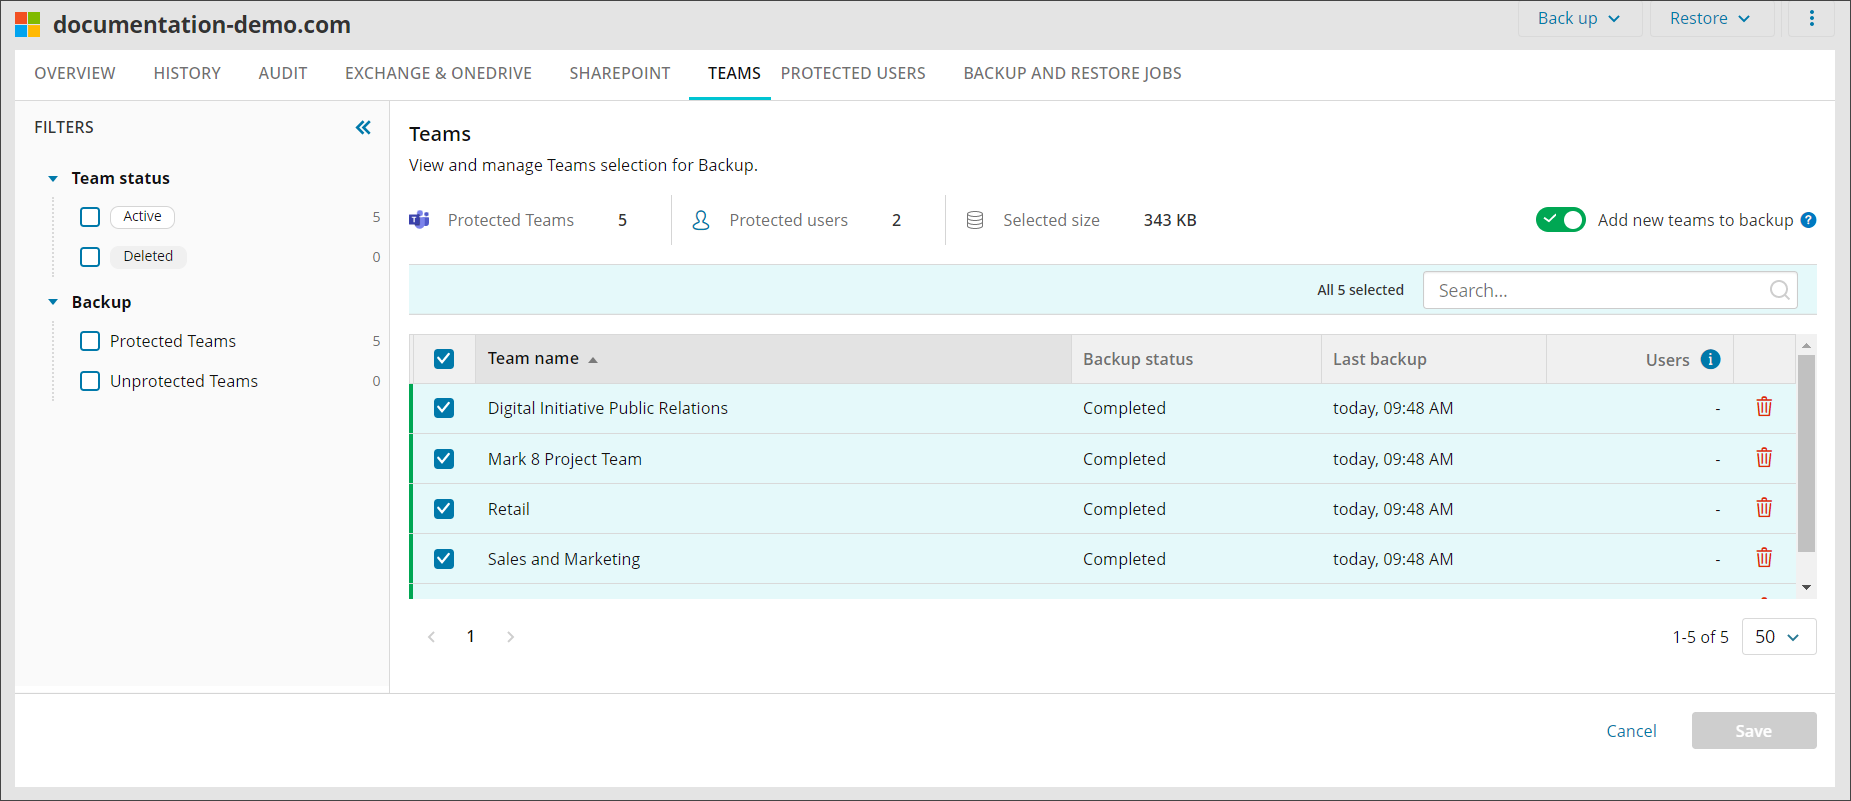
You can filter the displayed list by using the Filters on the left of the display, filtering on the Teams status or backup data.
Add data to Backup
In here, you can add new accounts or sites for backup by ticking the ones not currently backed up. You may look for the specific account using the search bar and filter the output using the left hand tool bar.
You may also enable or disable 'Automatically add new accounts to backup/Automatically add new sites to backup' by toggling the on/off slider.
After making any changes, you must click Save at the bottom of this dialog box or changes will be lost.
Delete Backups
This is only available to Management Console users with Security Officer permissions, all other users will not see this option.
It is possible to delete backup history in the following locations:
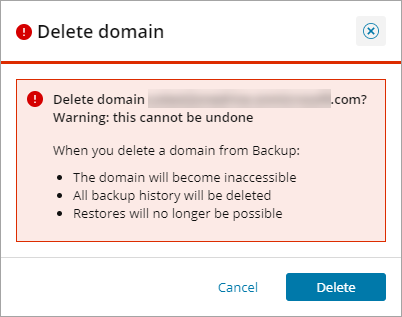
It will not be possible to recover previously backed up data from any user, account or site which has since been deleted from the N-able Cloud
Exchange & OneDrive Tab
- Click the domain name from the Cove Backup Dashboard to open the domain properties
- Switch to the Exchange & OneDrive tab
- Search for the user you wish to delete the history for
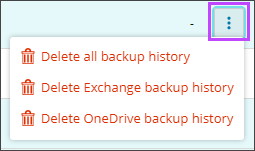
- Scroll to the far right-hand side of the user list and click the three vertical dots to open the Action menu
- Select one of the available options:
- Delete all backup history
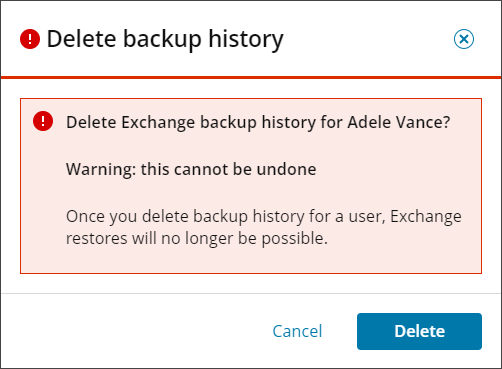
- Delete Exchange backup history
- Delete OneDrive backup history
- Confirm that you wish to proceed with deletion by clicking Delete
- Save the changes made before closing the Microsoft 365 domain properties
Deleting data can take up to 30 days.
SharePoint Tab
- Click the domain name from the Cove Backup Dashboard to open the domain properties
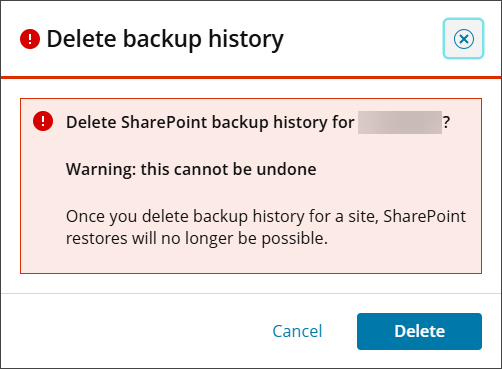
- Switch to the SharePoint tab
- Search for the Site Name you wish to delete the history for
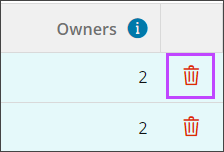
- Scroll to the far right-hand side of the site list and click the trash can icon
- Confirm that you wish to proceed with deletion by clicking Delete
- Save the changes made before closing the Microsoft 365 domain properties
Deleting data can take up to 30 days.
Teams Tab
- Click the domain name from the Cove Backup Dashboard to open the domain properties
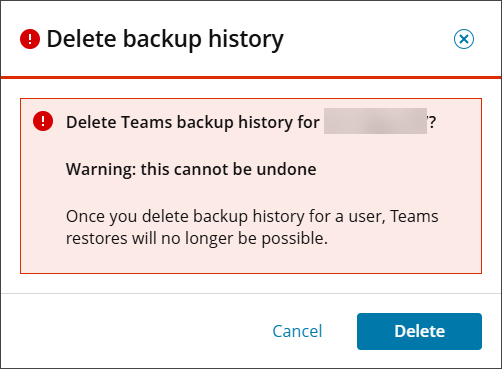
- Switch to the Teams tab
- Search for the Team Name you wish to delete the history for
- Scroll to the far right-hand side of the team list and click the trash can icon
- Confirm that you wish to proceed with deletion by clicking Delete
- Save the changes made before closing the Microsoft 365 domain properties
Deleting data can take up to 30 days.
View backup and restore job queue
To view the current backup and restore sessions that are in progress, these can be found in the Backup and Restore Jobs tab. The tab itself will also indicate how many jobs are active by showing a badge in the tab header. Beneath the progress bar you can also see the number of scanned items, processed items and size of the backup.
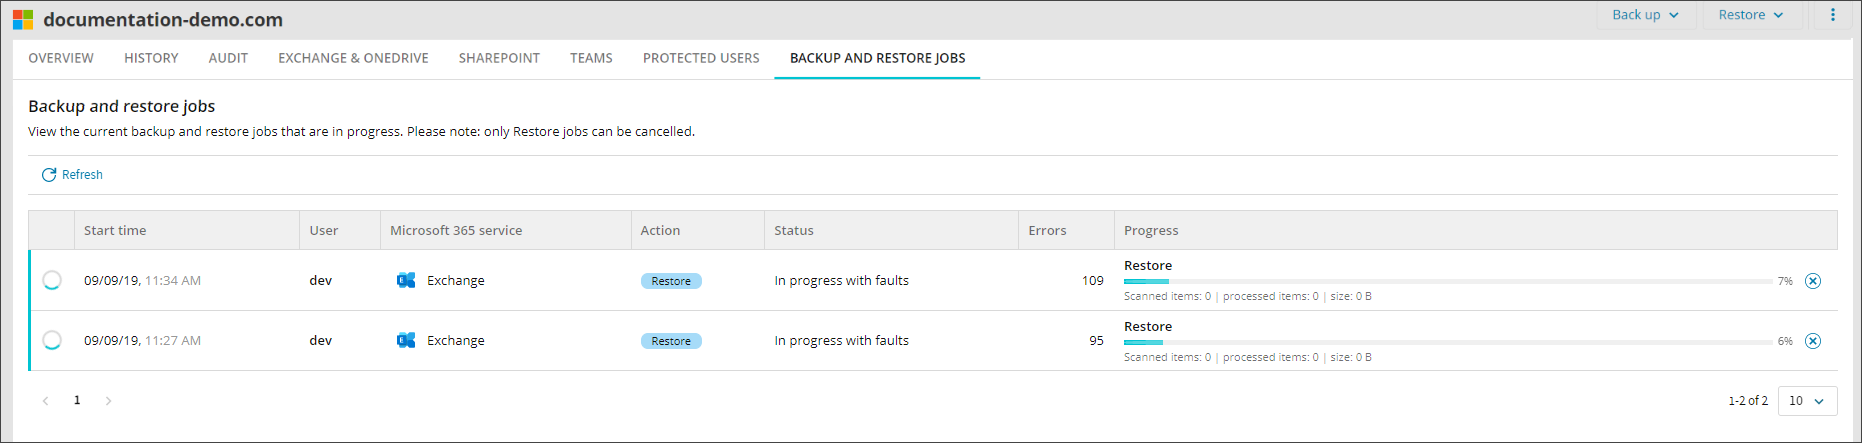
Backup jobs cannot be canceled but restore jobs can by clicking the cancel button in the Actions column.
Actions for domains
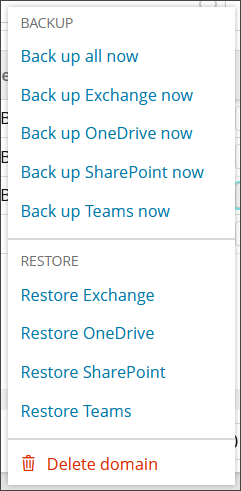
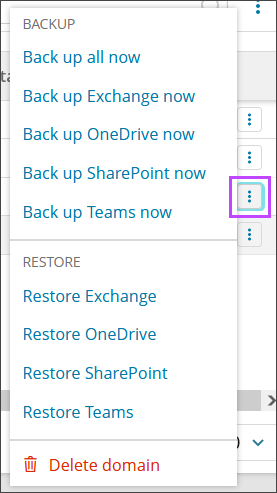
The action menu for Microsoft 365 domains can be accessed in a number of different ways:
- On the BackupDashboard, right click the domain to view the action menu
- On the BackupDashboard, scroll to the far right-hand side of the devices list and click the three vertical dots to view the action menu
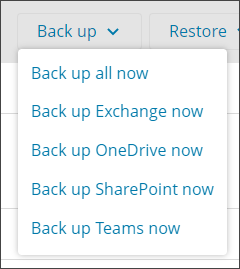
- Click the Domain name to open the domain overview and use the Back up and Restore menus in the top right corner

The action menus for Microsoft 365 domains have up to 8 items depending on services configured for the domain:
- Back up all now (initiates an unscheduled backup for all services)
- Back up Exchange now (initiates an unscheduled backup for Exchange)
- Back up OneDrive now (initiates an unscheduled backup for OneDrive)
- Back up SharePoint now (initiates an unscheduled backup for SharePoint)
- Back up Teams now (initiates an unscheduled backup of Teams)
- Restore Exchange (lets you restore selected Exchange items)
- Restore OneDrive (lets you restore selected OneDrive items)
- Restore SharePoint (lets you restore selected SharePoint items)
- Restore Teams (lets you restore selected Teams items)
- Delete domain (the domain is deleted from the Console and all its backup data is cleared from the N-able cloud with no possibility of recovery)