
By default, the Backup Manager saves your backups remotely in the cloud or at a private data center (depending on your terms of service). You can enable the LocalSpeedVault (a local storage directory) to have an additional copy on your own computer or in your local network. Doing this helps speed up the backup process.
Overview
Reasons to enable the LocalSpeedVault
When the LocalSpeedVault is on, scheduled backups run secondary to the cloud backup, thus speeding up the backup process. Also restoring data to a local folder becomes faster and does not depend on your Internet connection.
How it works
When a LocalSpeedVault is enabled on a device and a backup runs, the data is sent to both the LocalSpeedVault and the cloud or private storage location. As the LSV is on the local network, this part of the backup completes faster. Once this has completed and synchronized, the LSV begins pushing the backup data to the cloud or private storage as well.
This effectively means that the backup to the cloud or private storage is being sent twice at the same time and so completes faster.
During a restore, data is automatically downloaded from the LocalSpeedVault first to the local device. If the LocalSpeedVault is not available or not synchronized, the restore data will be pulled from the cloud or private storage location. This takes place automatically and cannot be reconfigured.
If the LocalSpeedVault becomes full, backups will still continue to the cloud, or your private storage nodes.
Feature availability
The feature is supported on Windows, macOS and Linux devices.
What can be used as the LocalSpeedVault
You can create a LocalSpeedVault directory on a local disk, a removable disk or in a local network. All kinds of network resources are suitable: workstations, file servers or network-attached storage (NAS) devices.
Network Shares can be used as a storage location for Linux and macOS devices by mounting them, then browsing to the Network Share location.
Requirements
Size Requirements
Whether you are using a local drive or a network resource, there must be a sufficient amount of free space.
Your backup data will take up the same amount of disk space as on the remote server, so we recommend that the LocalSpeedVault should be two or three times that of the used storage, e.g.:
| Initial Backup | Incremental Backup | Total Used Storage | LocalSpeedVault size |
|---|---|---|---|
| 200GB data backed up initially | 50GB worth of changes backed up incrementally throughout the day | 450GB of data stored | 1TB - 1.5TB recommended |
For Local Drives
If the LocalSpeedVault directory is on a local drive, it must be open to the LocalSystem account
- This is the account that the Backup Manager usually performs backups under
Read and write permissions are required
For Network Resources
If the LocalSpeedVault directory is in your local network, it must meet the following requirements:
- The local network must use the SMB protocol for file sharing
- The network resource must be accessible during backups (it must not go into the sleep mode or get disconnected from the network)
- The network resource must be open (available without authorization), which is not recommended due to security reasons, or – preferably – it must have an account that coincides with the account on the client machine where the Backup Manager is installed (the same username and password). This can be an Active Directory account
- If the computers in your local network are united into domains, the network resource must belong to the same domain as the client machine (otherwise there may be cross-domain authentication issues on Windows)
The network resource can be integrated with Active Directory or connected to a workgroup.
Security recommendations for network resources
If you manage the local network using Active Directory, the accounts from the client machines are suitable for access to the network resource (pass-through authentication). You can differentiate access to the network resource with the help of groups.
If the network resource is connected to a workgroup, we recommend creating a separate user account for backup purposes on each client machine where the Backup Manager is installed. The same account must be created on the network resource (this is necessary for access to the network resource).
- Use a unique username and password for each client machine
- Do not use administrative logins/passwords
- Limit access to the defined LocalSpeedVault share for all other users and groups
Enabling the LocalSpeedVault
Windows
To enable the LocalSpeedVault, do the following:
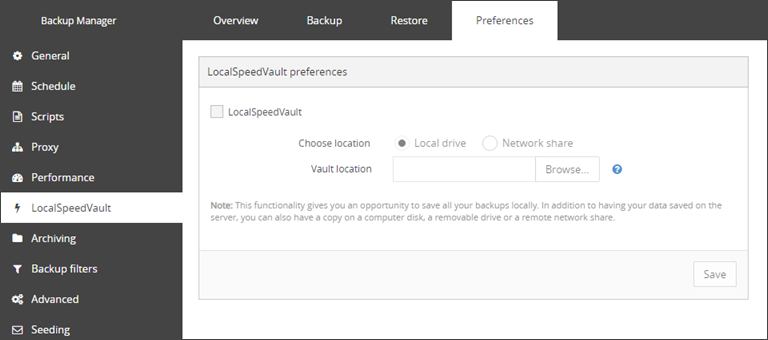
Go to Preferences > LocalSpeedVault
- Select the LocalSpeedVault checkbox
- Specify the location of the directory allocated for the LocalSpeedVault. This can be an existing or a new directory (the Backup Manager will create it for you automatically if it is not there yet)
- If the directory is on a network share, enter your access credentials for that network share
- Save the changes you have made

macOS & Linux
To enable the LocalSpeedVault, do the following:
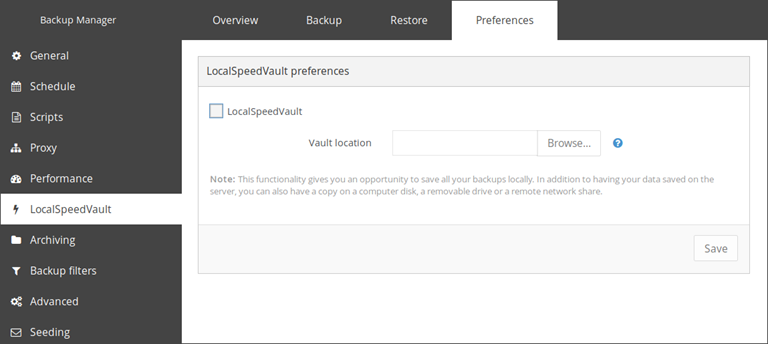
- Go to Preferences > LocalSpeedVault
- Select the LocalSpeedVault checkbox
- Specify the location of the directory allocated for the LocalSpeedVault
- Save the changes you have made
If the directory is on a network share, you must mount it on the device then select the network share location using the browse option for Vault Location.
Monitoring LocalSpeedVault
See the Monitoring the LocalSpeedVault page for full details.
Save
You must make sure to save any changes you make before moving away from this page.