
Virtual disaster recovery to local VHD files
If you do not have Hyper-V installed on the host machine, consider the "Local VHD file" target. It creates a VHD file that can be added to a virtual machine later.
Requirements
Before you initiate virtual disaster recovery to local VHD files, make sure both of the systems involved are supported and properly configured.
- Source system – the system that has been backed up with the Backup Manager and is going to be recovered.
- Host system – the system that the recovery software is installed on. It can coincide with the source system.
Device passphrases
You may require to retrieve the device name, passphrase etc., please see Getting passphrases for automatically installed devices.
Supported Windows versions
Here is the range of Windows versions that you can recover to Hyper-V targets:
- Windows 8, 8.1, 10
- Windows Server 2008, 2008 R2, 2012 R2, 2016
Backup selection requirements
To start using the virtual disaster recovery to Hyper-V, you need to back up the following:
- The system state of your computer (the System State data source).
- The whole system disk –
C:\or another disk that has your operating system and that the operating system boots from (the Files and Folders data source). - Any other data that is important to you. Supported data sources: Files and Folders, MS Exchange, and MS SQL.
It is possible to back up a system containing dynamic disks, though it should be noted that these are converted to basic disks during virtual disaster recovery.
If a disk uses the MBR partition table, the total size of its volumes must not exceed 2TB.
If in doubt concerning the selection of files, please perform a test restore or contact customer support for assistance.
Optional settings (for better restore speed)
If the data transfer speed through the Internet is not high enough, you can benefit from enabling the LocalSpeedVault in the source system.
Planning to perform recovery from another machine? Then consider placing the LocalSpeedVault folder on any of the following:
- A removable storage drive that you will be able to attach to the host machine
- The host machine (if it is located on the local network)
- Another machine on the local network that is accessible from the host machine.
The host system that virtual disaster recovery is performed from must meet some requirements. It can be the same system that is being recovered or a different one.
Supported platforms
You can initiate virtual disaster recovery to Hyper-V from the following versions of Windows:
- Windows 8, 8.1 and 10 – Pro and Enterprise editions only (due to Microsoft licensing limitations)
- Windows Server 2008 R2, 2012, 2012 R2 and 2016 – Standard and Datacenter editions only (due to Microsoft licensing limitations)
The host system must not be older than the source system. For example, if you want to restore Windows 8, you must install your recovery software on Windows 8 or a newer version.
Required software
The host system must have virtual disaster recovery software installed (the Backup Manager or the Recovery Console).
Steps
Here is how to perform virtual disaster recovery through the Backup Manager:
- Start the Backup Manager.
- Click Restore > Virtual Disaster Recovery.

- Select the type of virtual machine you want to recover the data to.
- Select the data to recover. If you have backed up the MS SQL and MS Exchange data sources, they will be available for selection (in addition to the Files and Folders data source).
- Fill out the settings for your type of virtual machine.
- Click Restore to start a recovery process.
- Hold on till the recovery process is completed. Its duration depends on the size of the system you are restoring, the data transfer speed, and the performance of your computer.
Here is how to perform virtual disaster recovery through the Recovery Console:
- Start the Recovery Console.
- Select a device and then click Configure. If the device is not listed, you should add it first (Add).
- From the list of data sources, choose Virtual disaster recovery.
- Select the data to recover. If you have backed up the MS SQL and MS Exchange data sources, they will be available for selection in addition to the Files and Folders data source.
- From the Restore target list, choose the type of virtual machine you want to recover your system to.
- Fill out the settings for your recovery target. Click OK.
The Recovery Console will offer you to start data recovery for the device. Click Yes to continue or click No to add the device without recovering data (you will be able to do it any time later using the Continuous restore checkbox).
Both of the tools support one-time restores and Continuous Restore.
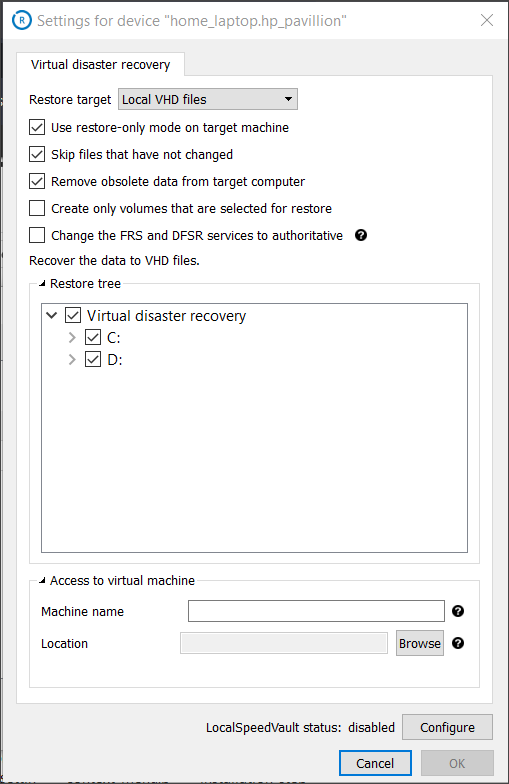
Settings
The "Local VHD files" target requires the following settings.
- Machine name. Enter a name that you want to assign to the target virtual machine. If you keep the field blank, it will be automatically populated with the name of your backup device.
- Restore to. Specify a path to the directory where your new VHD file will be created.
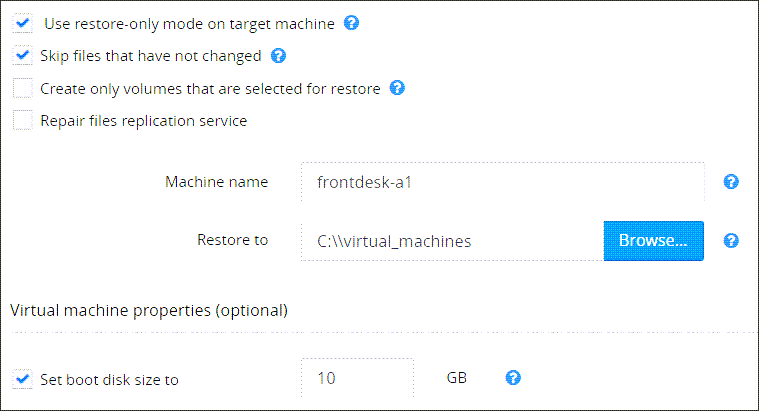
Set boot disk size to ...
Use this setting to customize the size to the system disk created on the virtual machine (by default, the new disk is the same size as the original).
If the disk contains several partitions, you cannot reduce the original size by more than the amount of free space on the last partition. For example, if the total size of the disk is 100 GB and the last partition has 10 GB of free space, you can set the value to 90 or more.
Use restore-only mode on target machine
Helps prevent unwanted backups from running on the recovered virtual machine.
Skip files that have not changed
Helps optimize data recovery operations and increases recovery speed. It applies to subsequent restore sessions (not the initial restore session in which the whole amount of data is transferred).
Create only volumes that are selected for restore
- If the setting is on, the target virtual machine will contain only those disks that have data selected for recovery.
- If the setting is off and no data from a disk is selected for recovery, the virtual disk is created without any data.
The setting is ignored if the disk you have excluded from recovery contains critical data. Such a thing can happen if your recovery selection includes MS Exchange or MS SQL and some files belonging to these data sources are located on the excluded disk. In this case the disk is created and populated with the files required by MS Exchange and MS SQL.
Repair files replication service
If you are restoring Active Directory with multiple domain controllers, you should change the FRS and DFSR services to authoritative in the domain controller that will be started in the first place. Avoid marking several FRS/DFSR services as authoritative in the production environment as it can result in data loss. When the feature is on, the FRS and DFSR services are started on the target VM in the authoritative mode. The NETLOGON and SYSVOL shares become available, so the Active Directory and DNS services become functional again.
More information about FRS/DFSR is available in the Microsoft Knowledge Base. Article IDs: KB2218556, kbinfo KB290762.