
Install N-able N-central on Microsoft Azure Resource Manager
The instructions below walk you through a new installation of N-able N-central in the Microsoft Azure Resource Manager environment. Microsoft Azure Classic deployment is no longer supported.
New installs should use Azure Managed Disks deployment. The Azure Resource Manager Install has been deprecated. These instructions are being retained should an existing server needs to be rebuilt, and cannot be rebuilt using the newer Azure Managed Disk deployment.
N-able N-central VHD images for Microsoft Azure are available sized for up to 20,000 devices. Larger deployments are not currently supported. Performance of N-able - N-central above 9,000 devices cannot be guaranteed on Microsoft Azure.
N-able recommends that you plan your deployment with N-able Support in advance.
You must have basic knowledge of how to use Microsoft Azure, Windows PowerShell and how to install and configure N-able N-central. N-able N-central deployment to Azure Resource Manager are not designed for technicians who are unfamiliar with Azure Resource Manager and PowerShell.
Creating snapshots for backups is not supported with N-able N-central with Azure.
Prerequisites
Before you begin, ensure that you have:
- An Azure subscription
- A Windows PC with Windows Edge, Internet Explorer 11 or current version of FireFox or Chrome, and PowerShell with Azure Resource Manager extensions.
-
Windows 10, or Windows Management Framework 5.1.
Set up the PowerShell and Azure environment. PowerShell commands are used to perform the Azure steps required to upload the virtual machine image file and create an Azure VM based on the image. Each step below requires PowerShell with Azure Resource Manager extensions installed on the working PC.
Background information on the environment setup can be found at https://docs.microsoft.com/en-us/powershell/azure/install-az-ps?view=azps-2.0.0.
Before you begin
- You must have Administrator privileges for the Azure Environment.
- PowerShell must be launched as an Administrator by clicking Start Menu > Search for PowerShell, Right Click the PowerShell icon and click Run as Administrator.
- Clean up any old Azure and Azure Resource Manager PowerShell Modules (as Administrator) - Older versions may not work/upgrade correctly.
- Install the new Azure Resource Manager PowerShell Module (as Administrator).
All Azure device and resource names must be Cloud, or in some cases, globally unique (no duplicates in the entire cloud location, or in all clouds).
Download and extract the N-able N-central VHD
Azure Resource Manager VHD images will no longer be built in future releases. A limited subset of the image sizes may be released between 2020.2 and the eventual end of support for the older Azure Resource Manager VHD images.
Download the image file for the version and disk size of N-able N-central you want to install. Extract the .VHD file on your local workstation. To reduce the size of the Azure Image files, they are compressed using XZ compression in the 7-Zip format. Use a compatible utility to decompress the image.
The extraction of even the 100 GB .VHD file can take over an hour to complete.
The N-able N-central Virtual Hard Disk (VHD) image is available on the N-able Resource Center. You will need enough free space to extract the full size of the image to the local disk. The images are 100GB, 200GB, 500GB or 1TB in size when fully expanded.
- Login to the N-able Resource Center (https://nrc.n-able.com/).
- Click the hamburger menu (
 ) and click Support > Software Downloads > N-central.
 - Click the link for the latest release of N-able N-central.
- Download the appropriately-sized VHD file for Microsoft Azure.
The web browser downloads the VHD file to the location it has configured for downloaded files from the Internet. Use a decompression tool to extract the VHD file.
Extract the VHD file
Extract the .VHD file using a tool such as 7-zip. The extraction of the 100GB VHD image can take over an hour to complete. Larger images will take longer.
- Set up the PowerShell and Azure environment. PowerShell commands are used to perform the Azure steps required to convert and upload the virtual machine image file and create an Azure Cloud VM based on the image. Each step below requires PowerShell with Azure Resource Manager extensions installed on the working PC. For more information on the environment setup, see https://docs.microsoft.com/en-us/powershell/azure/install-az-ps?view=azps-2.0.0.
- Clean up old Azure and Azure Resource Manager PowerShell modules. Older version may not work or upgrade properly. Run the following commands:
- Uninstall the AzureRM component modules:
Uninstall-AzureRM - Uninstall the AzureRM module:
Uninstall-Module AzureRM - Uninstall the Azure module:
Uninstall-Module Azure - Close PowerShell and run the Microsoft Azure PowerShell Uninstaller from the Programs and Features in the Control Panel.
- Reboot the system and install the new Azure Resource Manager PowerShell Module as an Administrator:
-
From the PowerShell console as Administrator, import the required PowerShell Azure Resource Manager Module previously installed:
You need Administrator privileges for the Azure environment.
Launch PowerShell as an Administrator
Create a Resource Group
Microsoft Azure is continually improving the user interface. As a result, the screen captures in these procedures may already be out of date. You may need to adjust your steps accordingly.
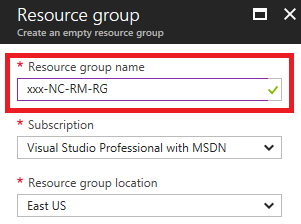
Create a Resource Group and give it a name.
- In Microsoft Azure, click the
 icon and click Add.
 - Enter a Resource group name. For example,
xxx-NC-RM-RG. - Click Create.
Create a Storage Account
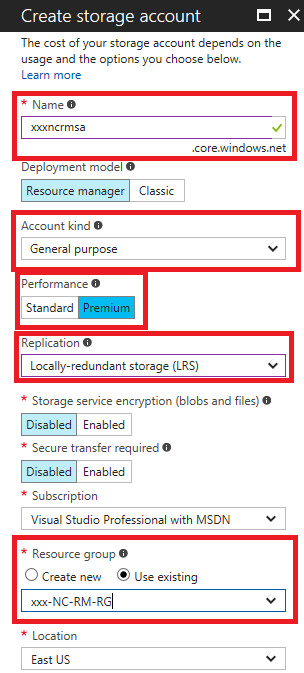
Ensure you select Premium storage if you have over 1000 devices.
- In Microsoft Azure, click the
 icon and click Add.
 - Enter a Name, for example
xxxncrmsa. - Complete the information as outlined in the image below.
- Click Create.
Create a Container
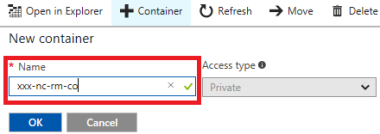
Create a Container inside the Storage Account.
- In the Storage Account, click Overview > Container.
- Enter a Name for the Container. For example,
xxx-nc-rm-co. - Click OK.
Upload the VHD
- In PowerShell, connect the console to the Azure Subscription:
- Set the Resource Group PowerShell variable using the name you entered above:
- Set the Azure Image File name (The file name of the .vhd file you extracted):
- Set the Azure Image location (the local folder where the above file is located):
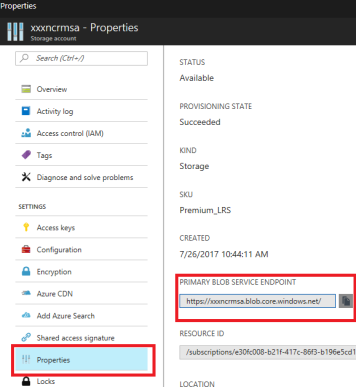
- In Microsoft Azure, copy the URL from the container you created above.
- Paste the URL to the UploadURL command:
- Upload the VHD file to Azure:
An Azure credentials window opens.

Allow the upload to run in the background. The upload will take several hours.
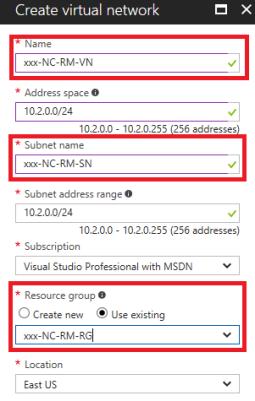
Create a Virtual Network
- In Microsoft Azure, click the
 icon and click Add.
 - Enter a Name for the virtual network. For example,
xxx-NC-RM-VN. - Complete the information as outlined in the image below.
- Click Create.
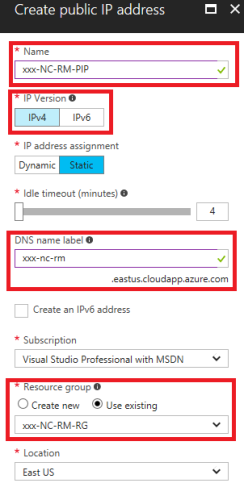
Create a Public IP Address
- In Microsoft Azure, click the
 icon and click Add.
 - Enter a Name. For example,
xxx-NC-RM-PIP. - Complete the information as outlined in the image below.
- Click Create.
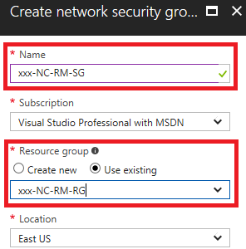
Create a Network Security Group
- In Microsoft Azure, click the
 icon and click Add.
 - Enter a Name. For example,
xxx-NC-RM-SG. - Complete the information as outlined in the image below.
- Click Create.
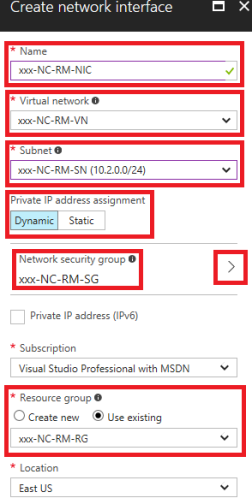
Create a Network Interface
- In Microsoft Azure, click the
 icon and click Add.
 - Enter a Name . For example,
xxx-NC-RM-NIC. - Complete the information as outlined in the image below.
- Click Create.
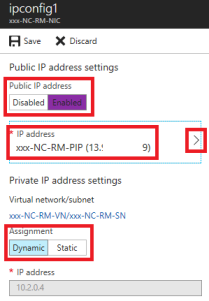
Link the Public IP to the NIC
Enable and attach the Public IP to the NIC created.
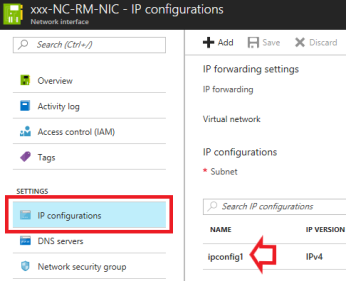
- Go to the IP configuration for the Network Interface you created above.
- Click IP Configurations in the Settings area and click ipconfig1.
- Complete the information as shown in the image below.
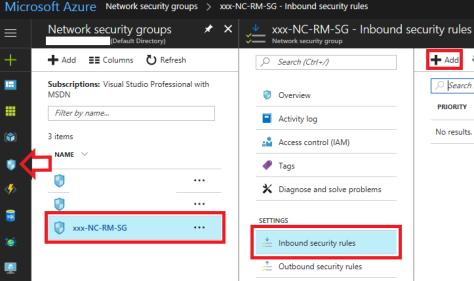
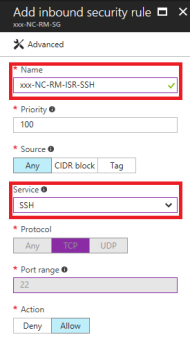
Create the Inbound Security Rules for N-able N-central.
Create security rules to connect with N-able N-central.
- In Microsoft Azure, click the icon
 .
. - Click the Security Group > Inbound security rules > Add.
- Add the inbound security rules as outlined in the images below. Create a rule for a Source of Any and Source Port Range of "*" (asterisk) to accept all incoming traffic. Set the destination for ports 22, 80, 443, 5280, 10000, and any other ports you may require.
- Click OK.
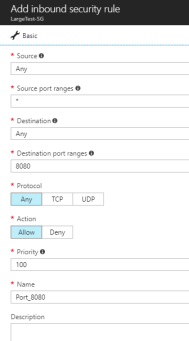
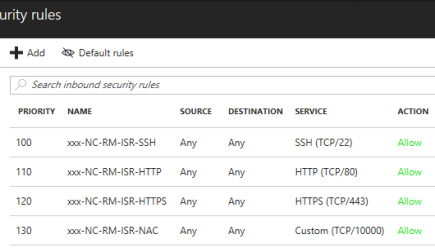
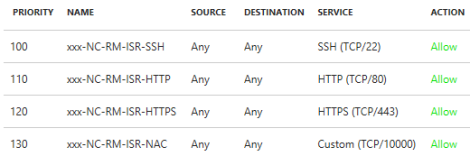
Complete as many rules as required for communication. For example:
When the upload completes, go to the PowerShell window and Create the VM. Refer to the Number of Devices Managed table in the N-able N-central in the System Requirements for proper Azure Instance Sizing.
- > 1,000 devices should use Premium Storage.
- > 6,000 devices should also use Compute Optimized Instances.
The new N-able N-central server should be accessible through its IP Address or DNS address that was assigned by Microsoft Azure. You can access it using a web browser and the N-able N-central server configuration can continue as outlined the Install Guide.
To monitor the state of this VM, you can use the Azure portal.
Be sure to adjust the time zone to match your desired location. If you are restoring a N-able N-central backup, the time zone must be an exact match to the server from which you are restoring the backup.
If your location is not listed, be sure to select a location that is in the same time zone as you are.
What's next?
With N-able N-central installed:
- review the Getting Started help topics
- setup Service Organizations, Customers and Sites, and configure users.