Enable Recovery Testing
From Main Dashboard
To enable Recovery Testing on a device, follow the steps below:
-
Navigate to the N-central Backup Dashboard.
-
Select the device(s) you wish to assign a plan to using the checkboxes to the left of the device name.
-
Click Assign.

-
Select Recovery Testing plan.
-
Select your Recovery Testing frequency:
-
Disaster Ready Testing plan Biweekly (every 14 days)
-
Monthly (every 30 days)
-
No Plan.
This uses Virtual Disaster Recovery capabilities to automate the recovery, boot testing and screenshot creation of your devices using our environment.
-
-
Click Continue.
-
Confirm the compatibility of devices and click Next.
-
The device passphrase(s) will be detected automatically.
-
Click Next to progress to the Recovery testing report view to enter one or more email addresses to receive the report (separate multiple email addresses using a comma or semi-colon).
-
Select Next to enable the plan on the selected devices.
-
You will now see the status of the plan has changed to Completed and the banner shows the number of devices added to the plan.
-
Click Finish to complete the process.
From Device Properties
As with any normal device, when you click on the device's name, you will see the Device Properties dialogue. However, if no plan is assigned to a compatible device, the Settings tab will display an option to add the device to plan.
You can also add Recovery testing report recipient email addresses via the device's Settings tab, when the plan is already in place.

From Recovery Testing Dashboard
To add Recovery Testing to devices from here:
-
Navigate to the N-central Backup Dashboard.
-
Navigate to Recovery > Recovery Testing.
-
Click Add to Plan.
-
Choose whether to assign the Disaster Ready Testing plan Biweekly (every 14 days) or Monthly (every 30 days).
-
Click Next to continue.
-
Confirm the compatibility of devices under the selected customer.
-
You may use the Customer drop-down to choose a specific customer.
-
Any compatible devices will be selected automatically, deselect any devices that should not be assigned to the plan.
-
Click Next to proceed.
-
The device passphrase(s) will be detected automatically.
-
Click Next to progress to the Recovery testing report view to enter one or more email addresses to receive the report (separate multiple email addresses using a comma or semi-colon).
-
Select Next to enable the plan on the selected devices.
-
You will now see the status of the plan has changed to Completed and the banner shows the number of devices added to the plan.
-
Click Finish to complete the process.
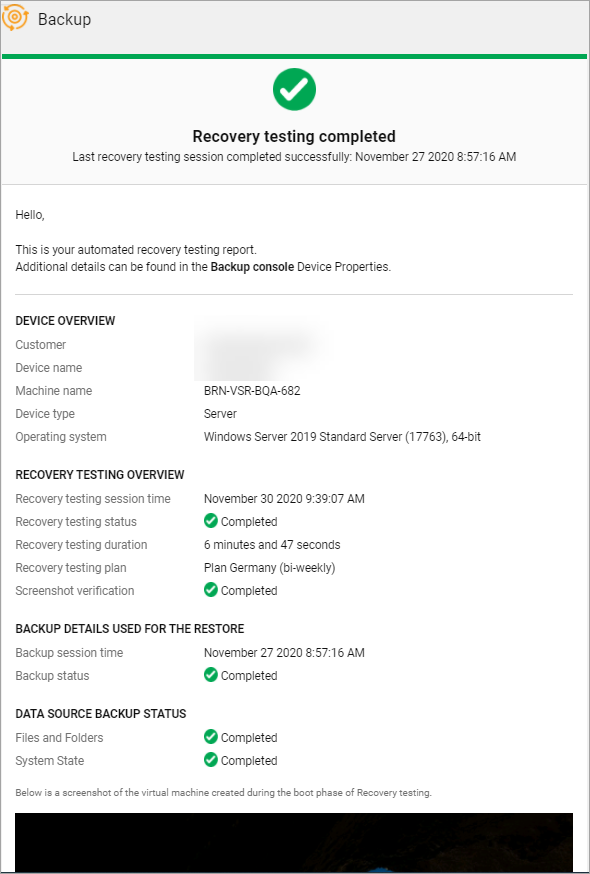
Recovery testing report
Where the plan has Recovery testing report recipient email address(es) configured, once the test has completed, those recipients will receive the report in their email in-box. Below is an example of a successful test email.