Set up DNS Filtering Roaming Client
The N-central integrated version of DNS Filtering is no longer available for new activations. Only partners who have already enabled this feature can access it. For partners who want to use DNS Filtering’s features and functionality, we recommend using the standalone version. To view the standalone documentation visit the DNS Filtering User Guide.
DNS Roaming Client is only supported on Windows devices.
A Roaming Client is software that you install on a device that runs in the background to ensure that the device is protected and filtered when it leaves a secure network. For example, when roaming other networks such as coffee shops, airports, and so on.
A Roaming Client does two major things:
-
Ensures that all device DNS requests go through DNS Filtering where they are protected and filtered.
-
Embeds the device identity in the DNS requests.
You can automatically install DNS Filtering Roaming Client using rules.
There are two ways in which you can set up DNS Filtering Roaming Client:
-
Install on a per-device basis
-
Install using rules
Set up DNS Filtering Roaming Client by device
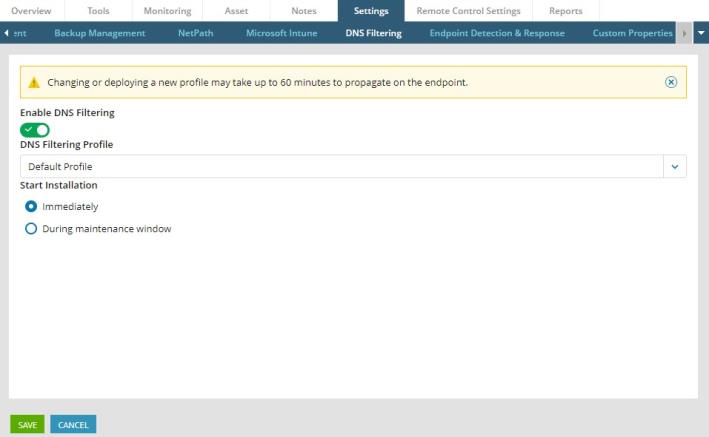
- At the System, Service Organization, Customer, or Site level, click All Devices and select the device you want to install the DNS Filtering Roaming Client on.
- Click the Settings tab then the DNS Filtering tab.
- In the Enable DNS Filtering section, click the toggle to enable DNS Filtering on the device.
- Choose your profile from the DNS Filtering Profile drop-down list.
- Under the Start Installation section, choose when you want the Roaming Client agent installed.
- Click Save.

Set up DNS Filtering Roaming Client using rules
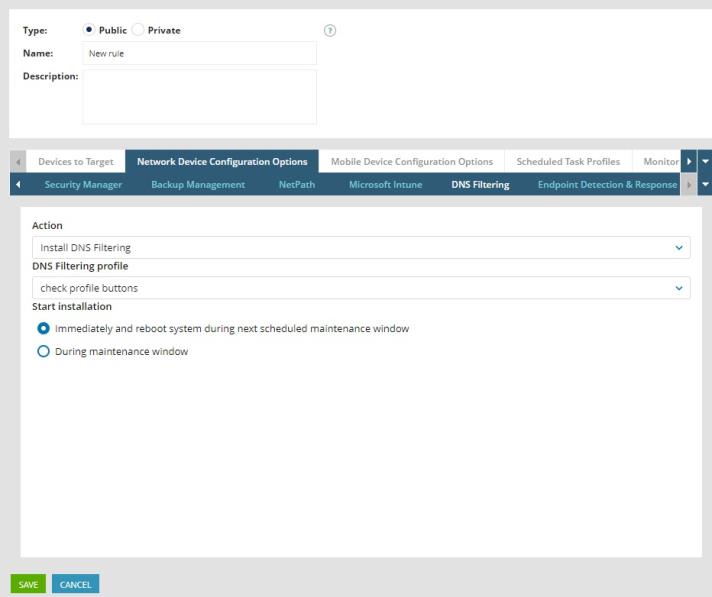
- At the Service Organization, Customer, or Site level, go to Configuration > Monitoring > Rules.
- Click Add.
- Choose the type of access and enter a name and description for the rule.
- Click the Network Device Configuration Options tab and then the DNS Filtering tab.
- From the Action menu, select Install DNS Filtering.
- In the DNS Filtering profile drop-down list, select your DNS Filtering profile.
- In the Start installation section, select the timing of the installation.
- Click Save.


